Hi, welcome to our setting up hosting & domain guide.
This can be a pretty confusing and wide-ranging topic -- actually getting your site online. That's why we are starting with vocabulary, which should be consistent across different methods. And for clarity, we decided to in-detail map out two specific ways you can get your site online.
Note: our weekly guides aim to provide a general landscape ... an
overall survey of what’s most essential about the technology at hand and the basics of how to use it. From a technical or skill
perspective, our guides are not exhaustive or thorough because there
are already many other resources on the internet that are just that.
We encourage you to check them out -- we’ve linked some.
Part 0. Vocabulary
First, let's look again at some vocabulary — which should be consistent across the web, no matter which hosting provider or DNS registrar you use.
Later in this guide, we will show how to get your site online in two different ways (A. NearlyFreeSpeech, B. Github Pages), but this vocabulary will be helpful should you choose a way we don't specifically go over.
📝
website
a file or a bundle of files living on a server somewhere
🖥
server
a computer that’s always connected to the internet, so when someone types your URL or domain in, the server will offer up your website. usually you have to pay for a server, also called “hosting” or a “host.”
📍
IP
“internet protocol” address, which is a unique string of numbers that’s an address for any device connected to the internet which other machines use to find that device—whether it's your home router, your computer, your cellphone, or a server
“universal resource location” which is the specific address to access any resource. if you type in a domain name, most servers will present you index.html by default
a business that handles the reservation of domain names as well as the assignment of IP addresses for those domain names. contracts for domains are typically on a yearly basis.
“domain name system” which is like all the phonebooks of the entire internet
humans use domain names 〰️, while on the other hand, web browsers use IP addresses 📍, so DNS translates domain names to IP addresses so browsers can load internet resources
📗
nameserver
a single phonebook that is owned by the hosting provider that lists all the domain names associated with its customers
〰️📍
DNS record
a line in the metaphorical phonebook
🌐
TLD
a “top-level domain” is the rightmost part of a domain name such as .com. certain TLDs are reserved for specific geographic areas or societal services
Other examples include .org, .net, .school, etc. New TLDs are added every year, see this list on Wikipedia. Google around for the latest.
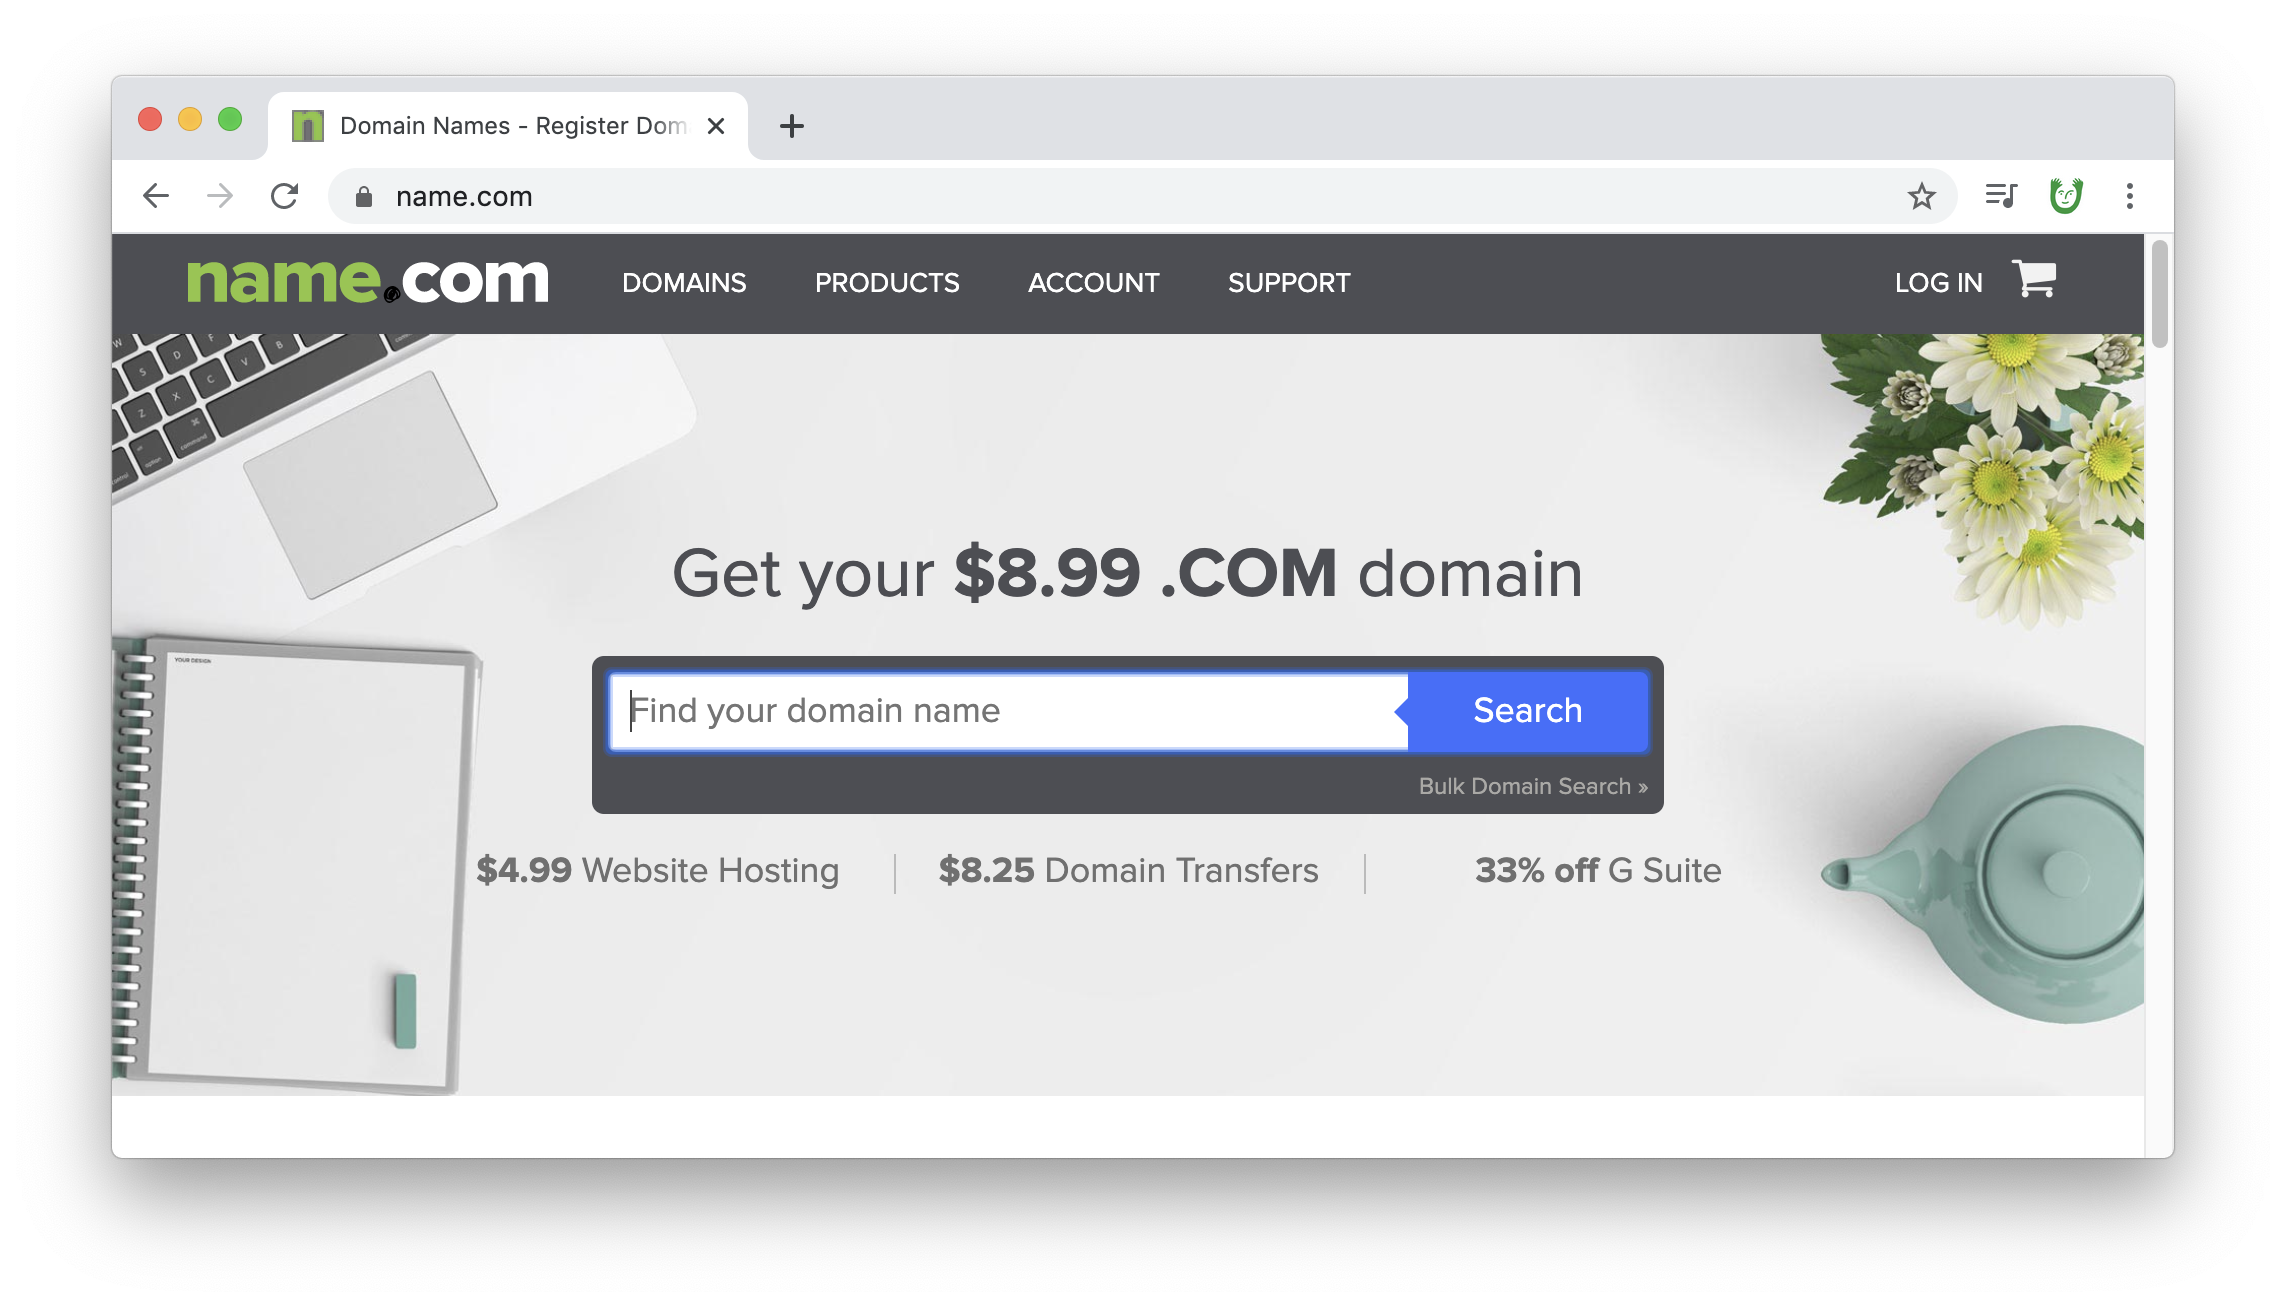
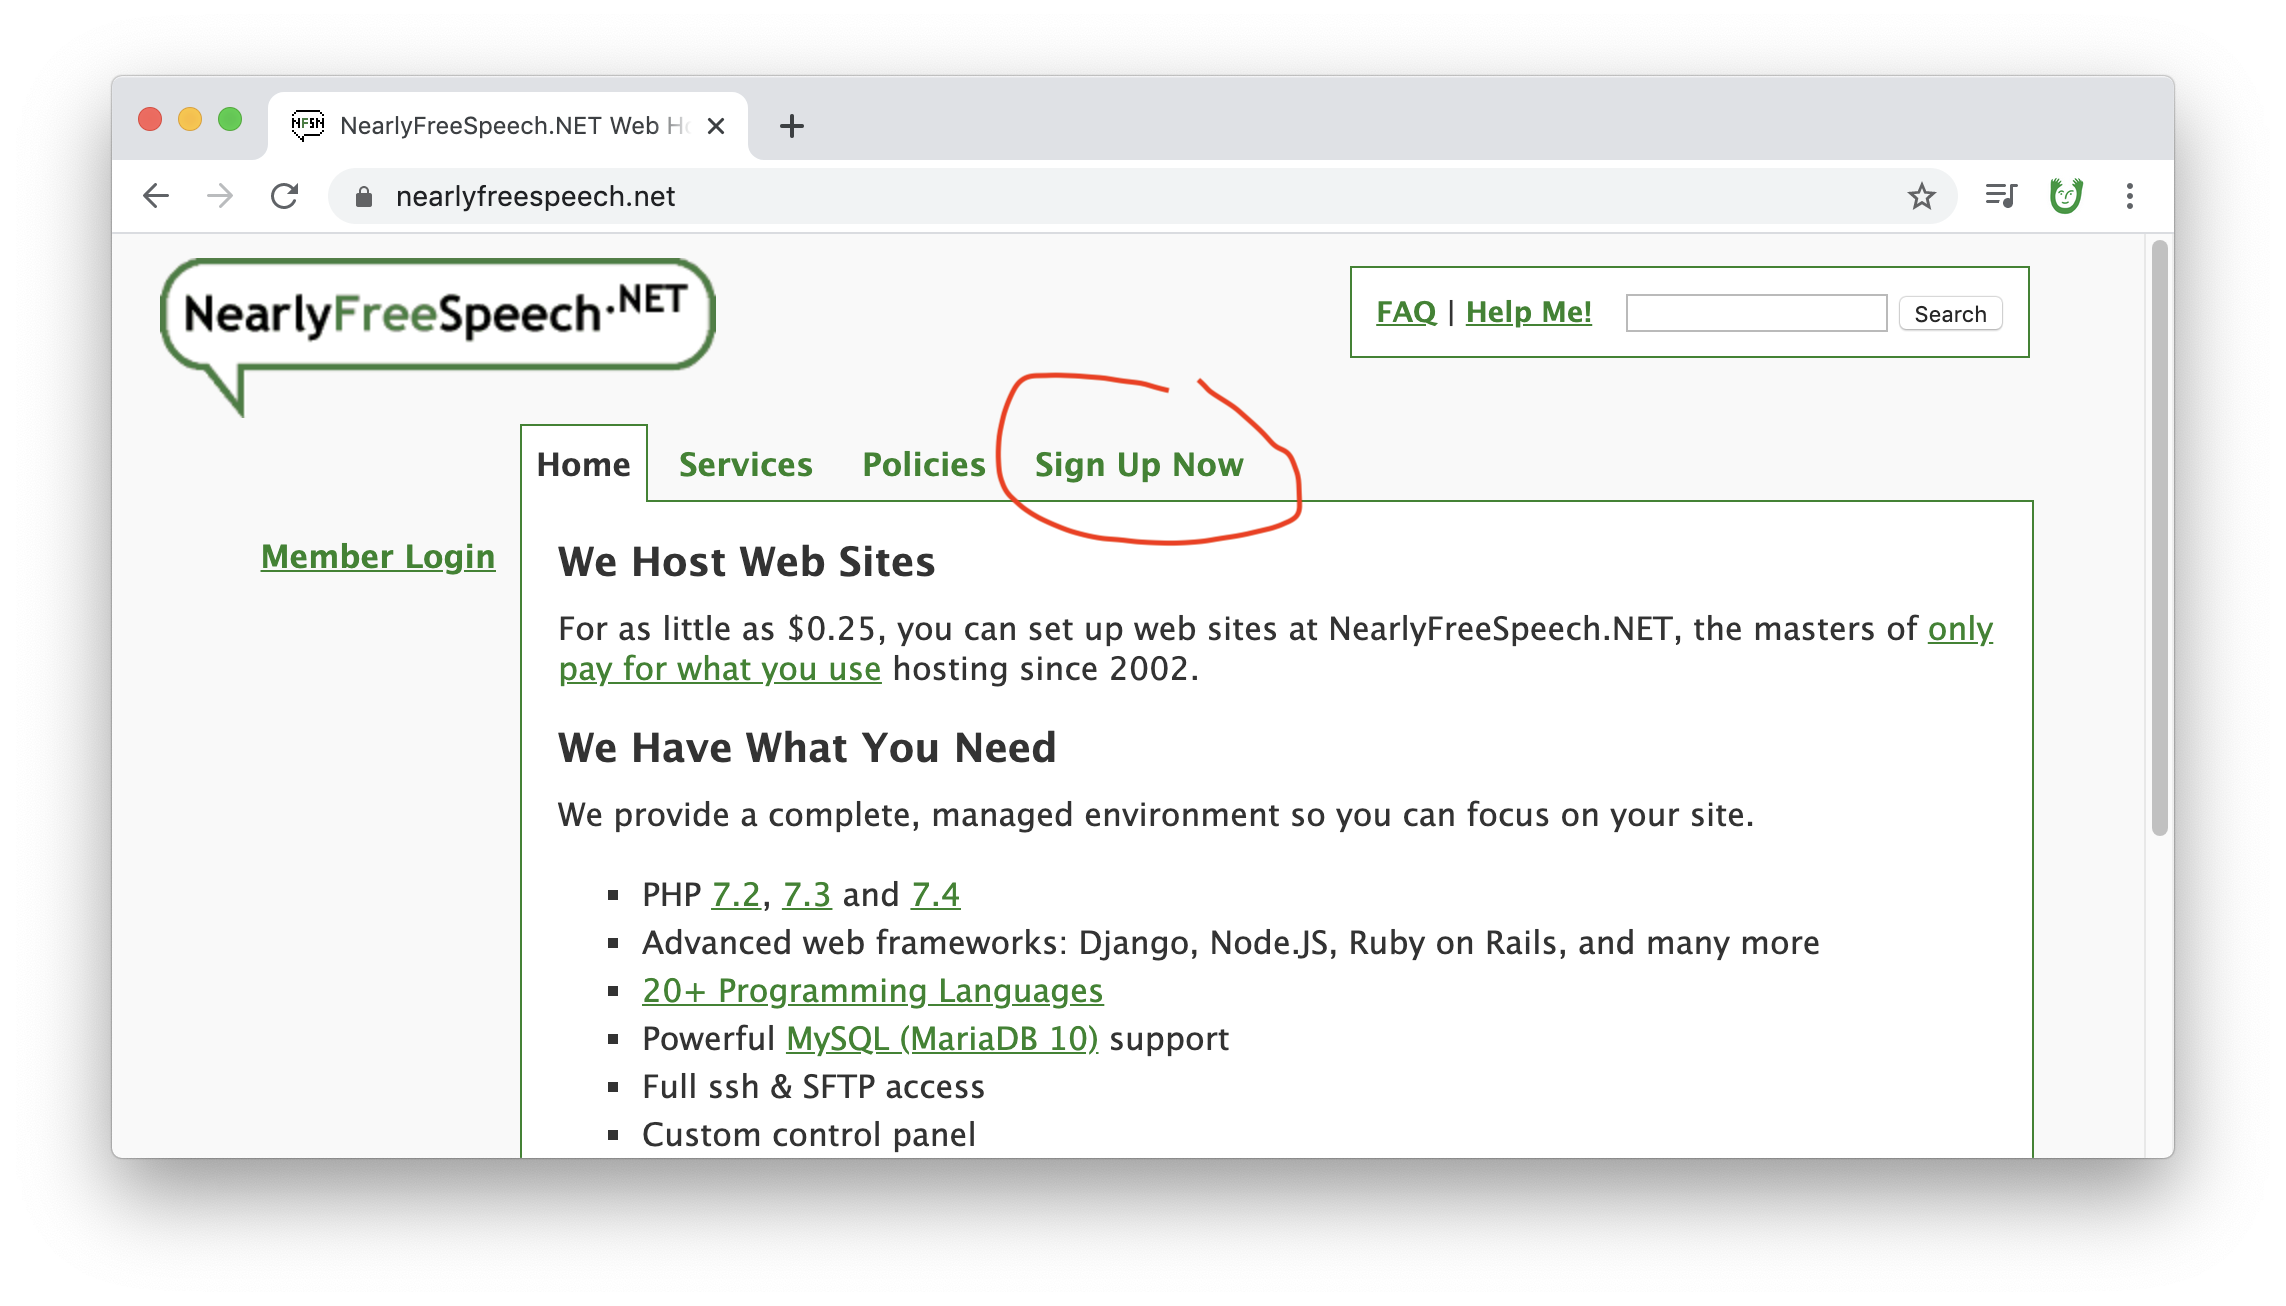
Create or log into your account at a domain name registrar
Purchase a domain name here
In this example, we are using the DNS registrar name.com, but you can use your preferred DNS registrar if you have one. Some others include iwantmyname.com, namecheap.com, and gandi.net.
First, go to 💁〰️ name.com and type in your chosen domain name.
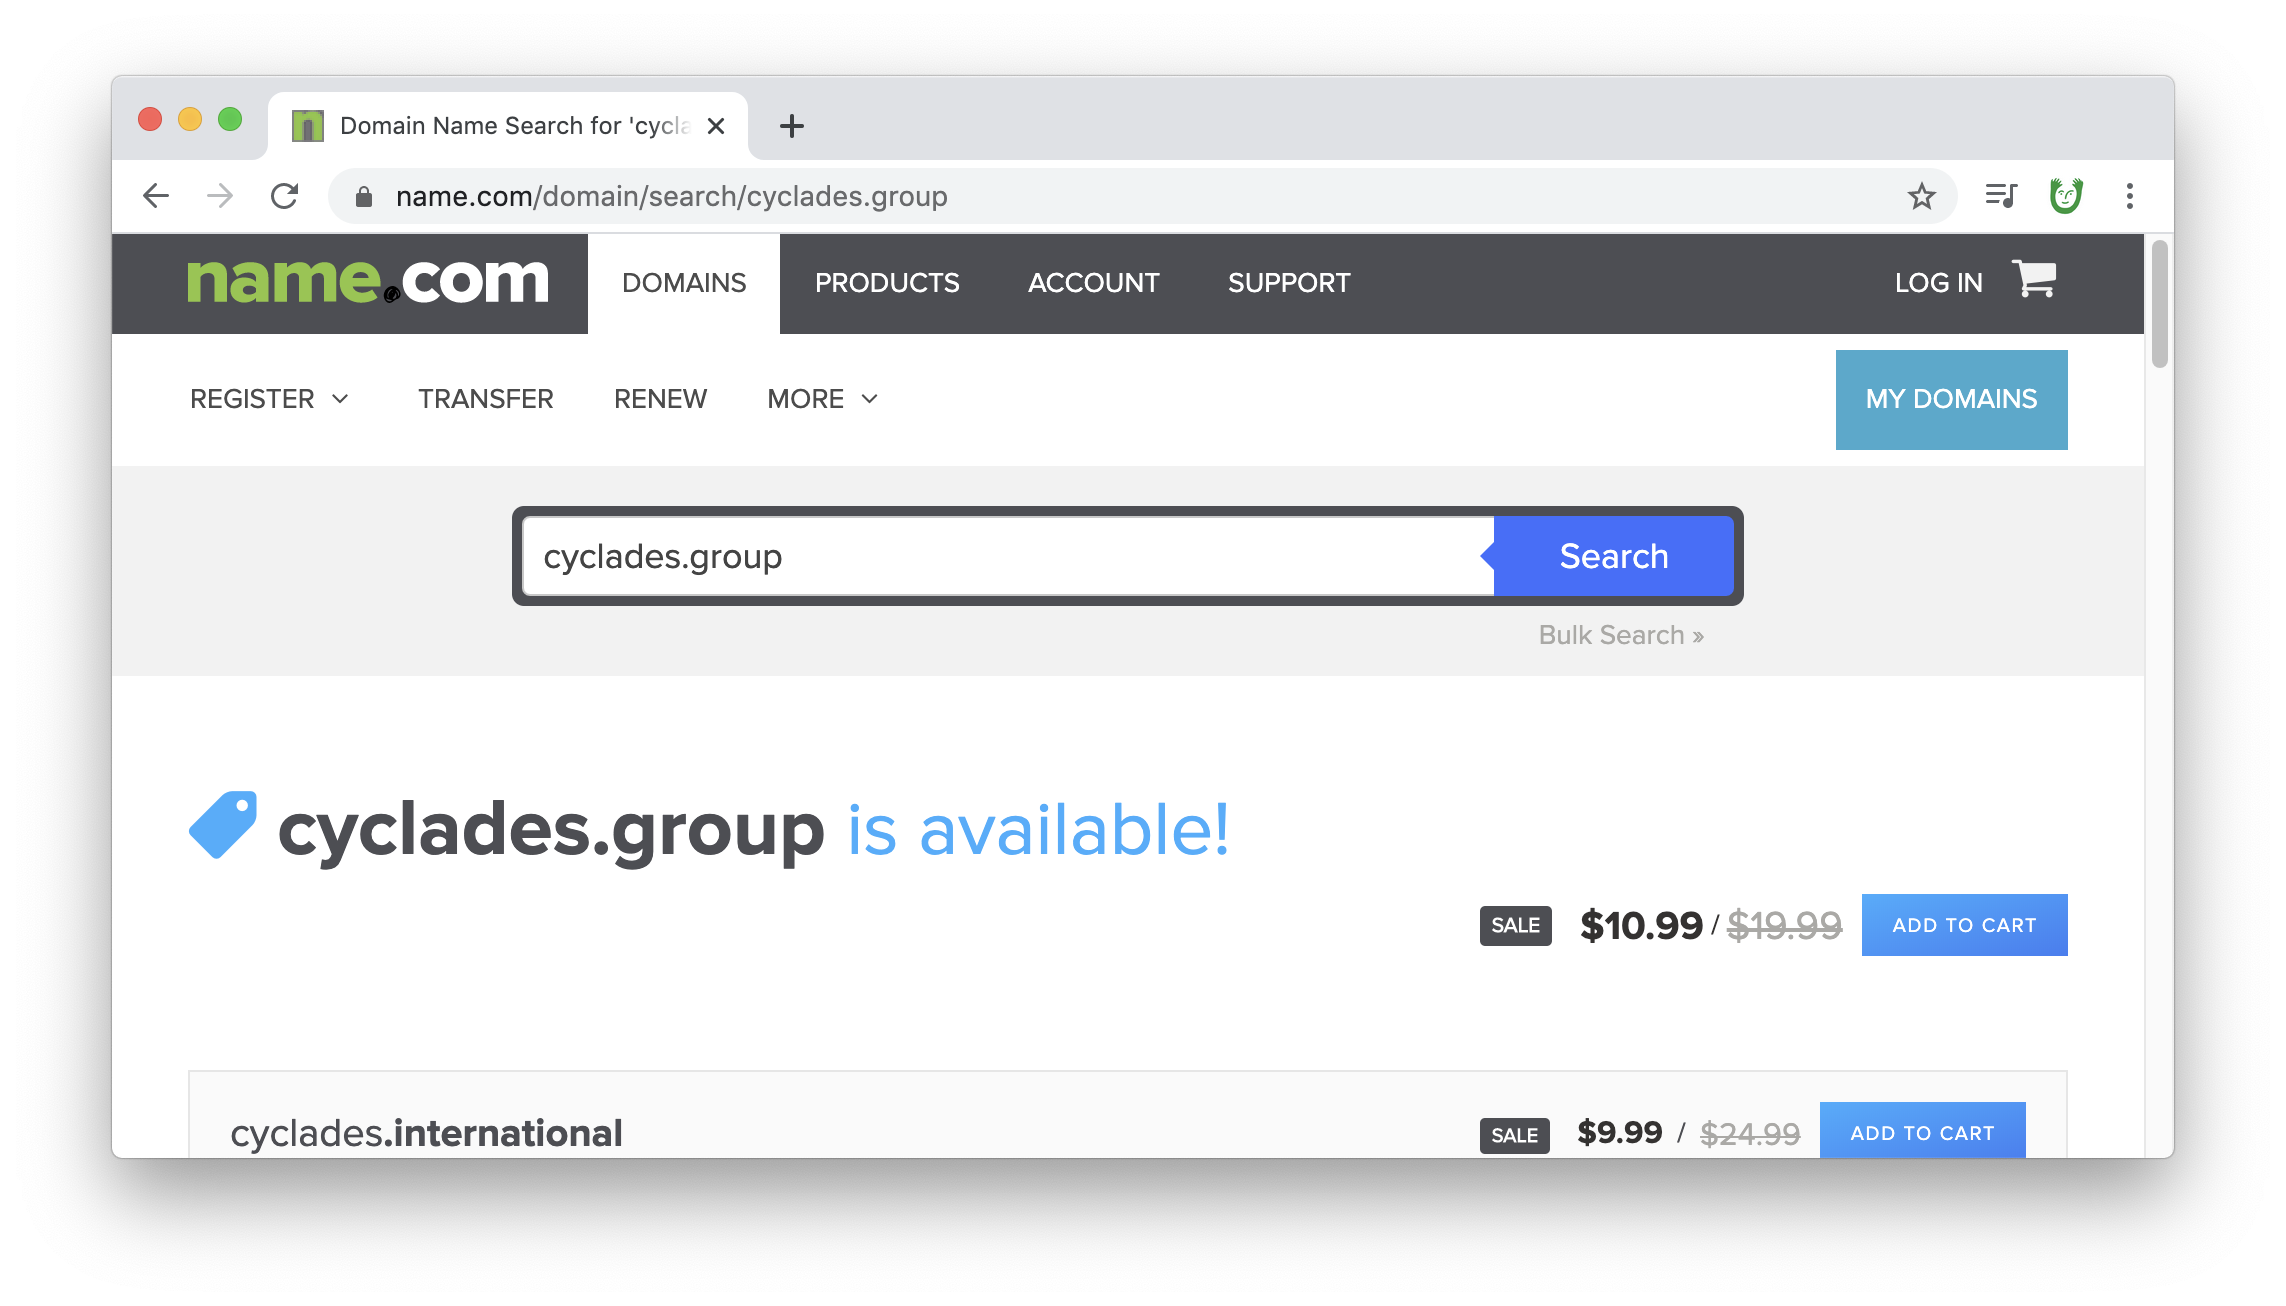
Add that domain to your cart and start checking out.
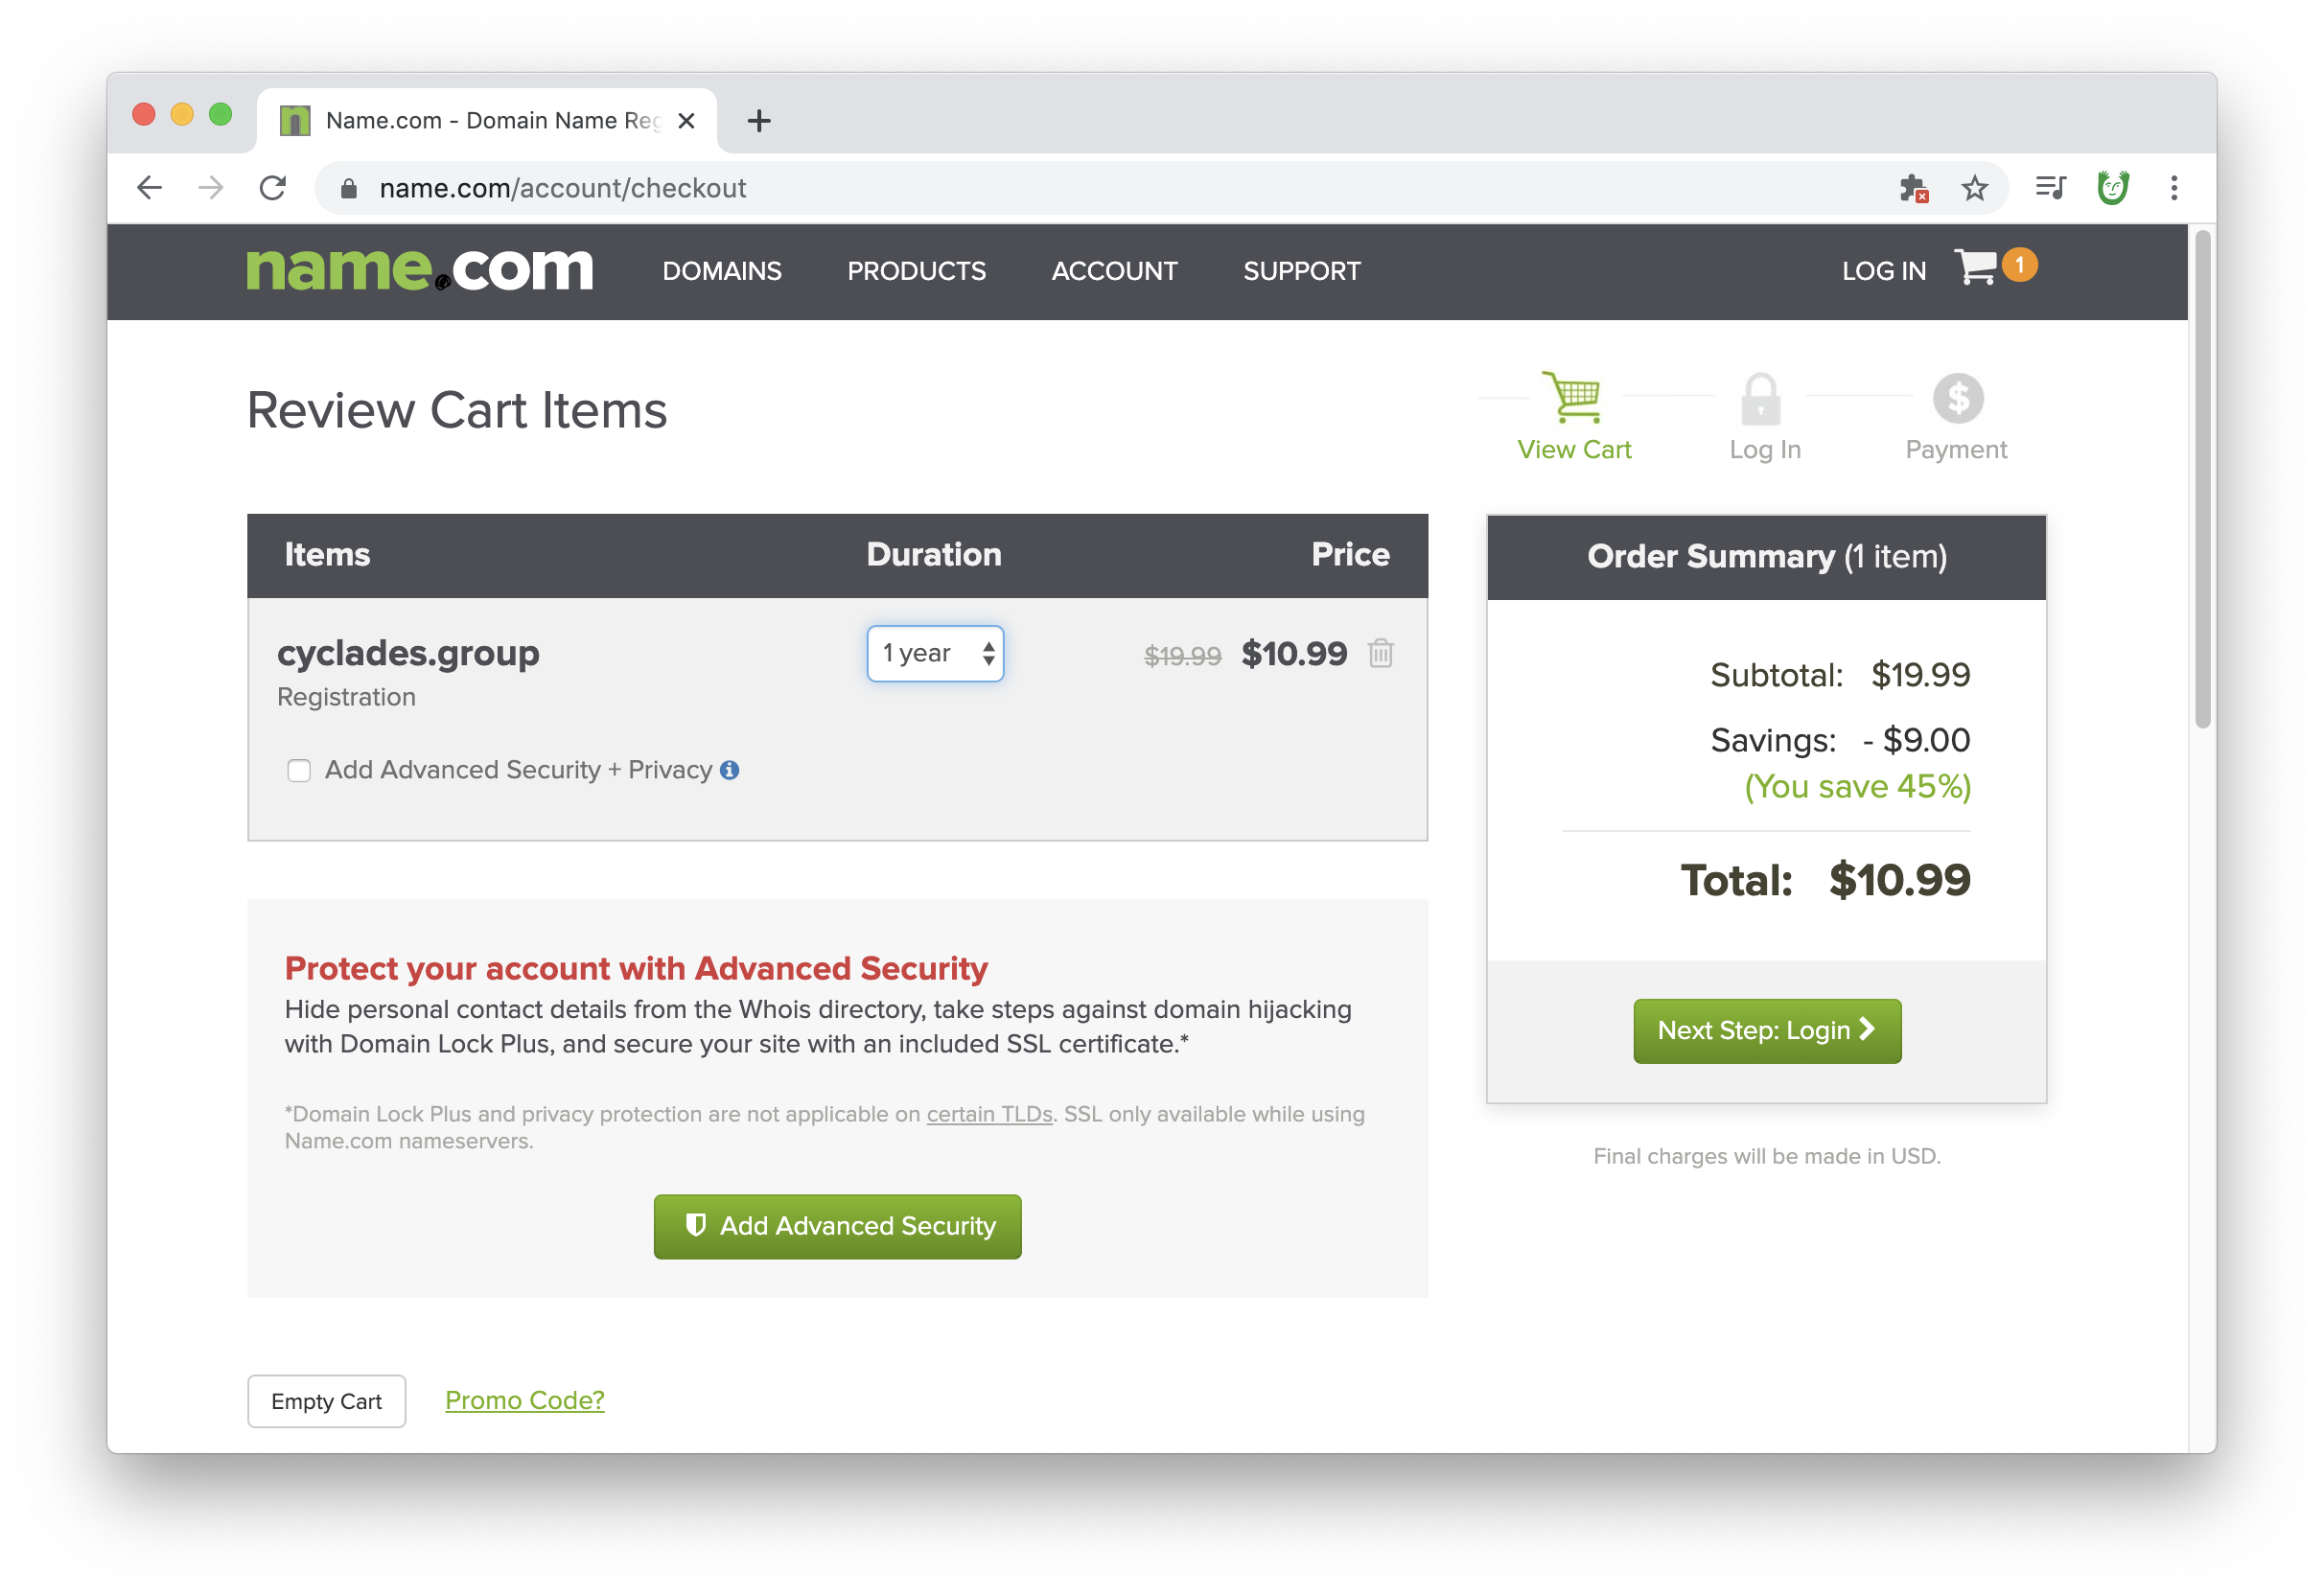
It's up to you if you want to include the extra $4.99 “whois privacy.” Adding this will ensure that your personal information is not available for spammers.
For more information ... you can look up the details of any domain in Whois Lookup, which is public. Here you can see laurelschwulst.com has my old mailing address because I didn't purchase privacy, and alternatively you can see fruitful.school's contact information is redacted because we did purchase privacy.
Select duration as one year unless you're feeling confident about the future. Name.com will also prompt you to create an account or log into your existing account...
Place your order.
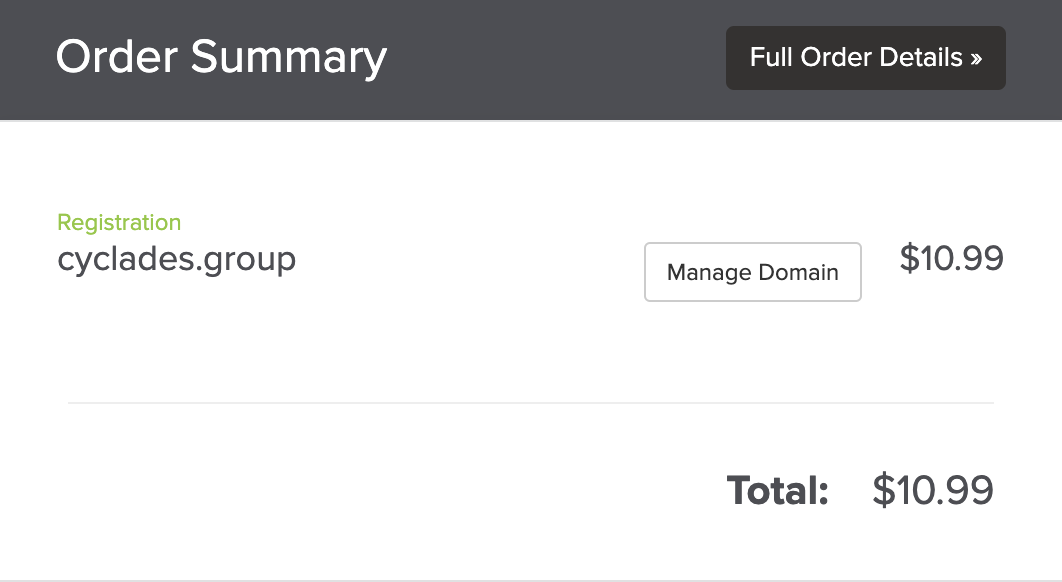
Congrats! You just bought a domain.
We will come back to this domain name registrar once we have our hosting set up, so remember to keep your login information saved or handy...
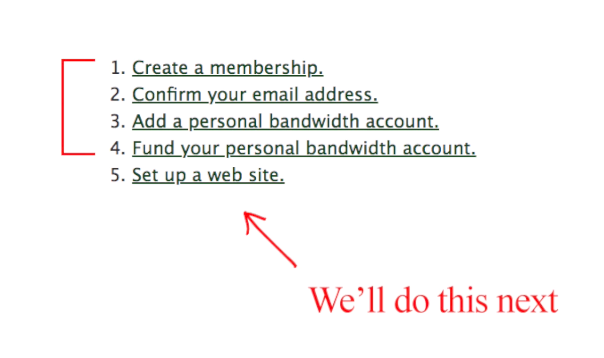
Part 2. Set up hosting 🖥
As mentioned in the vocabulary section, a host or server is essentially a computer that's always connected to the internet. When you use a hosting provider, you are renting/using space on this special computer always connected to the internet. You do this so that when someone types your URL in, this server will offer up your website.
Bahnhof’s nuclear-proof servers (extreme example)
Options for hosting
In this guide, we show two possible paths you could take with hosting. Note that there are many possible hosting configurations you could use, and these are just two. (We have mapped out a handful of other options in our appendix at the end.)
Regarding step 4, funding your account — we recommend depositing around $20, but you can deposit less and try it out for a while. If the money runs out, your website will go offline. Nearlyfreespeech.net will email you when you're getting close to this limit.)
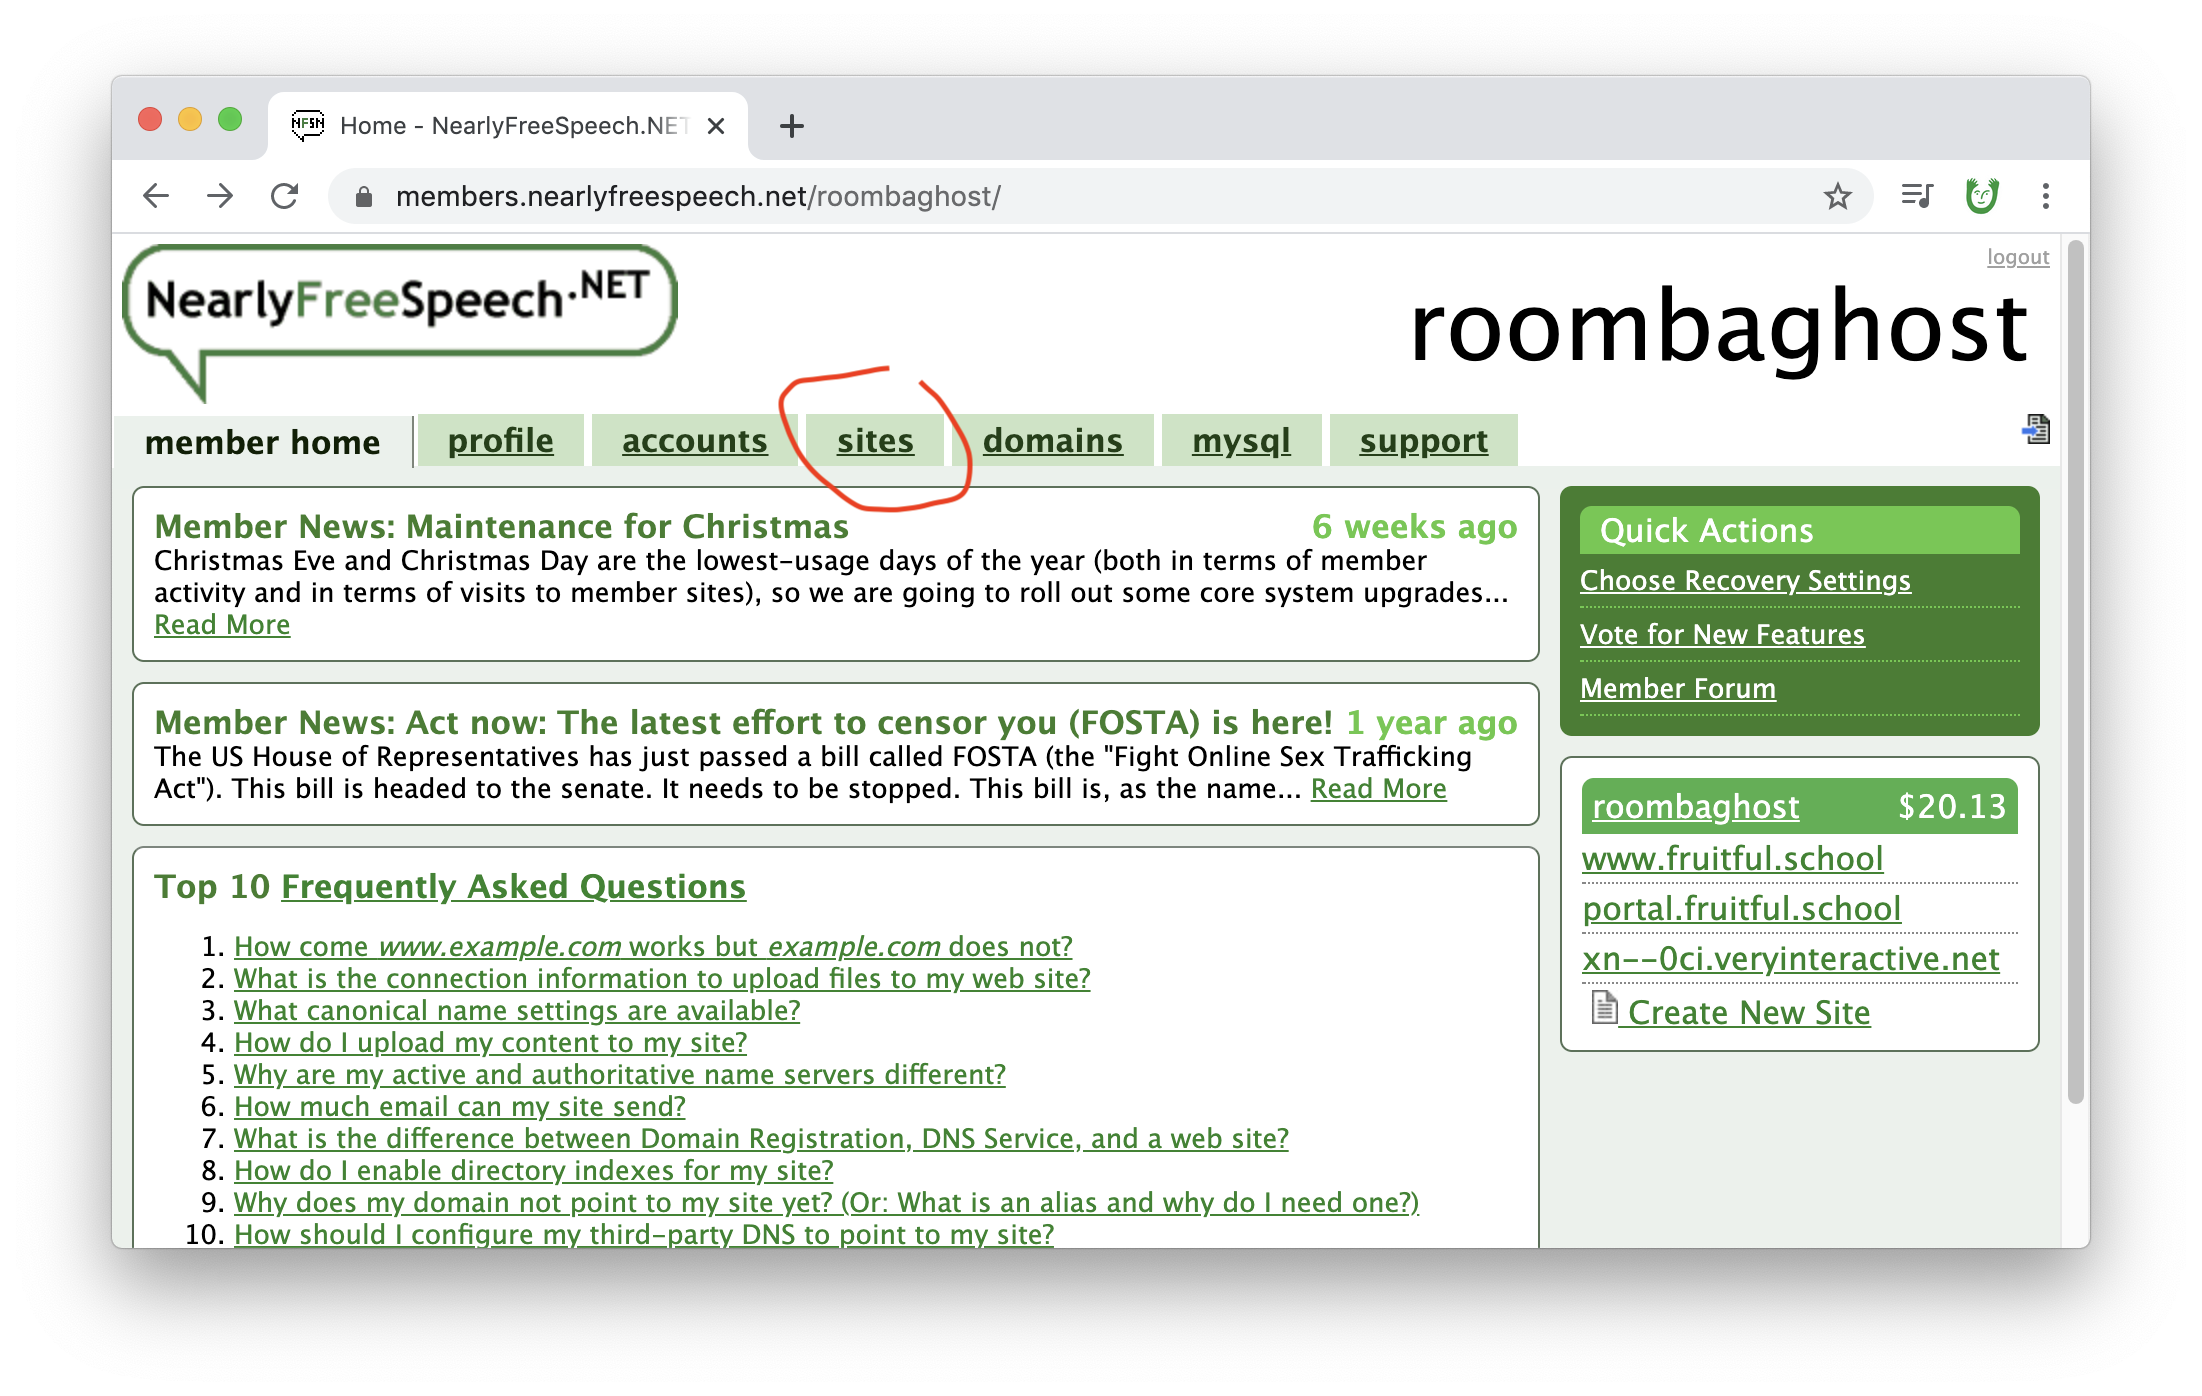
2. Set up a new site inside your NFS account
Next, let's set up your website. Click on the "sites" tab...
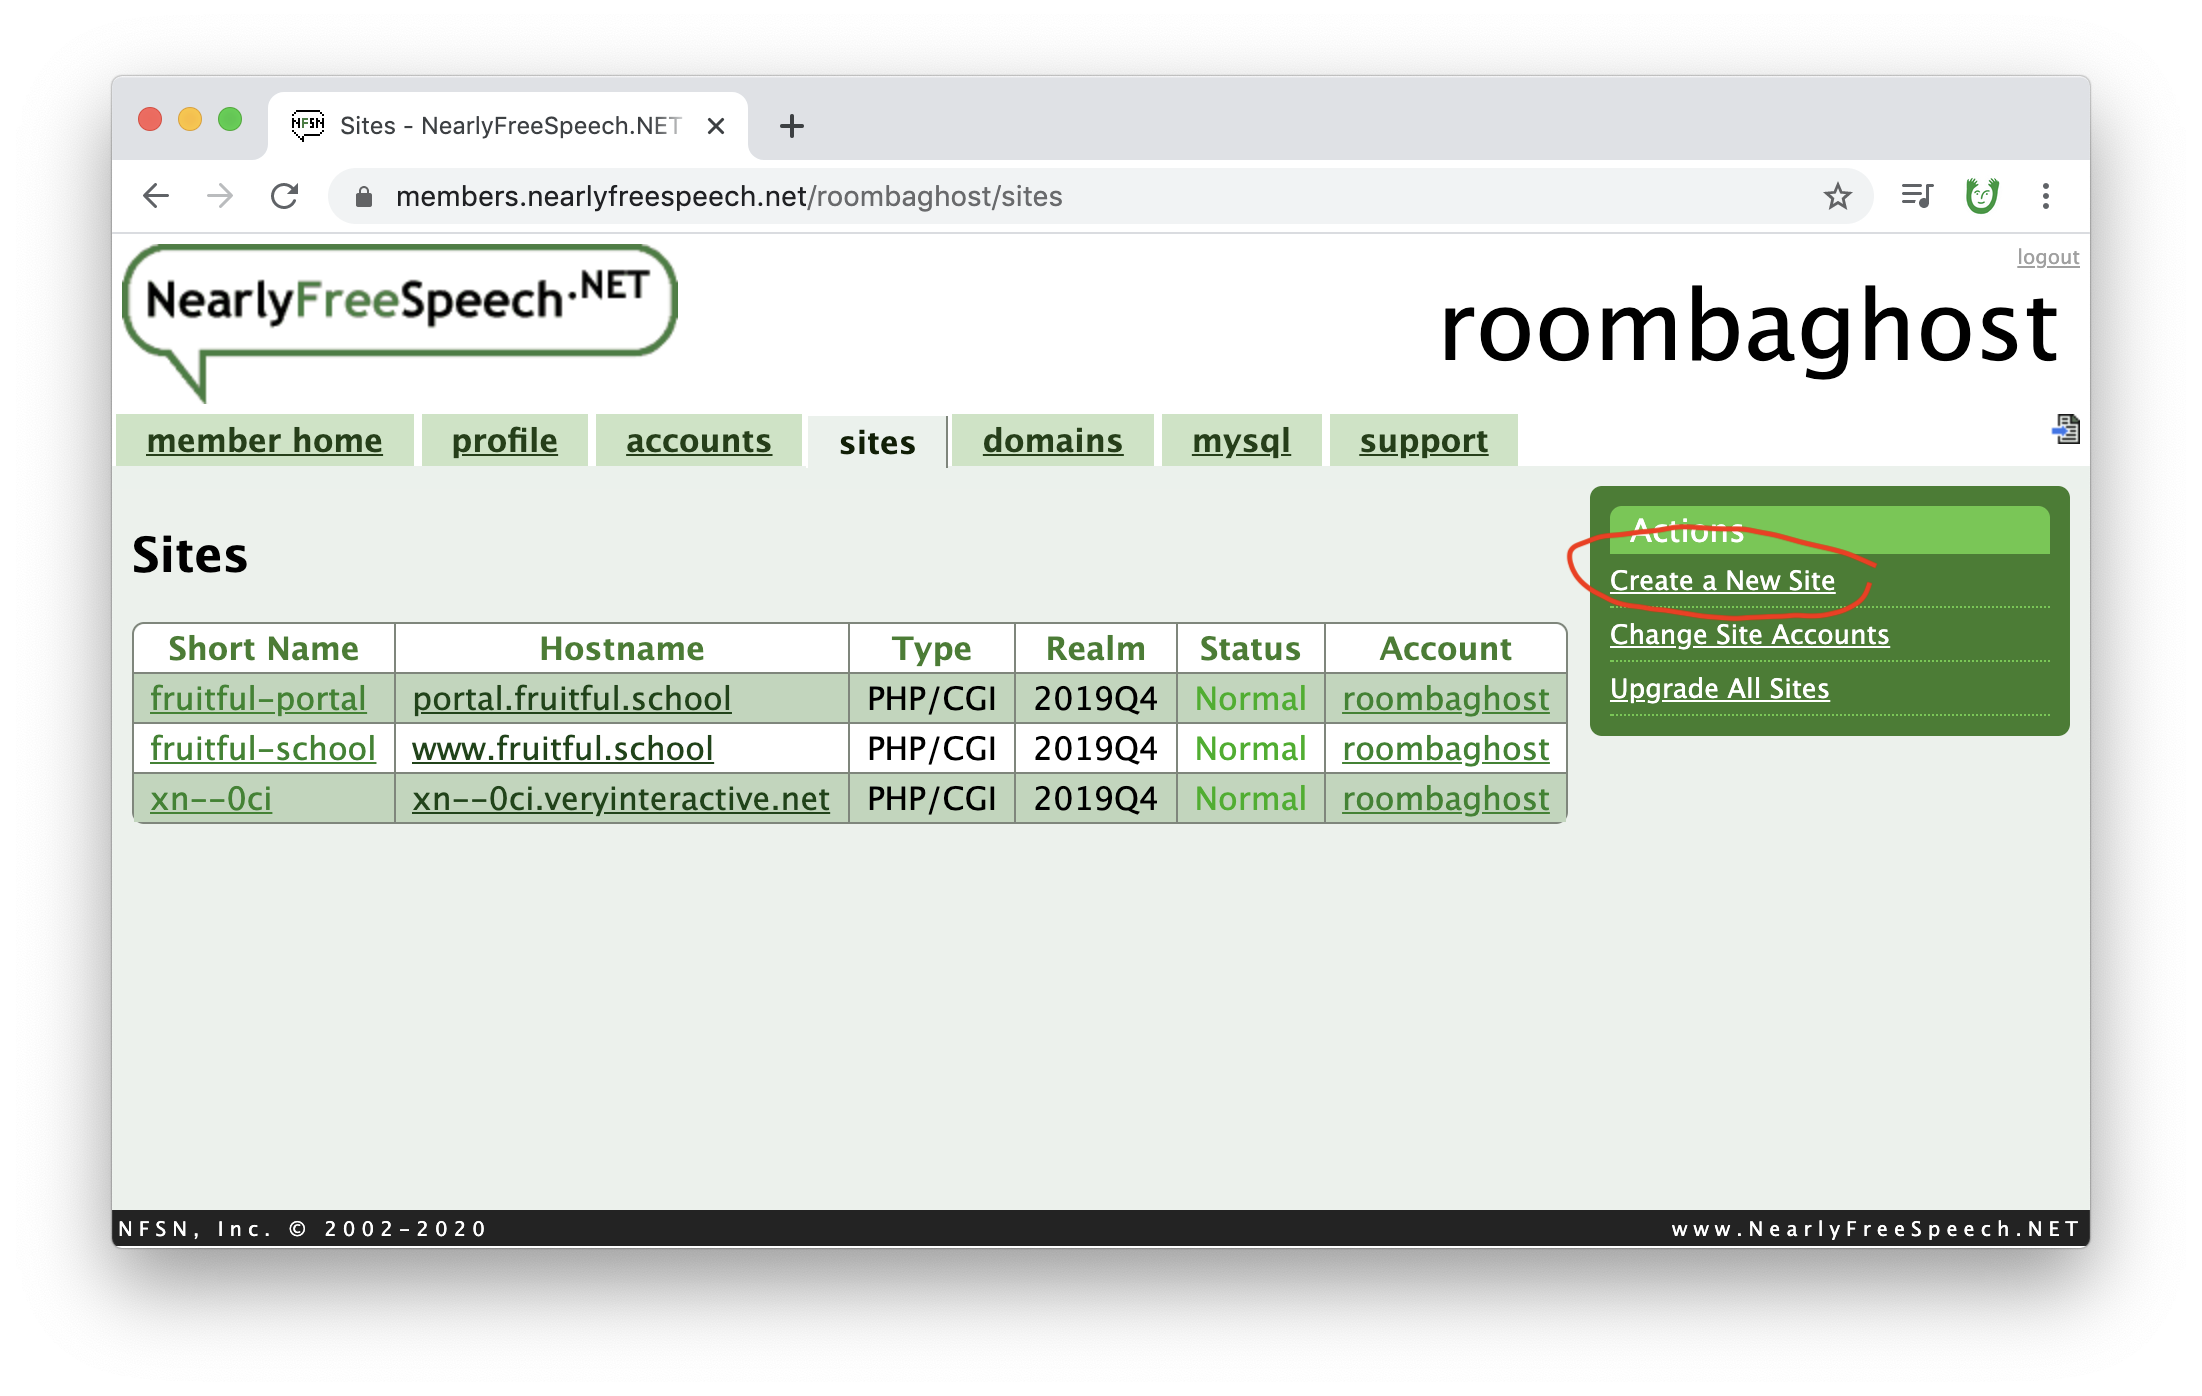
And click "Create a new site" on the right...
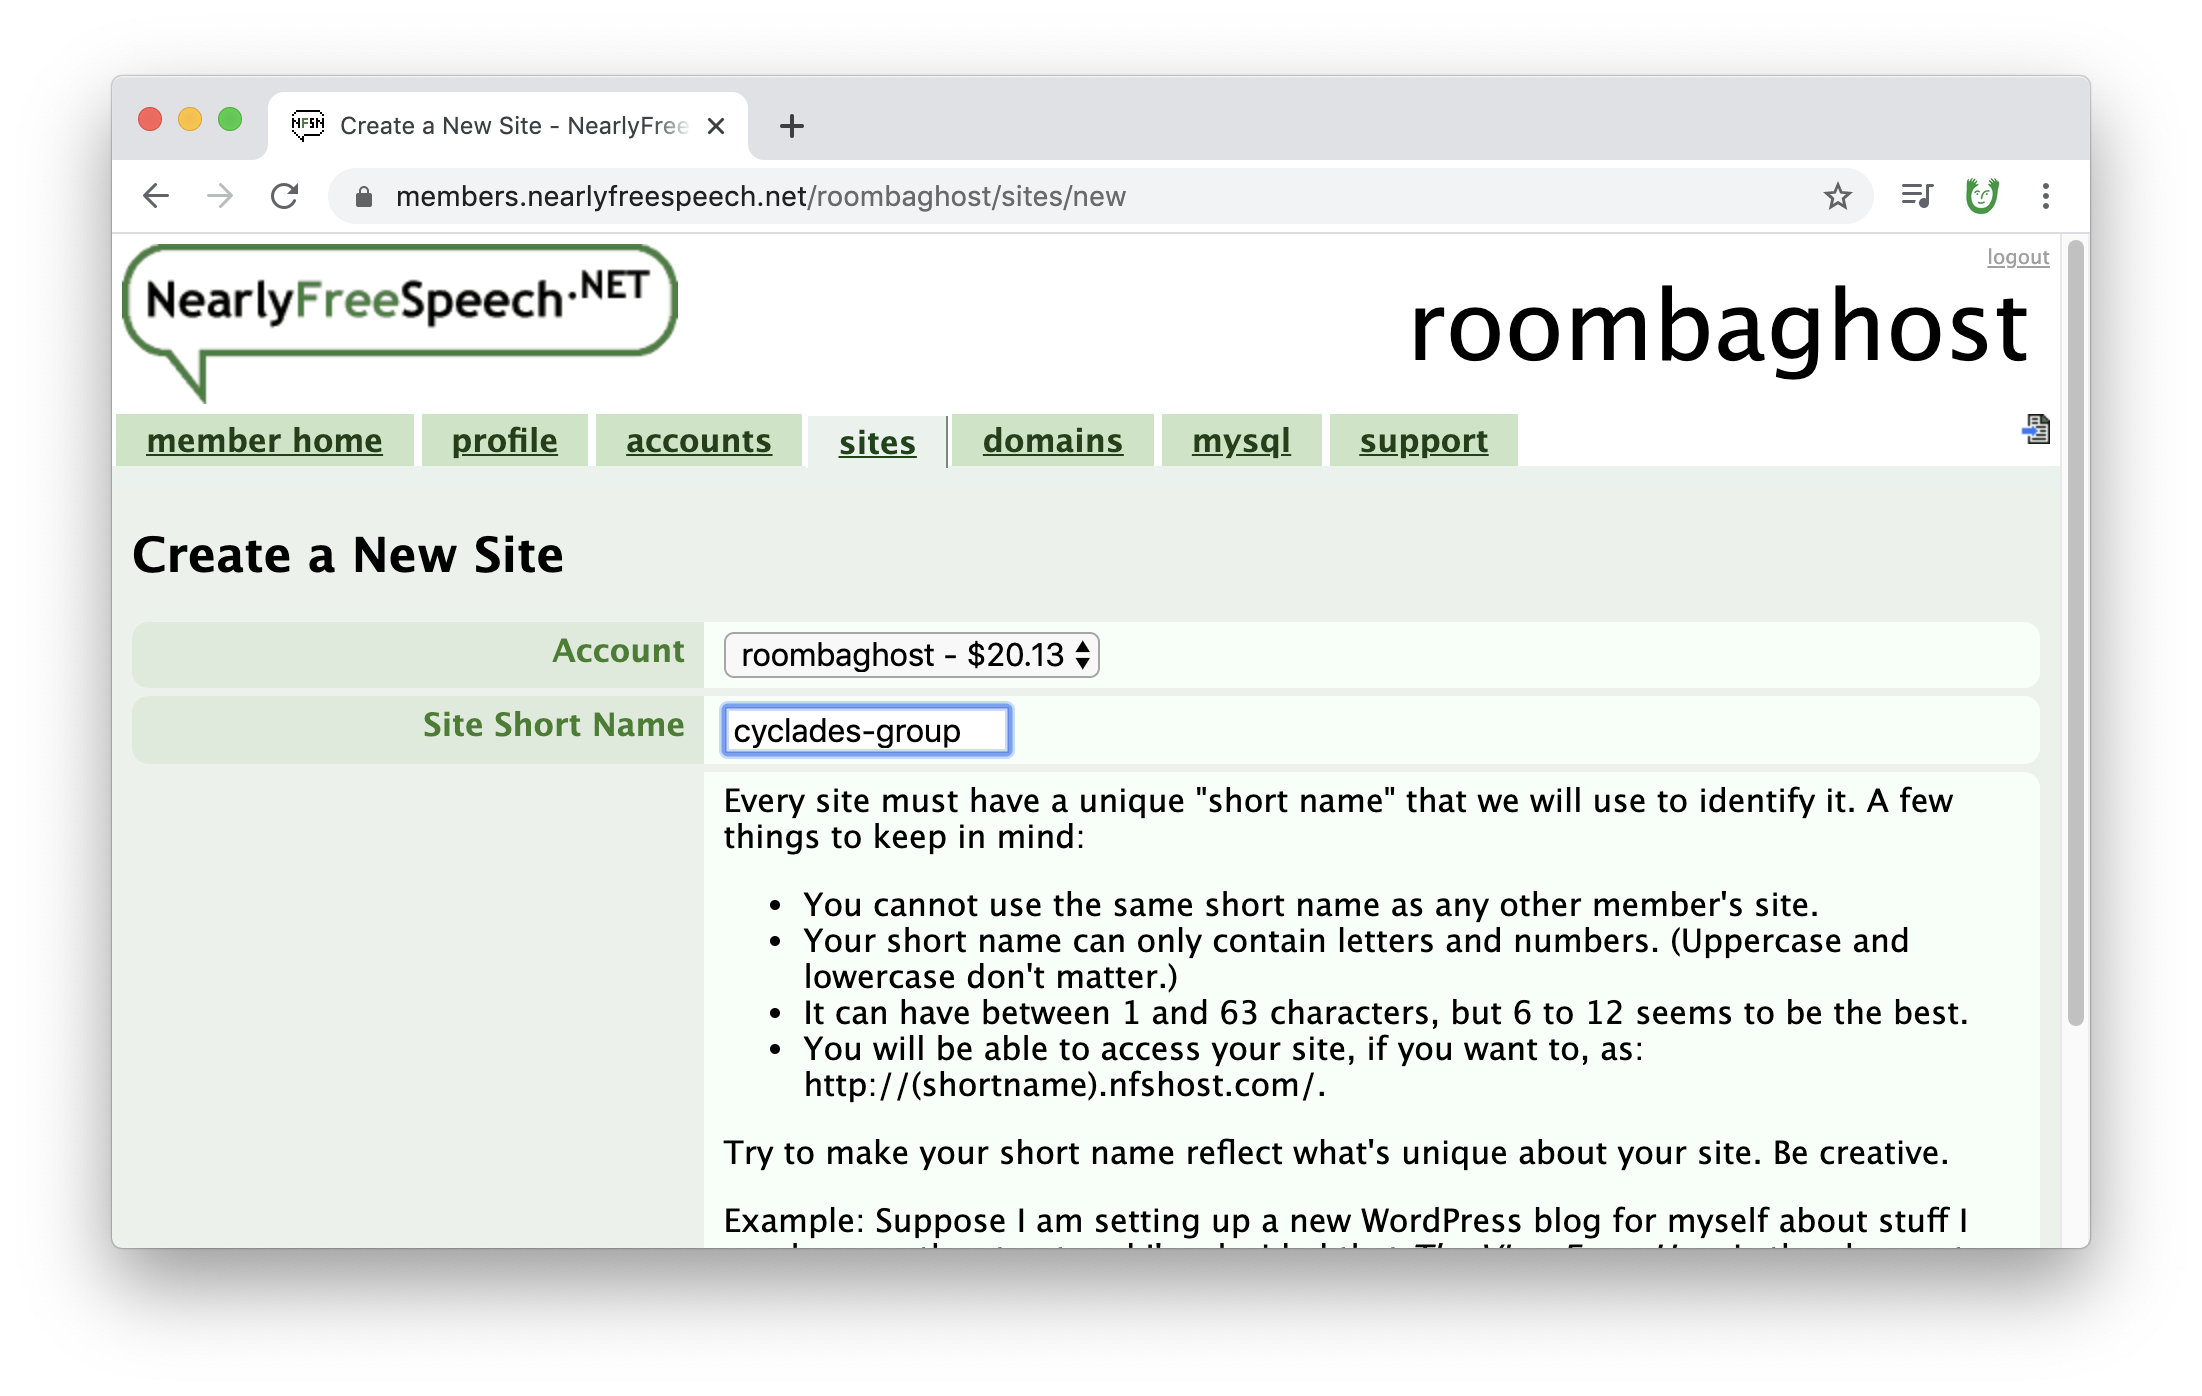
Type in a "site short name". This is kind of like an alias for your site.
Then click "Next".
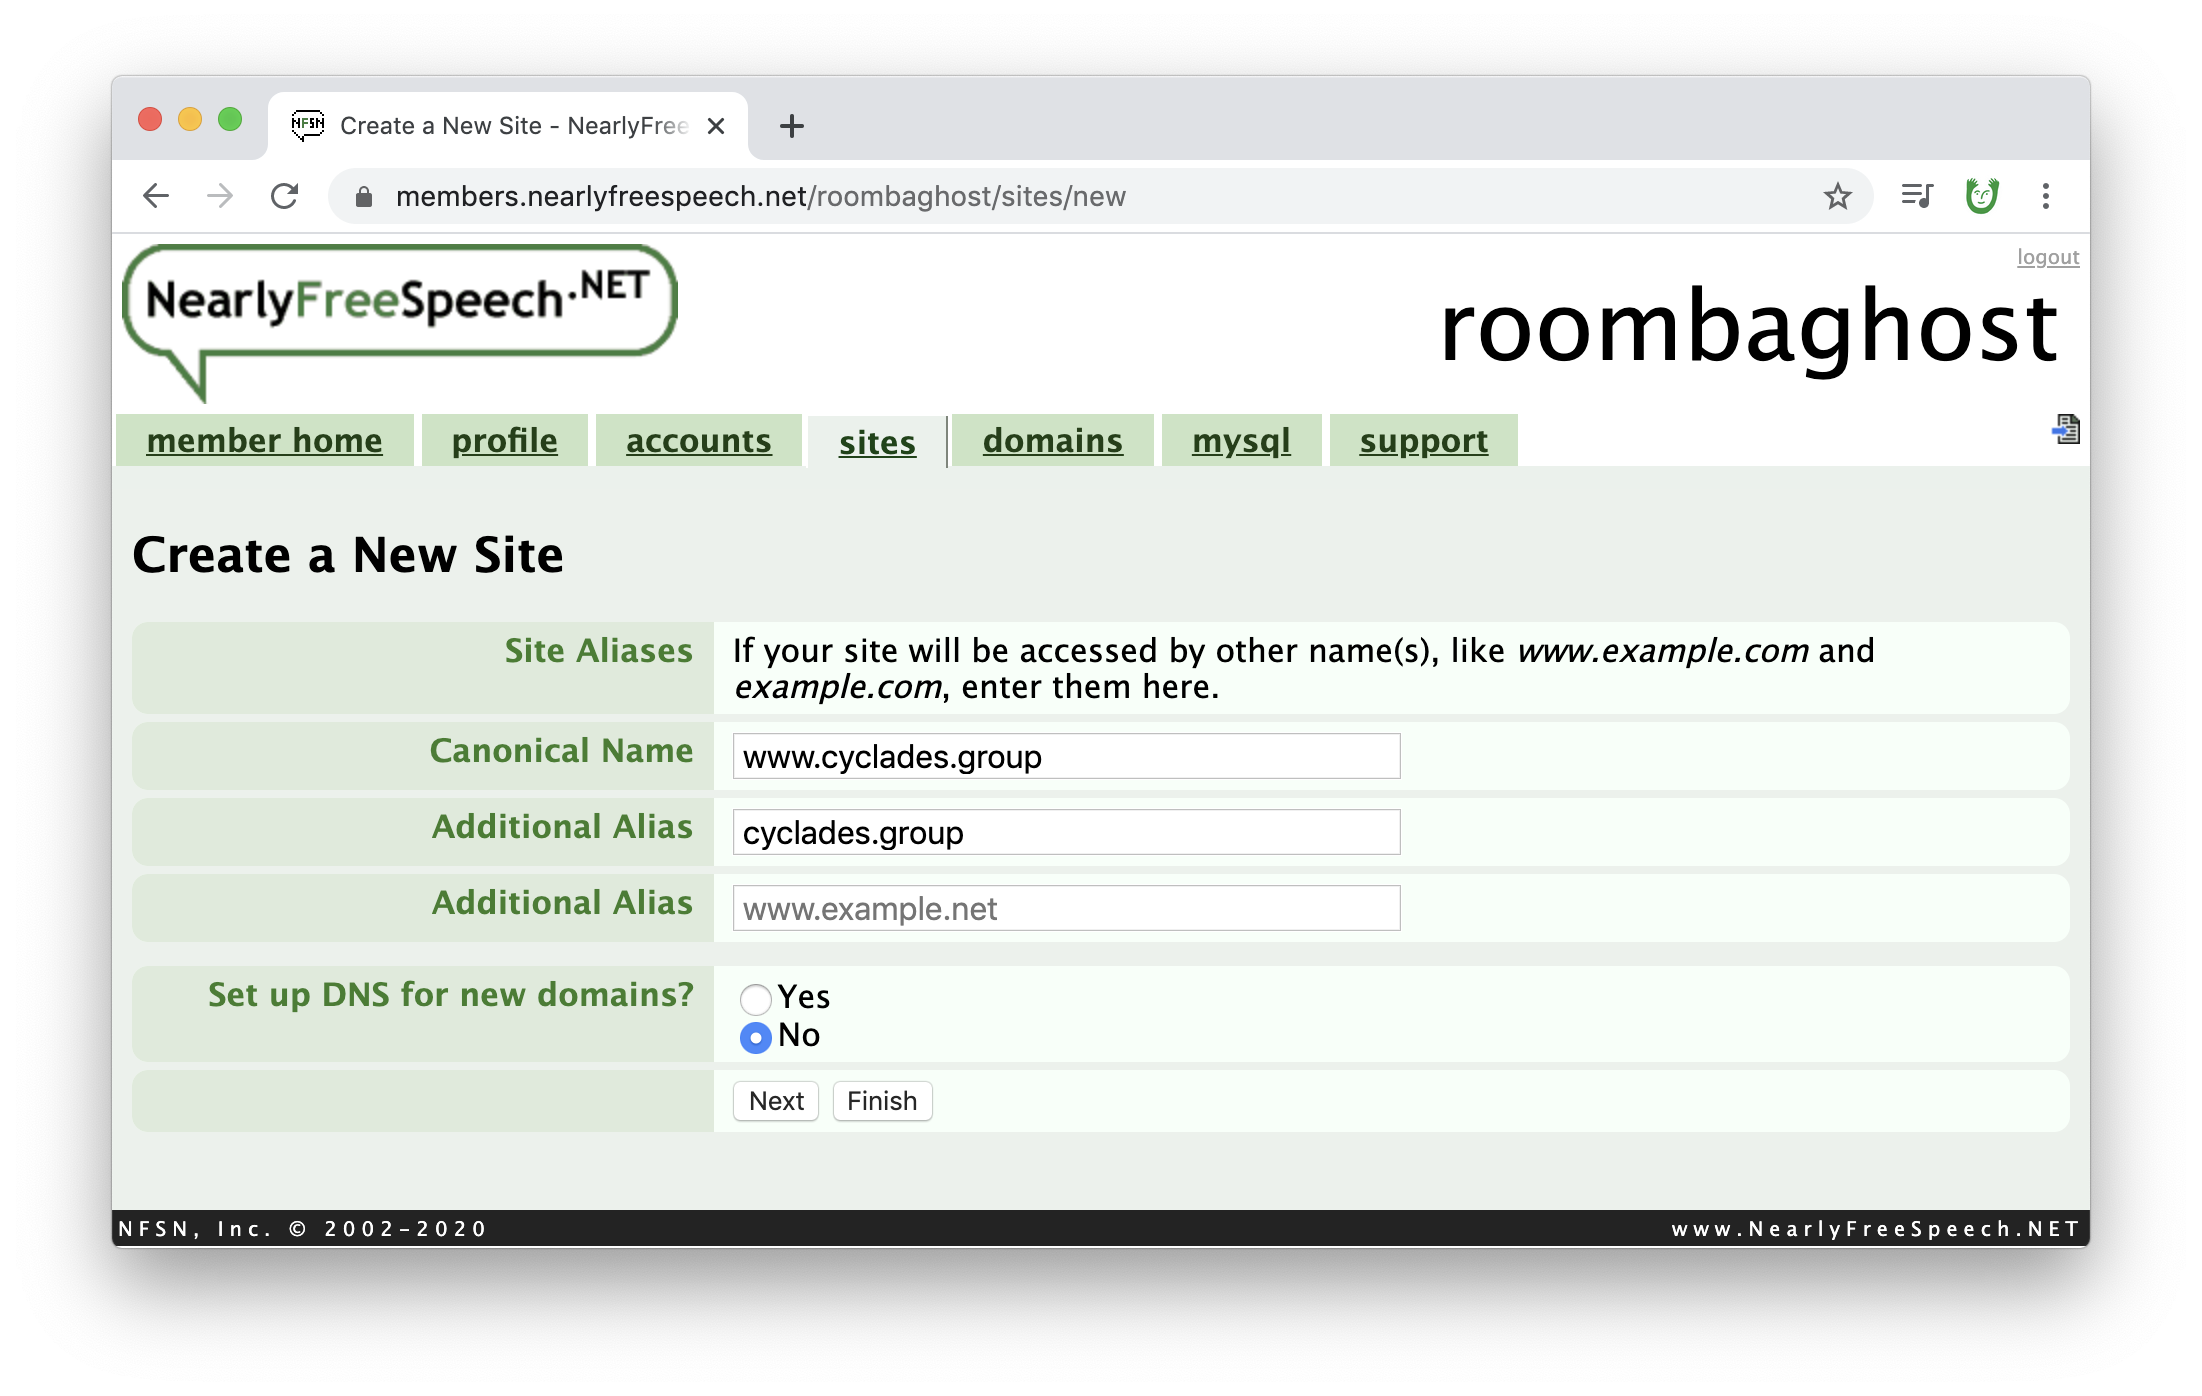
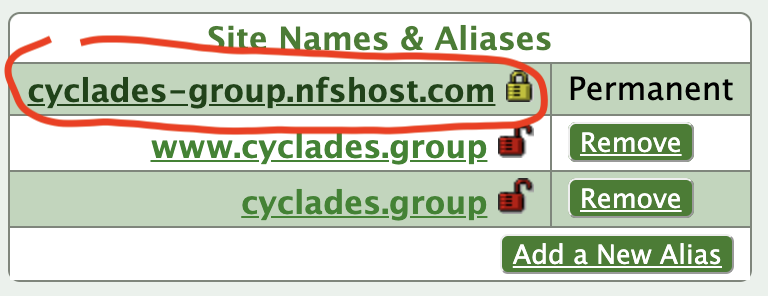
On the following screen, add a canonical name and an additional alias. These should be your domain name (that you purchased just before) with and without the www part. Select "No" for setting up DNS. Next...
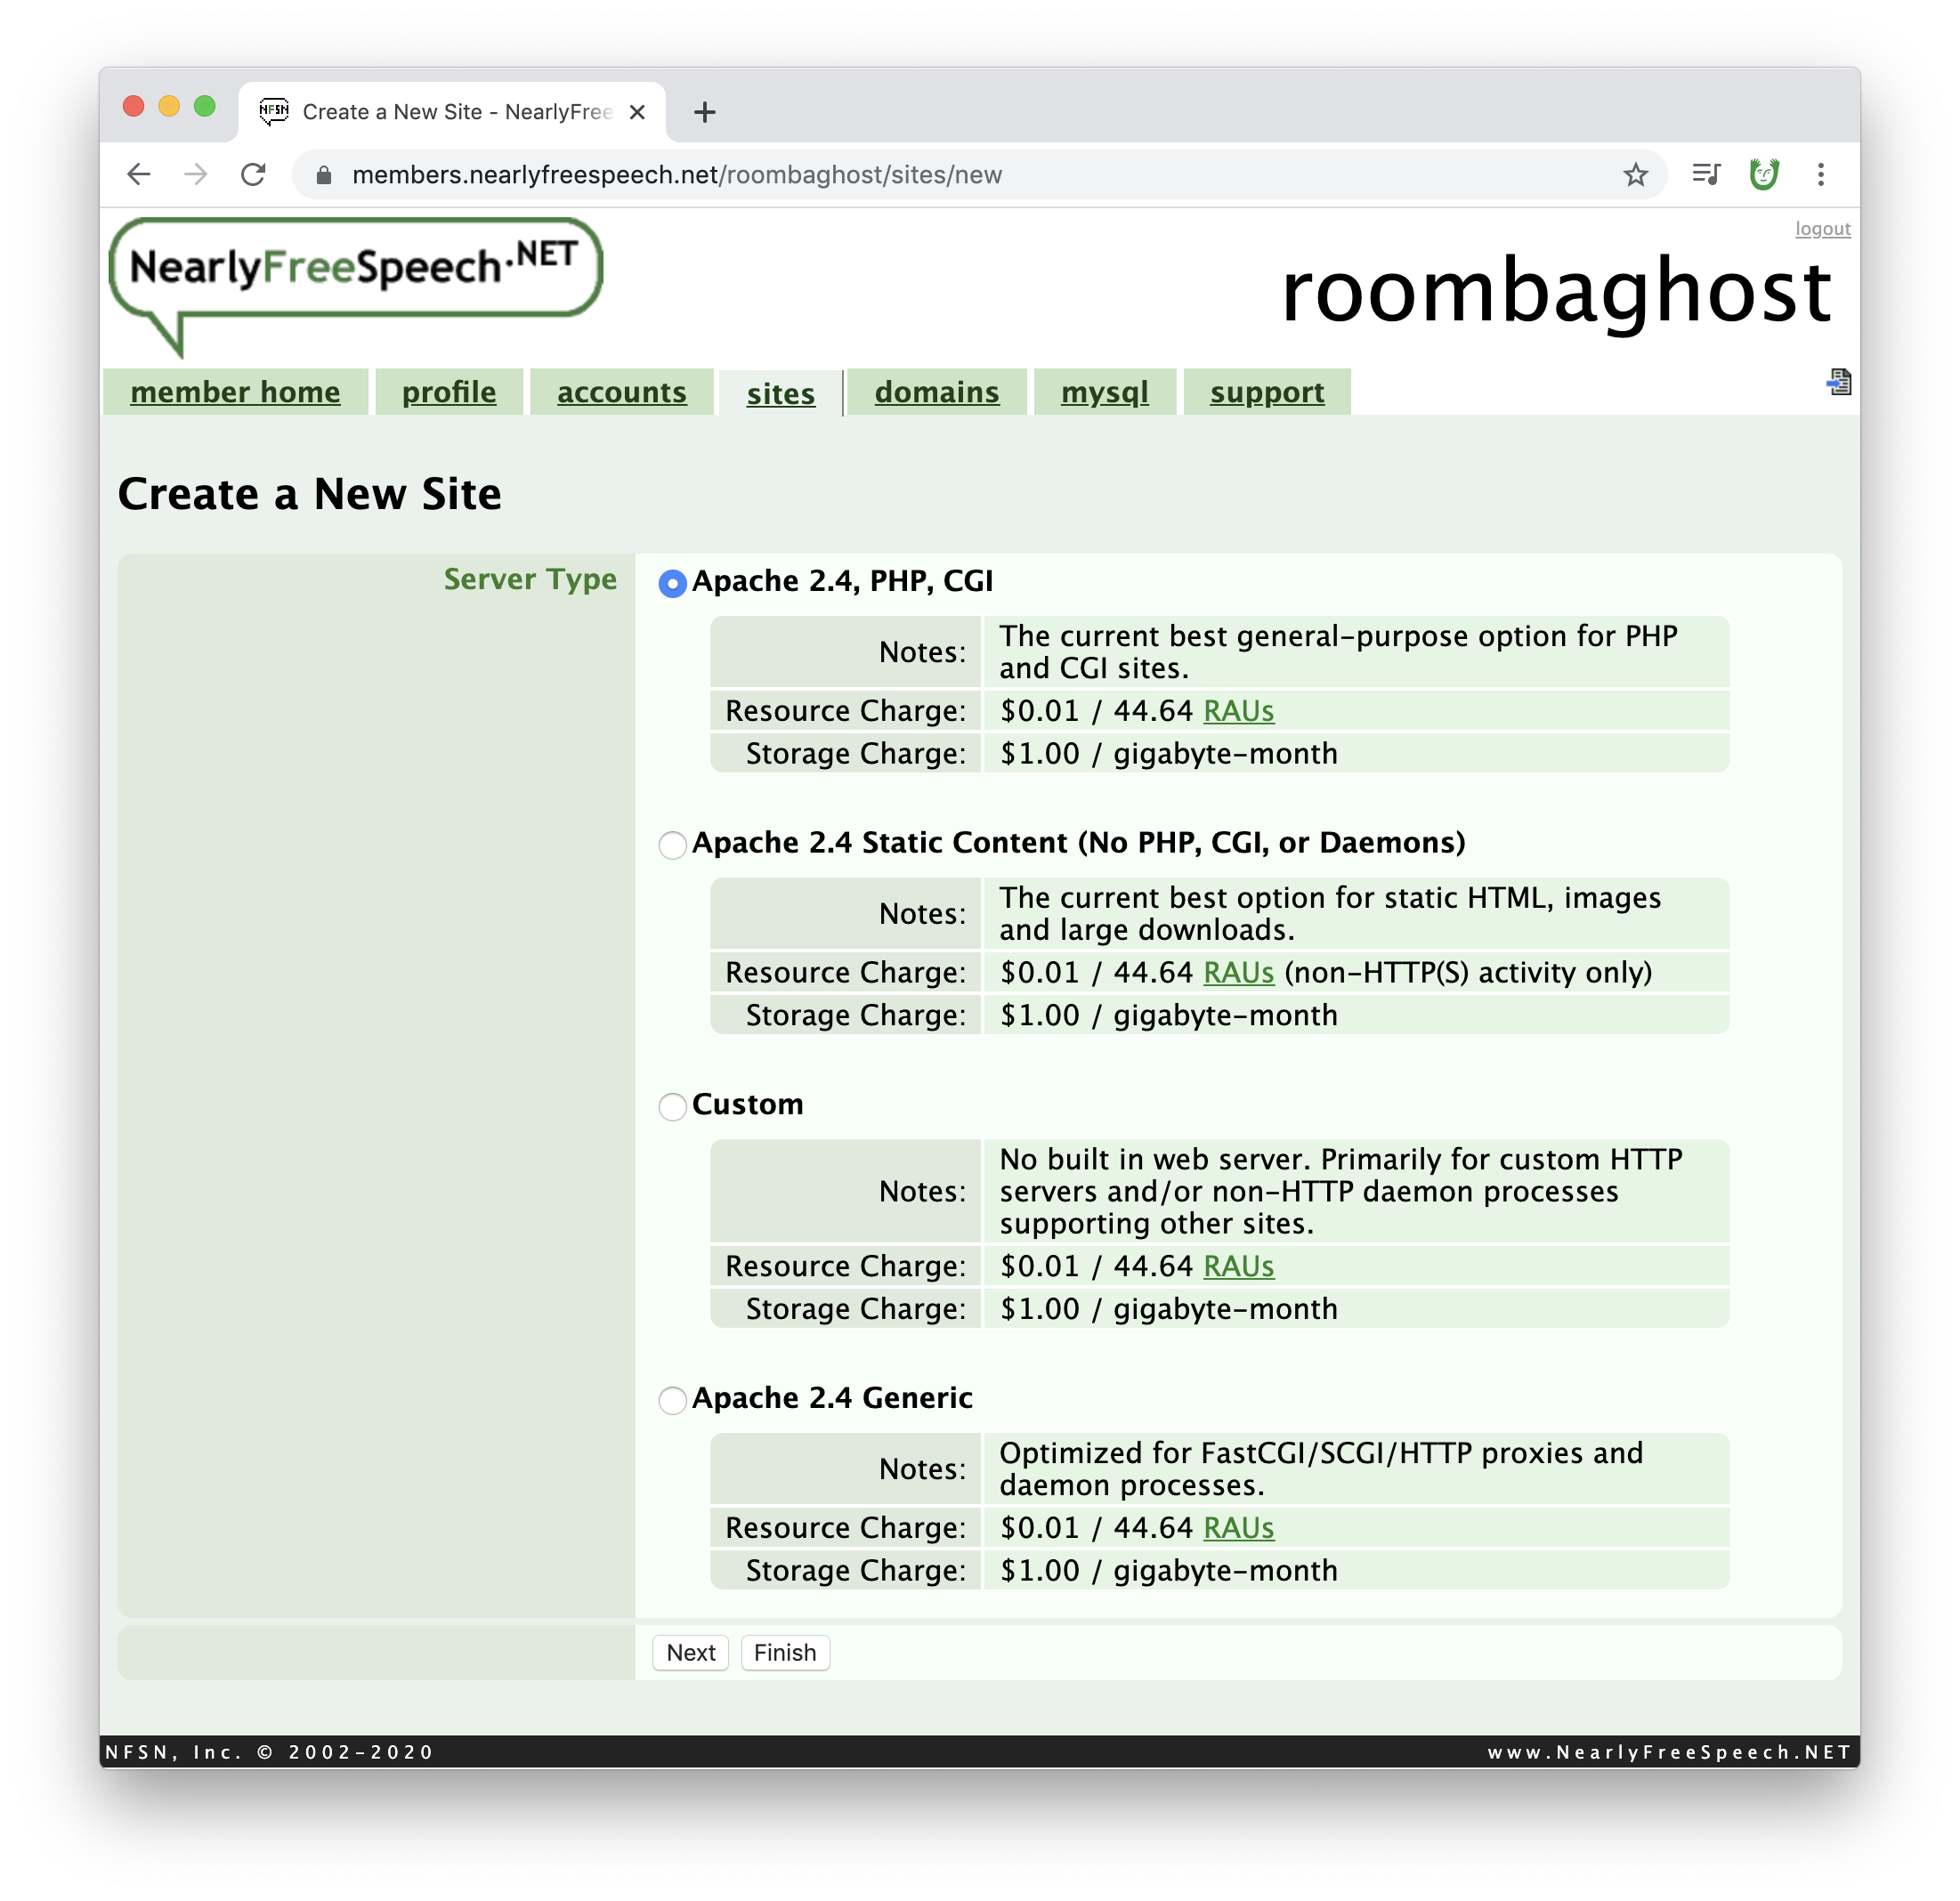
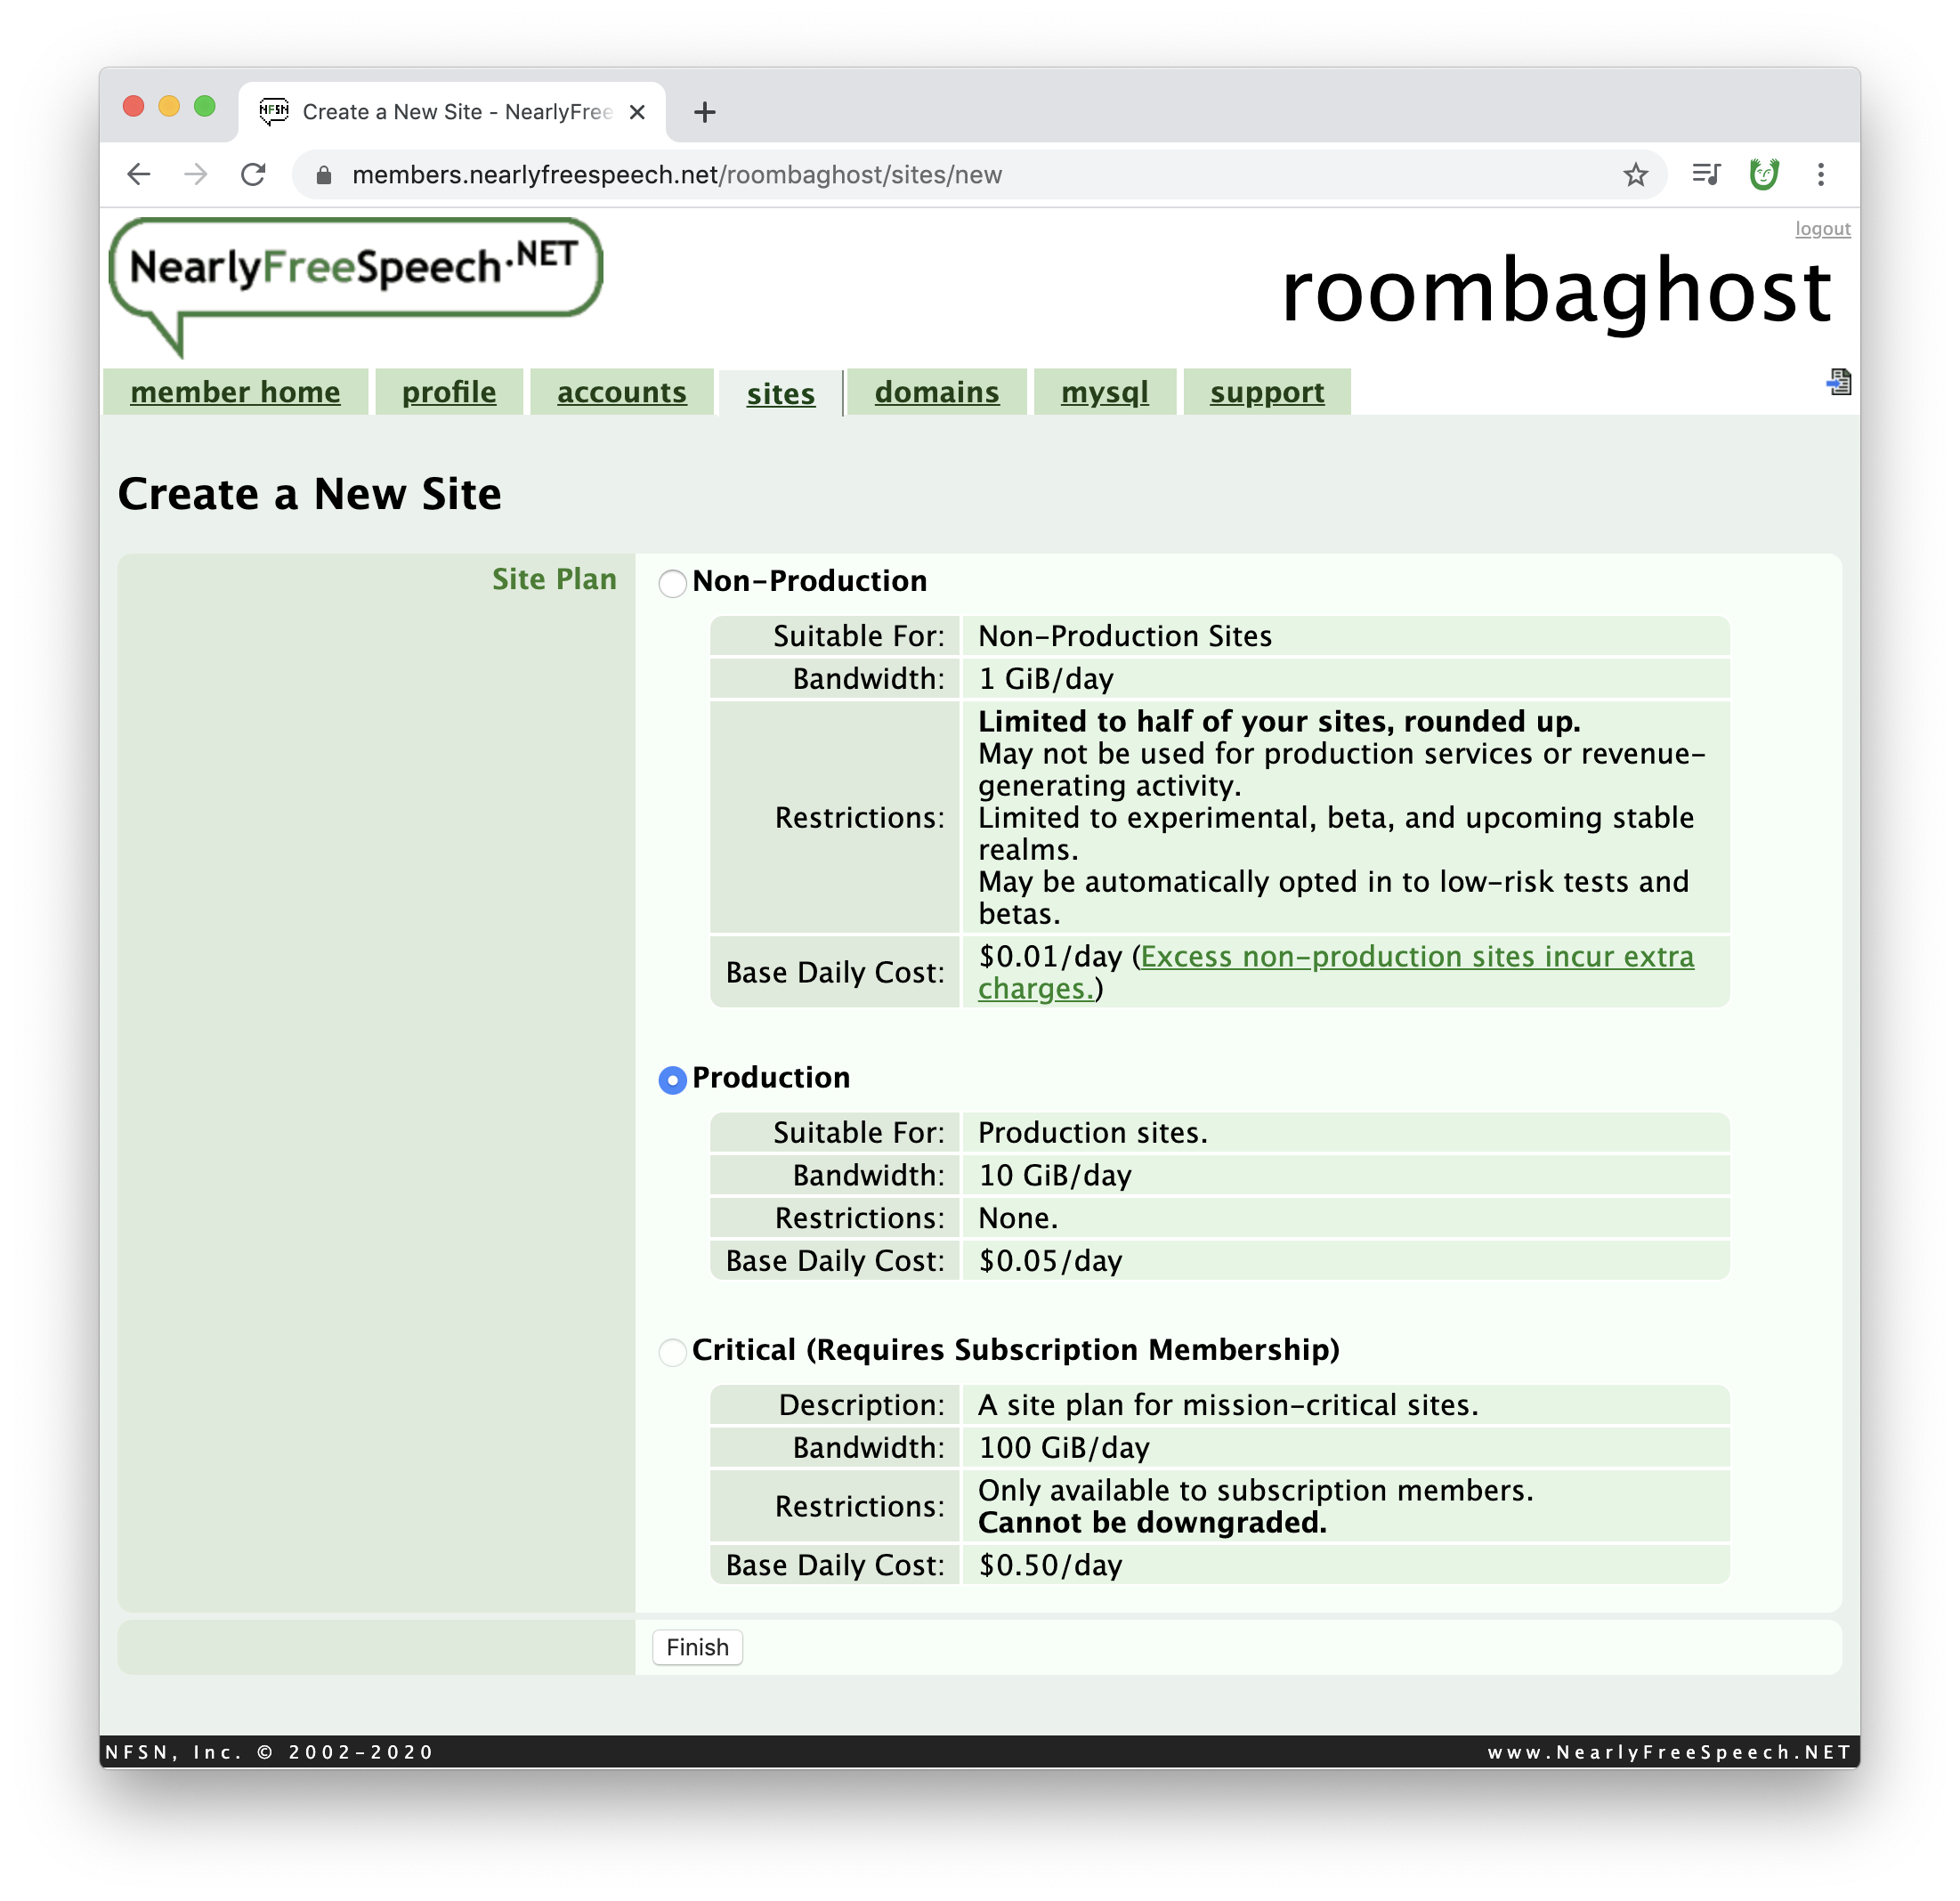
Choose the default Server Type, the first one (Apache 2.4, PHP, CGI).
Choose the default Site Plan, the "Production".
Note: Likely many of you you could instead choose "Non-Production" which is a little cheaper. But we recommend "Production" in case any of your sites get a lot of traffic since the bandwidth limit is a little higher.
Click "Finish"!
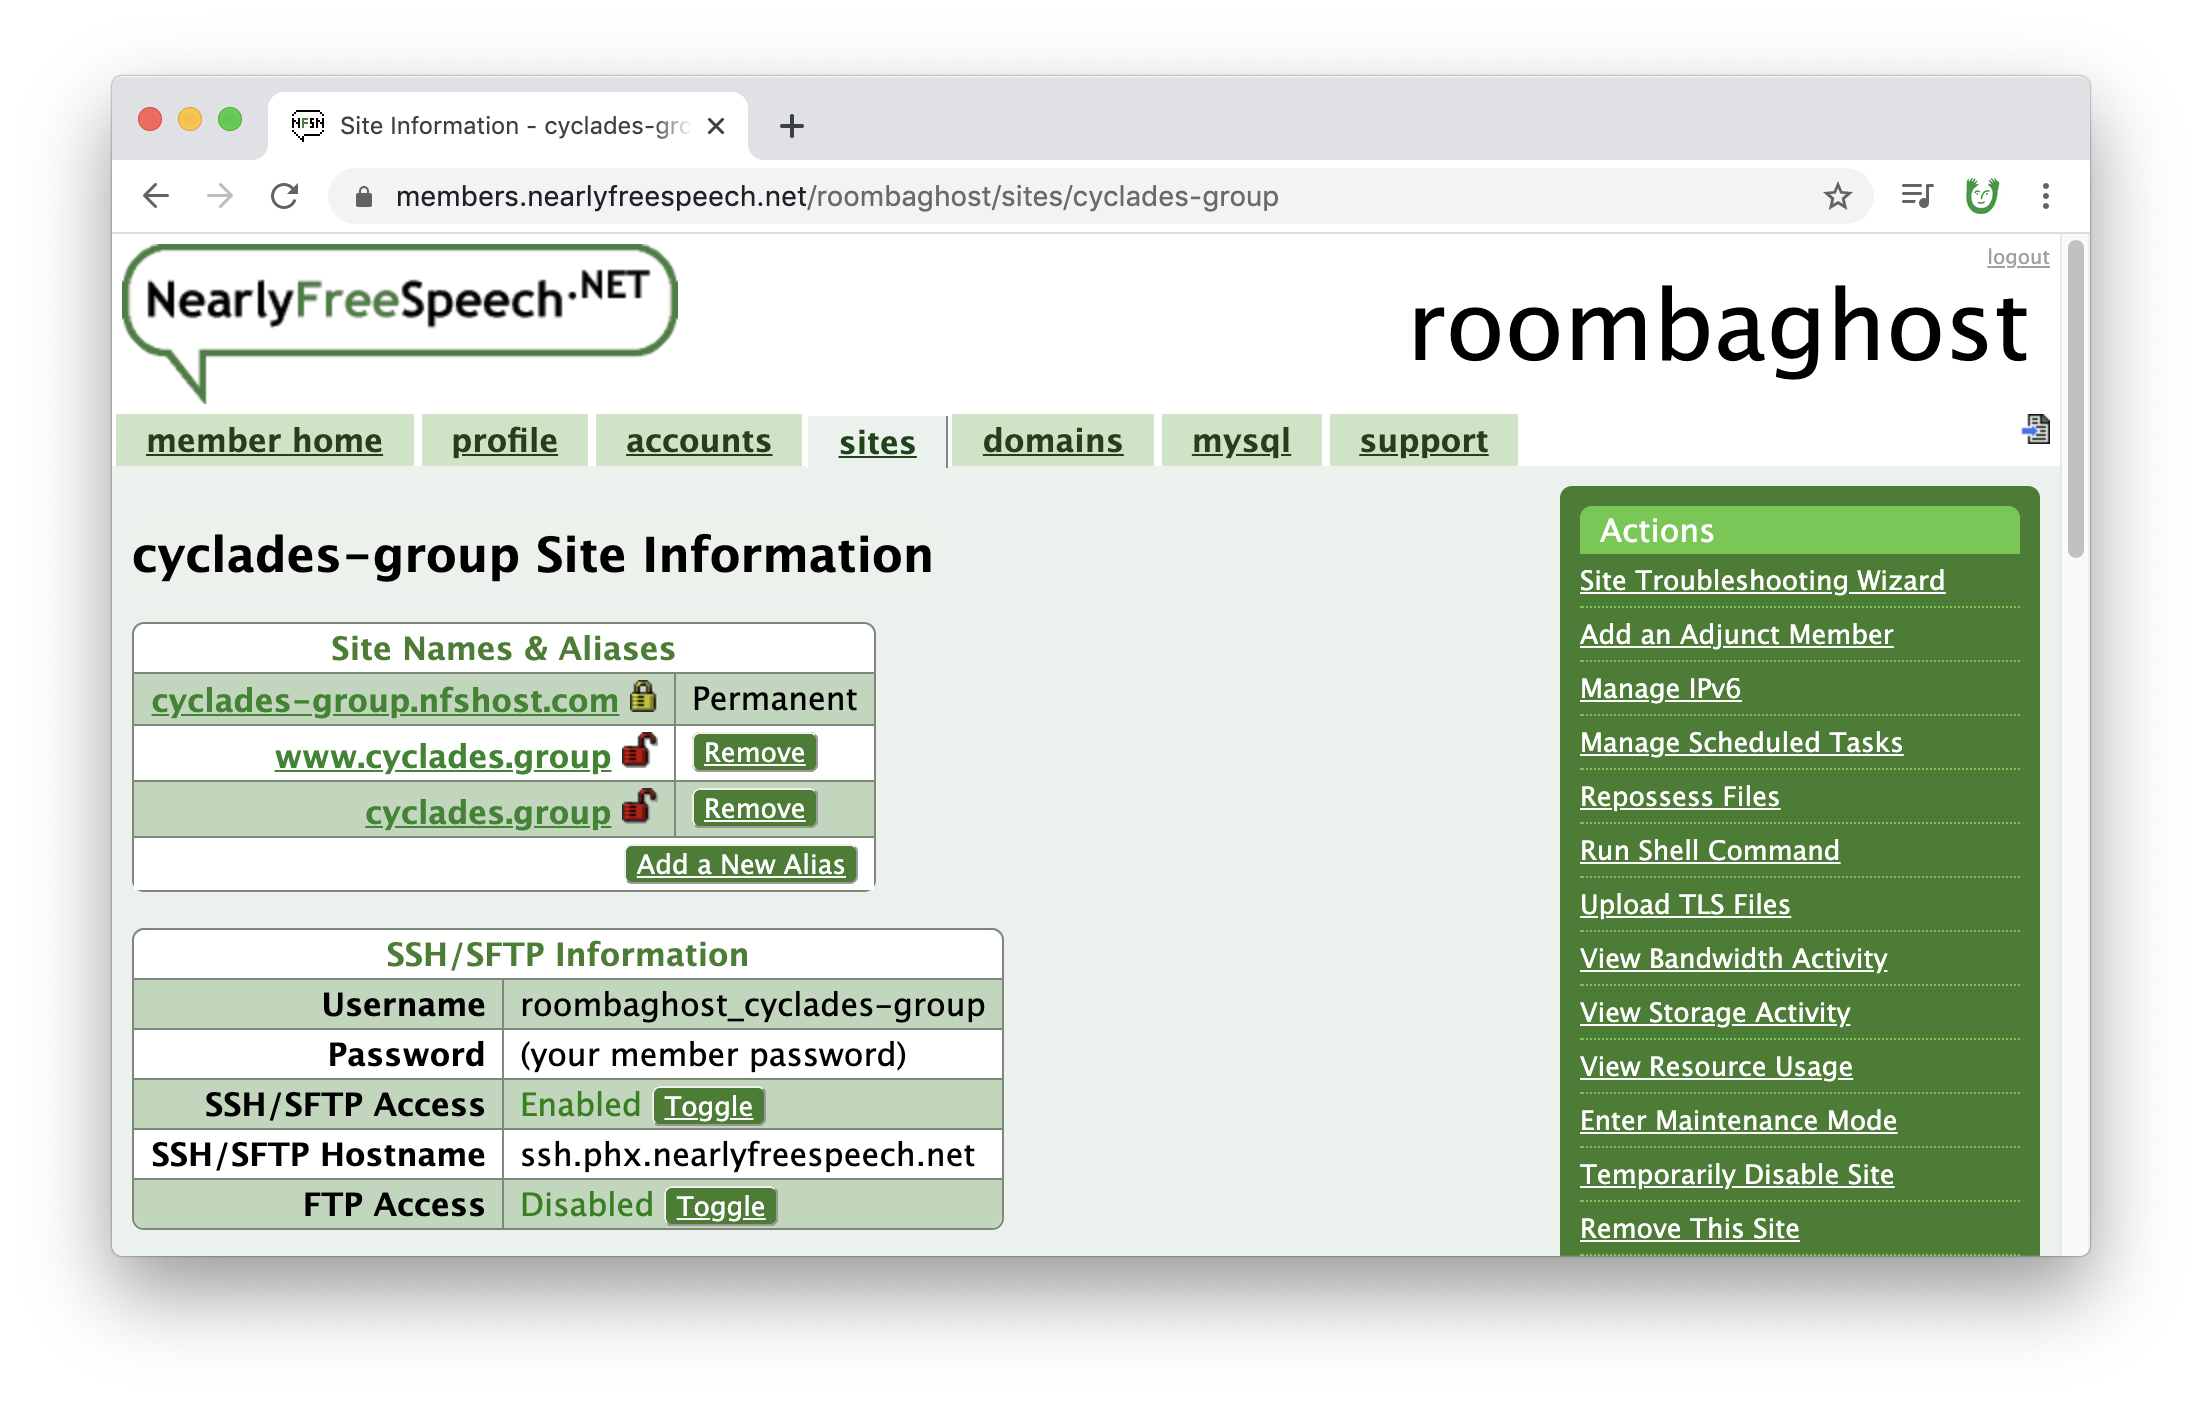
Finally, you should end up at this dashboard page about the site you just created!
This "site dashboard" is a helfpul page. We will come back to it in future steps. The areas we'll reference later include: "Site Names & Aliases", "SSH/SFTP Information", and "IP Address". Keep these handy for later...
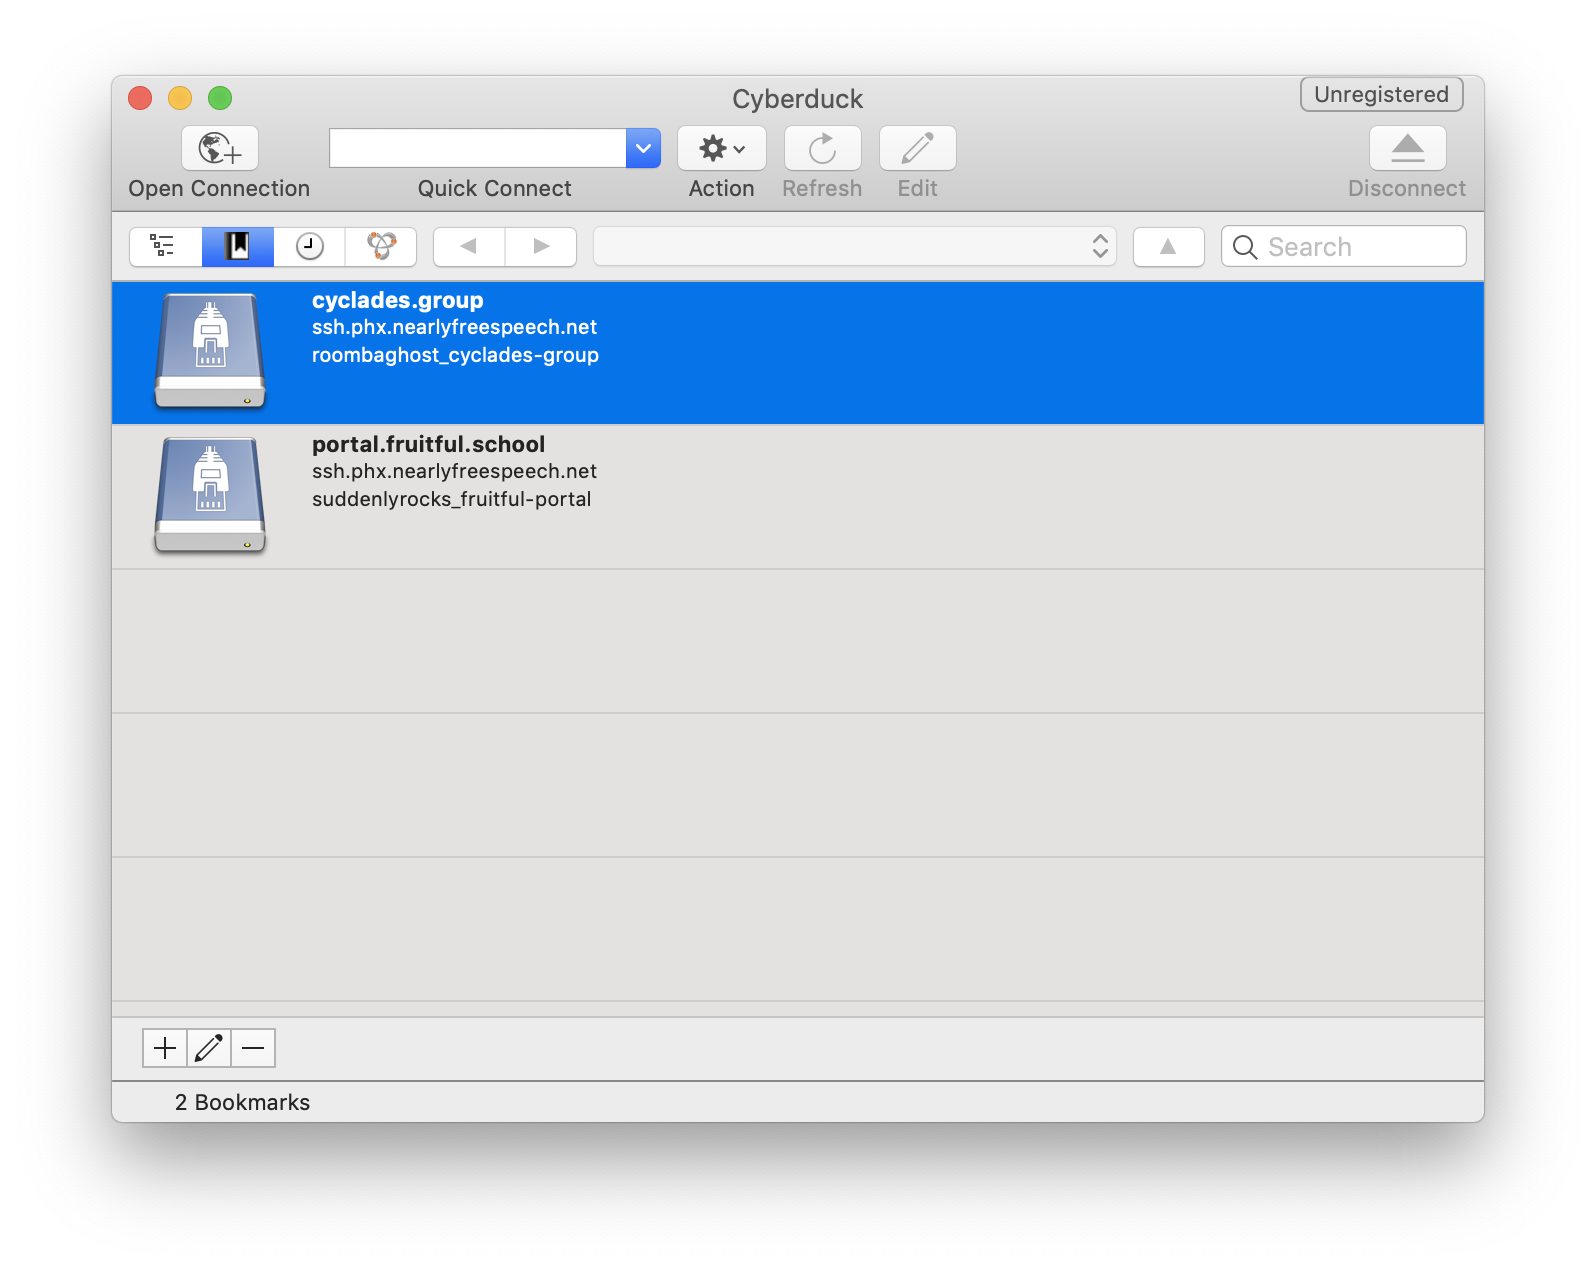
3. Connect to your new NFS hosting and upload something via SFTP with Cyberduck as a test
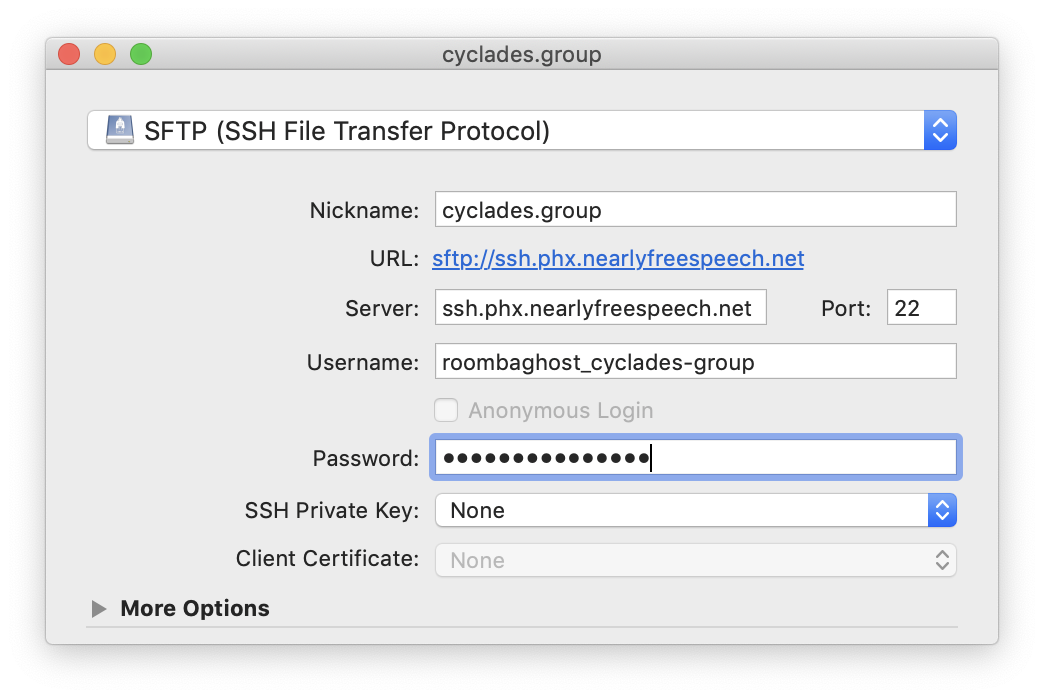
Now let's connect to this host using SFTP with our FTP client, 🦆 Cyberduck...
Open up 🦆 Cyberduck
Click the "+" button in the lower left corner
Change the upper dropdown to say "SFTP (SSH File Transfer Protocol)." Make sure to do this, if you select normal "FTP" it won't work.
You can fill in the nickname to be your site's title
Find that "SSH/SFTP information" from nearlyfreespeech.net...
Copy over the information into Cyberduck. Your password should be your account password for nearlyfreespeech.net.
There is no "Done" button, so just press the red circle to close in the upper left corner.
You should now see that you added a bookmark to your 🦆 Cyberduck home. You'll see your site's nickname there. Double click on it to open...
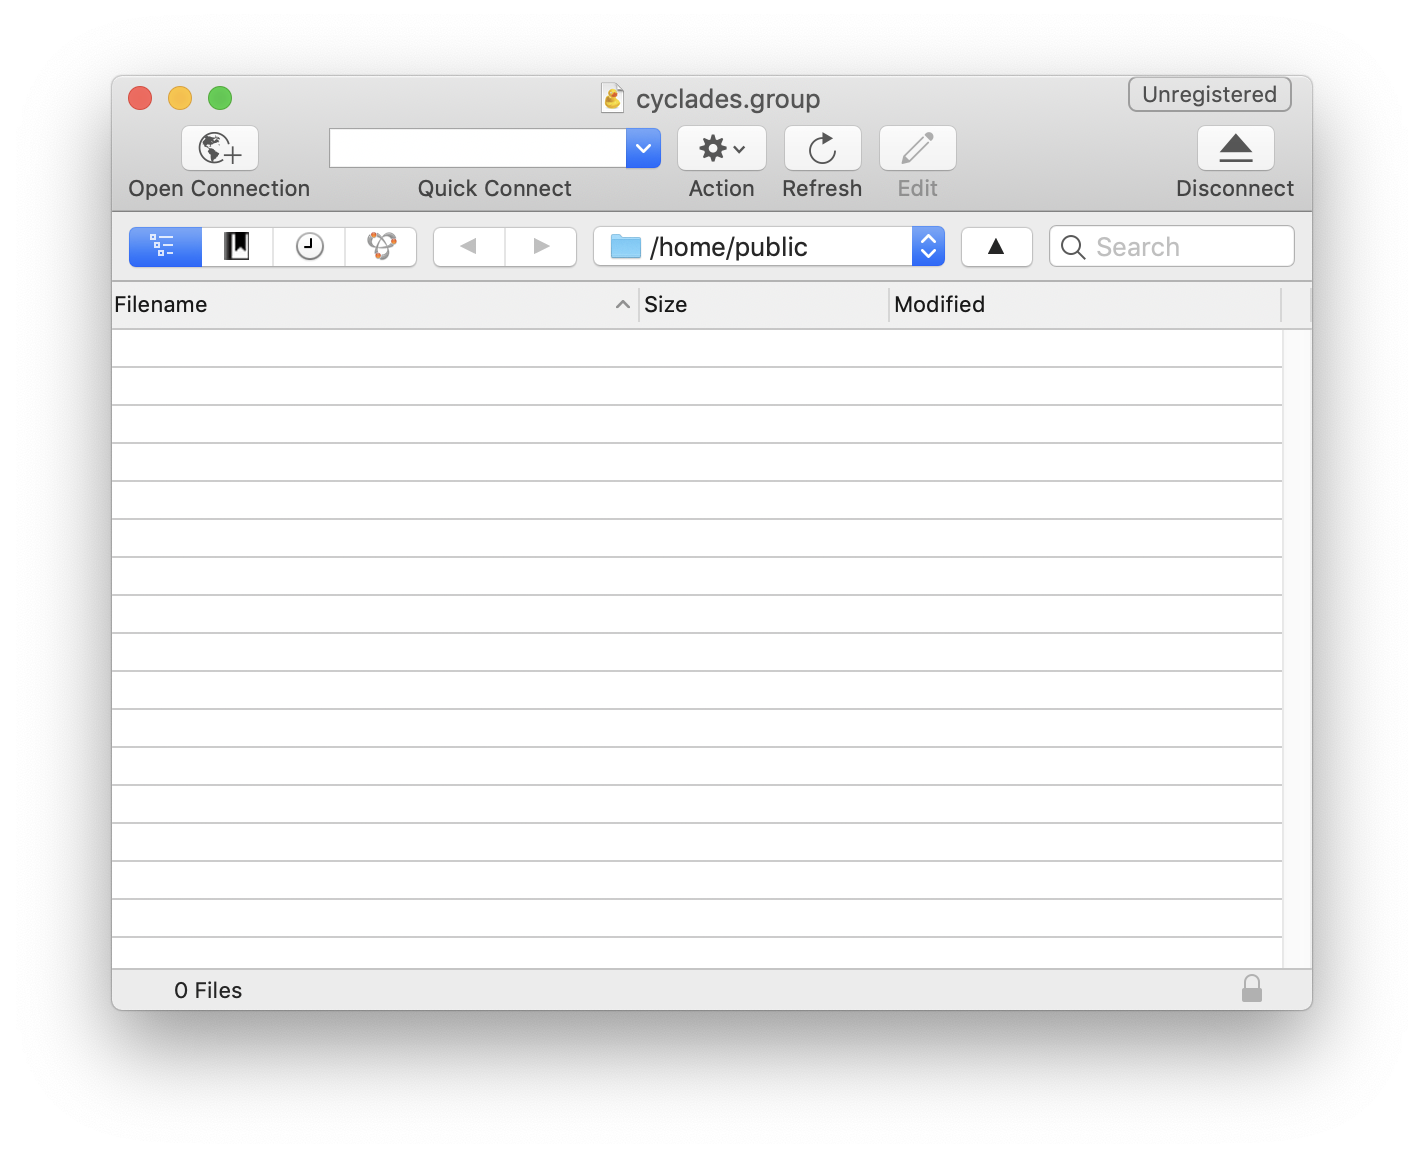
You should see an empty area because there are no files here yet.
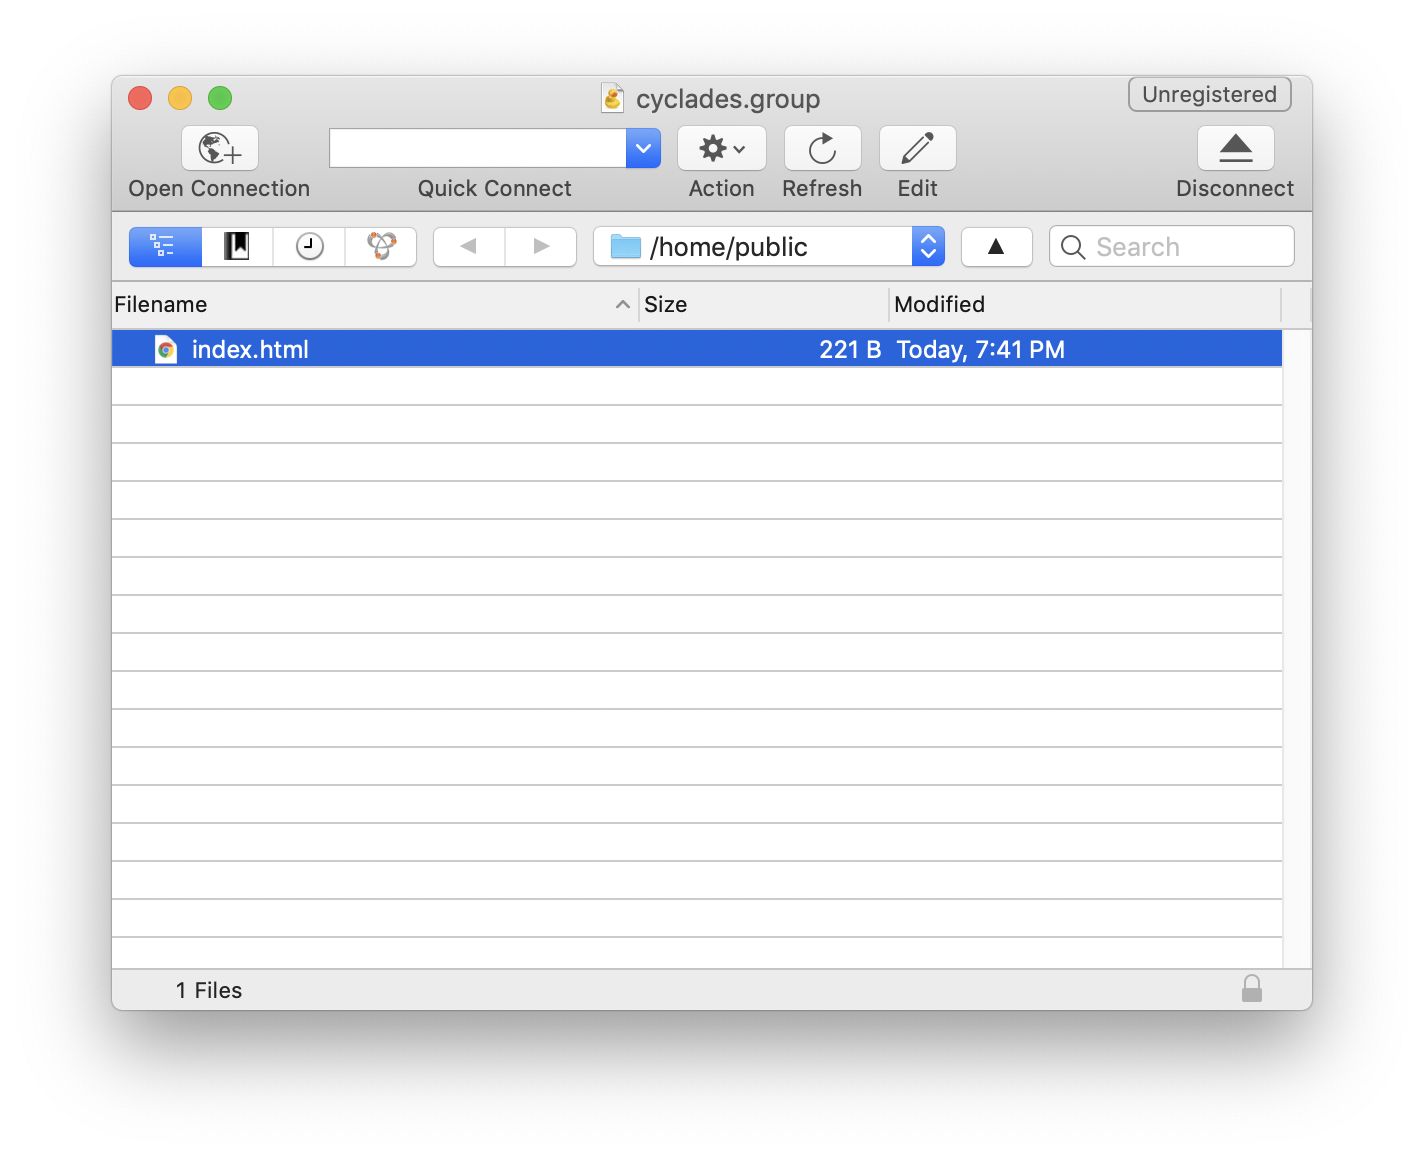
Try creating a new file in your text editor called index.html, as a test...
I first used GitHub when I was working in a professional coding setting with others (this was the design studio Linked by Air for me). There, I needed to collaborate with my co-workers on the same code base. It felt really pro to use GitHub, but also it took me a long time to fully understand. A lot of the confusing aspects of git and GitHub are put into place so that code isn't accidentally deleted.
When we use GitHub for its hosting product GitHub Pages, we aren't using a lot of its powerful functionality including collaborative and version control features. So it might seem confusing at first...
Here is some GitHub-specific vocabulary that might be useful...
repository
a vessel / container for a single project on GitHub
push
upload / update changes to the repository
pull
download / update changes from the repository
commit
the preliminary step before you push, this is a way of saving your changes / updates to the repository. every commit needs a "commit message" that describes what you are updating
Before we begin...
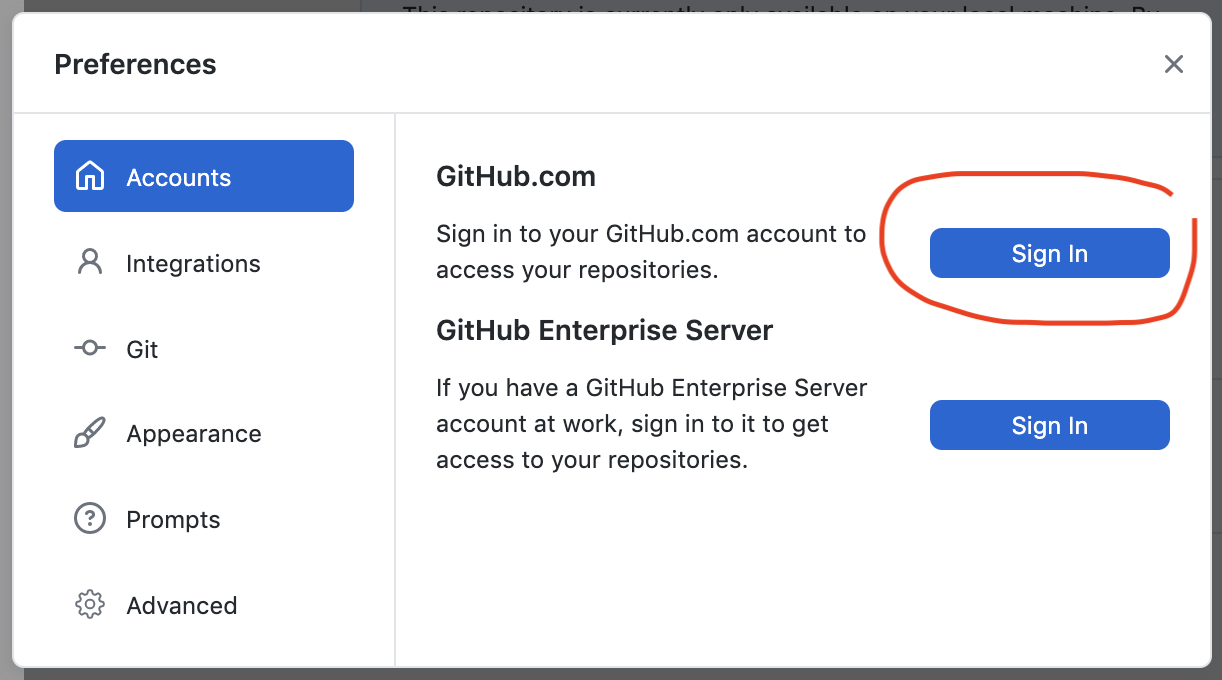
If you don't already have an account on GitHub, create one.
From here, sign into your GitHub account by going to GitHub Desktop / Preferences in the upper bar navigation.
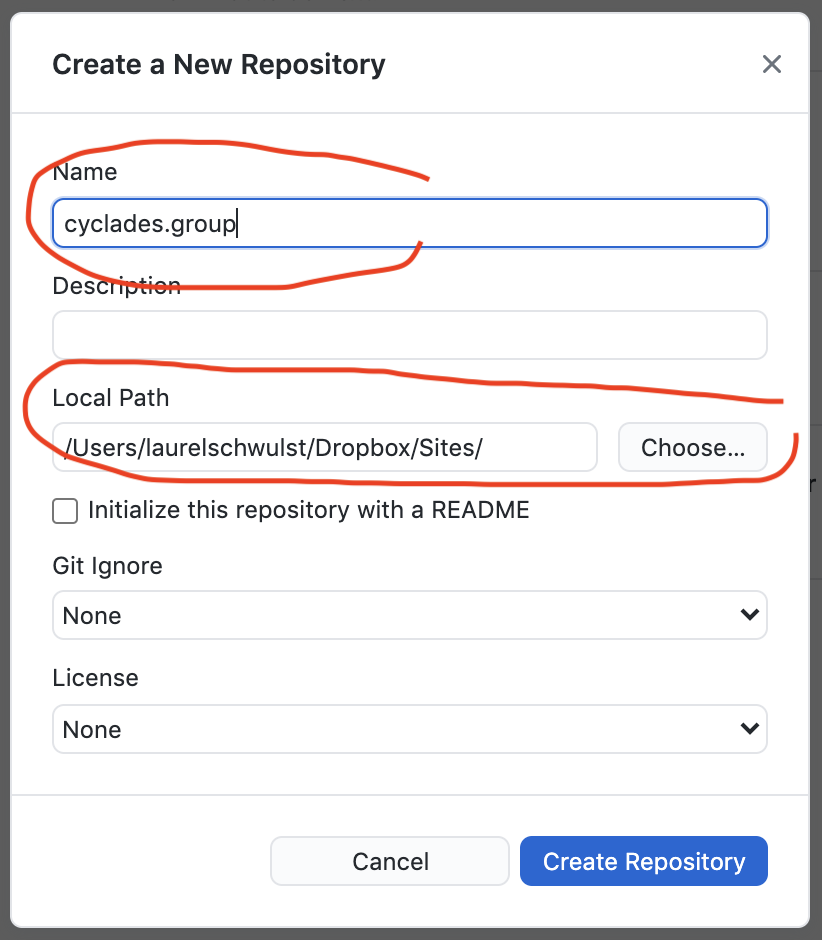
From here, find a menu or link that allows you to "Create a new repository". It might be hiding in the left menu.
In the popup that follows, insert a name for your repository. I would recommend using the domain name that you registered, but it could be something else too.
You will also want to specify where your repository lives. I chose my "Sites" folder, which is where all my sites live on my computer. (Personally, mine are in my Dropbox, but up to you where this is.)
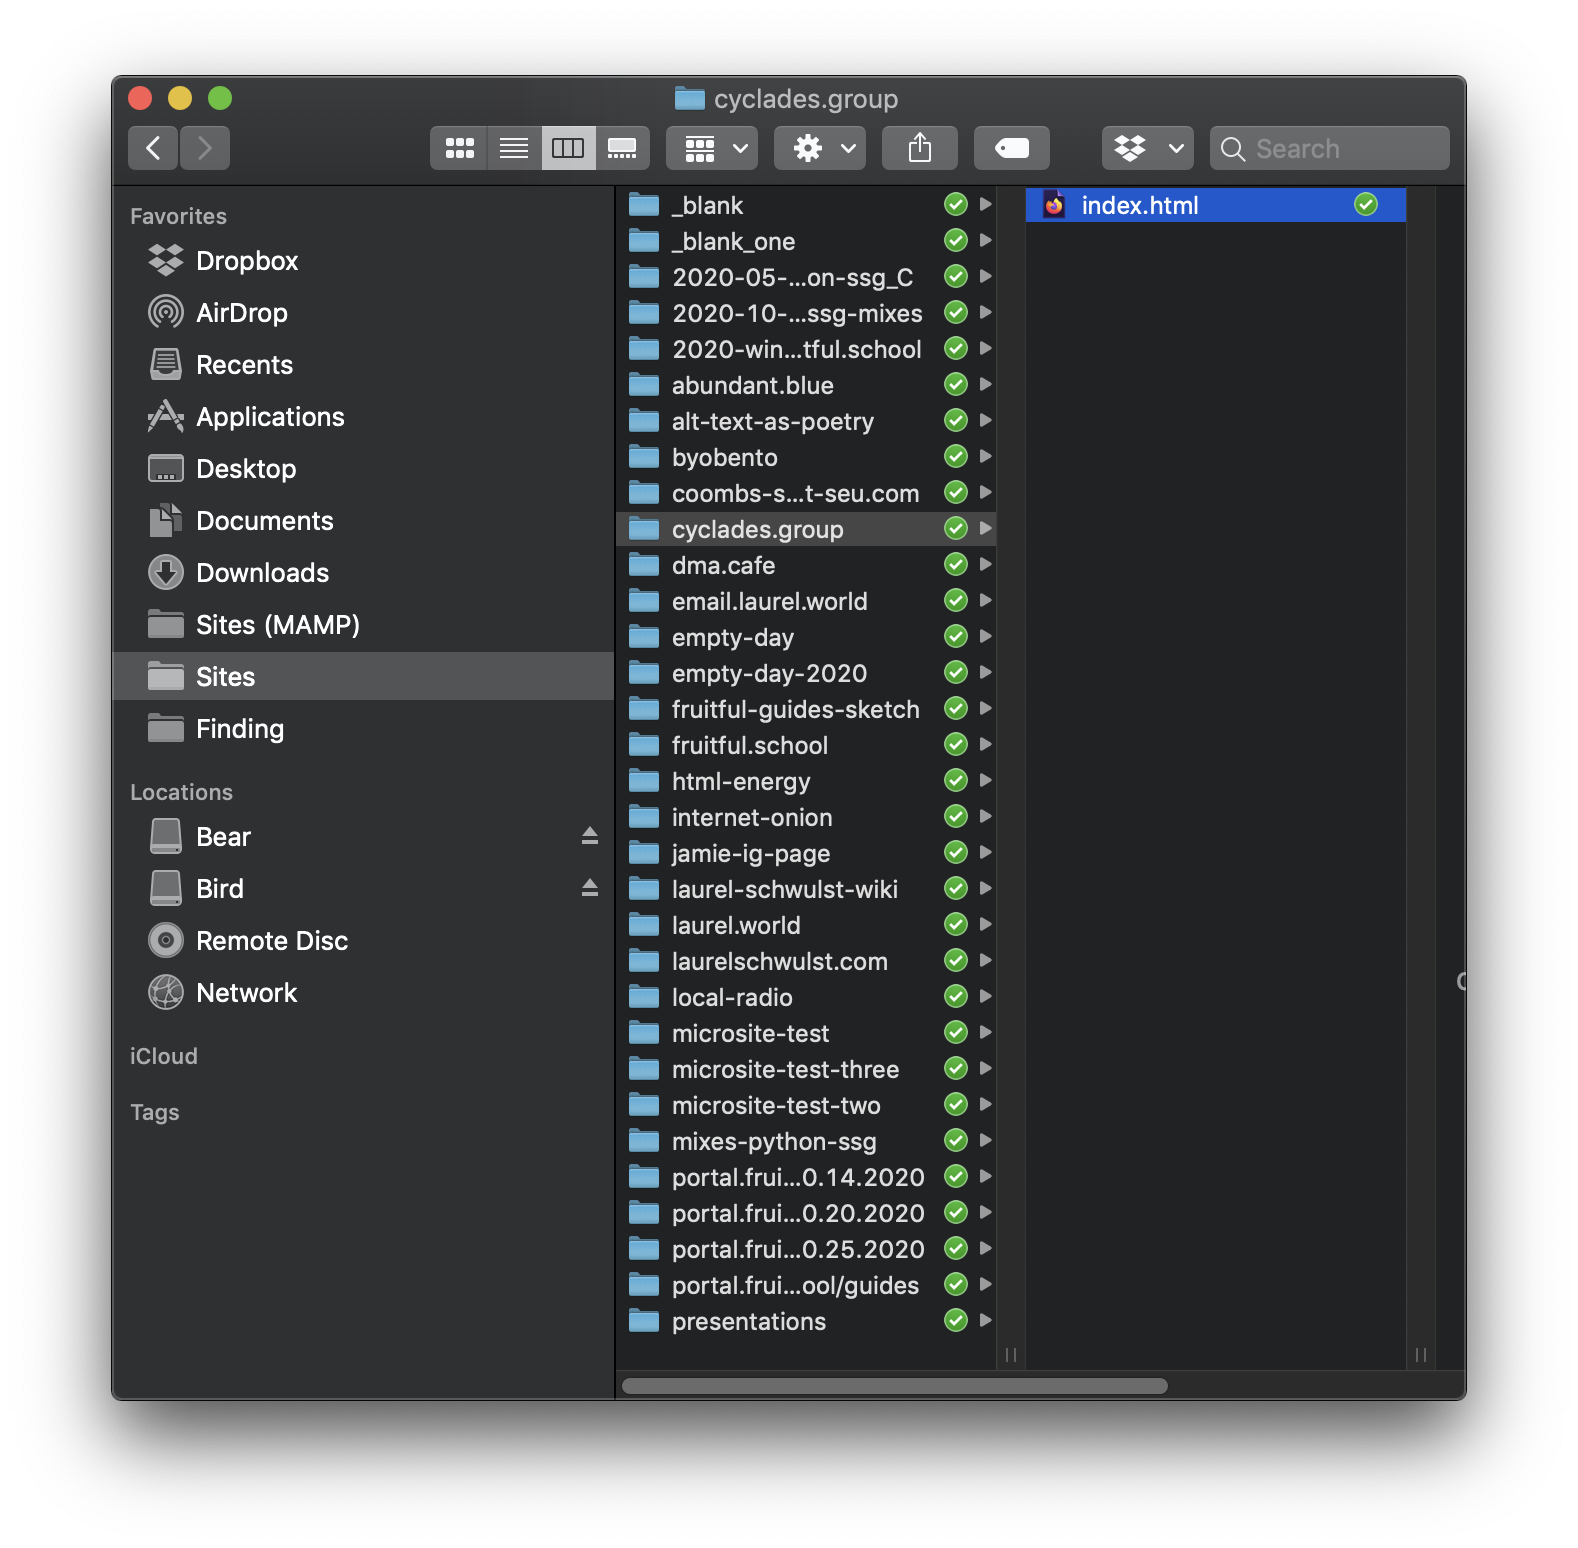
Once you do this, you will see that GitHub Desktop has created a new folder inside your "Sites" folder (or wherever you specified your repository to be saved) titled whatever you called your repository.
2. Push a test to this repository to see that it's working
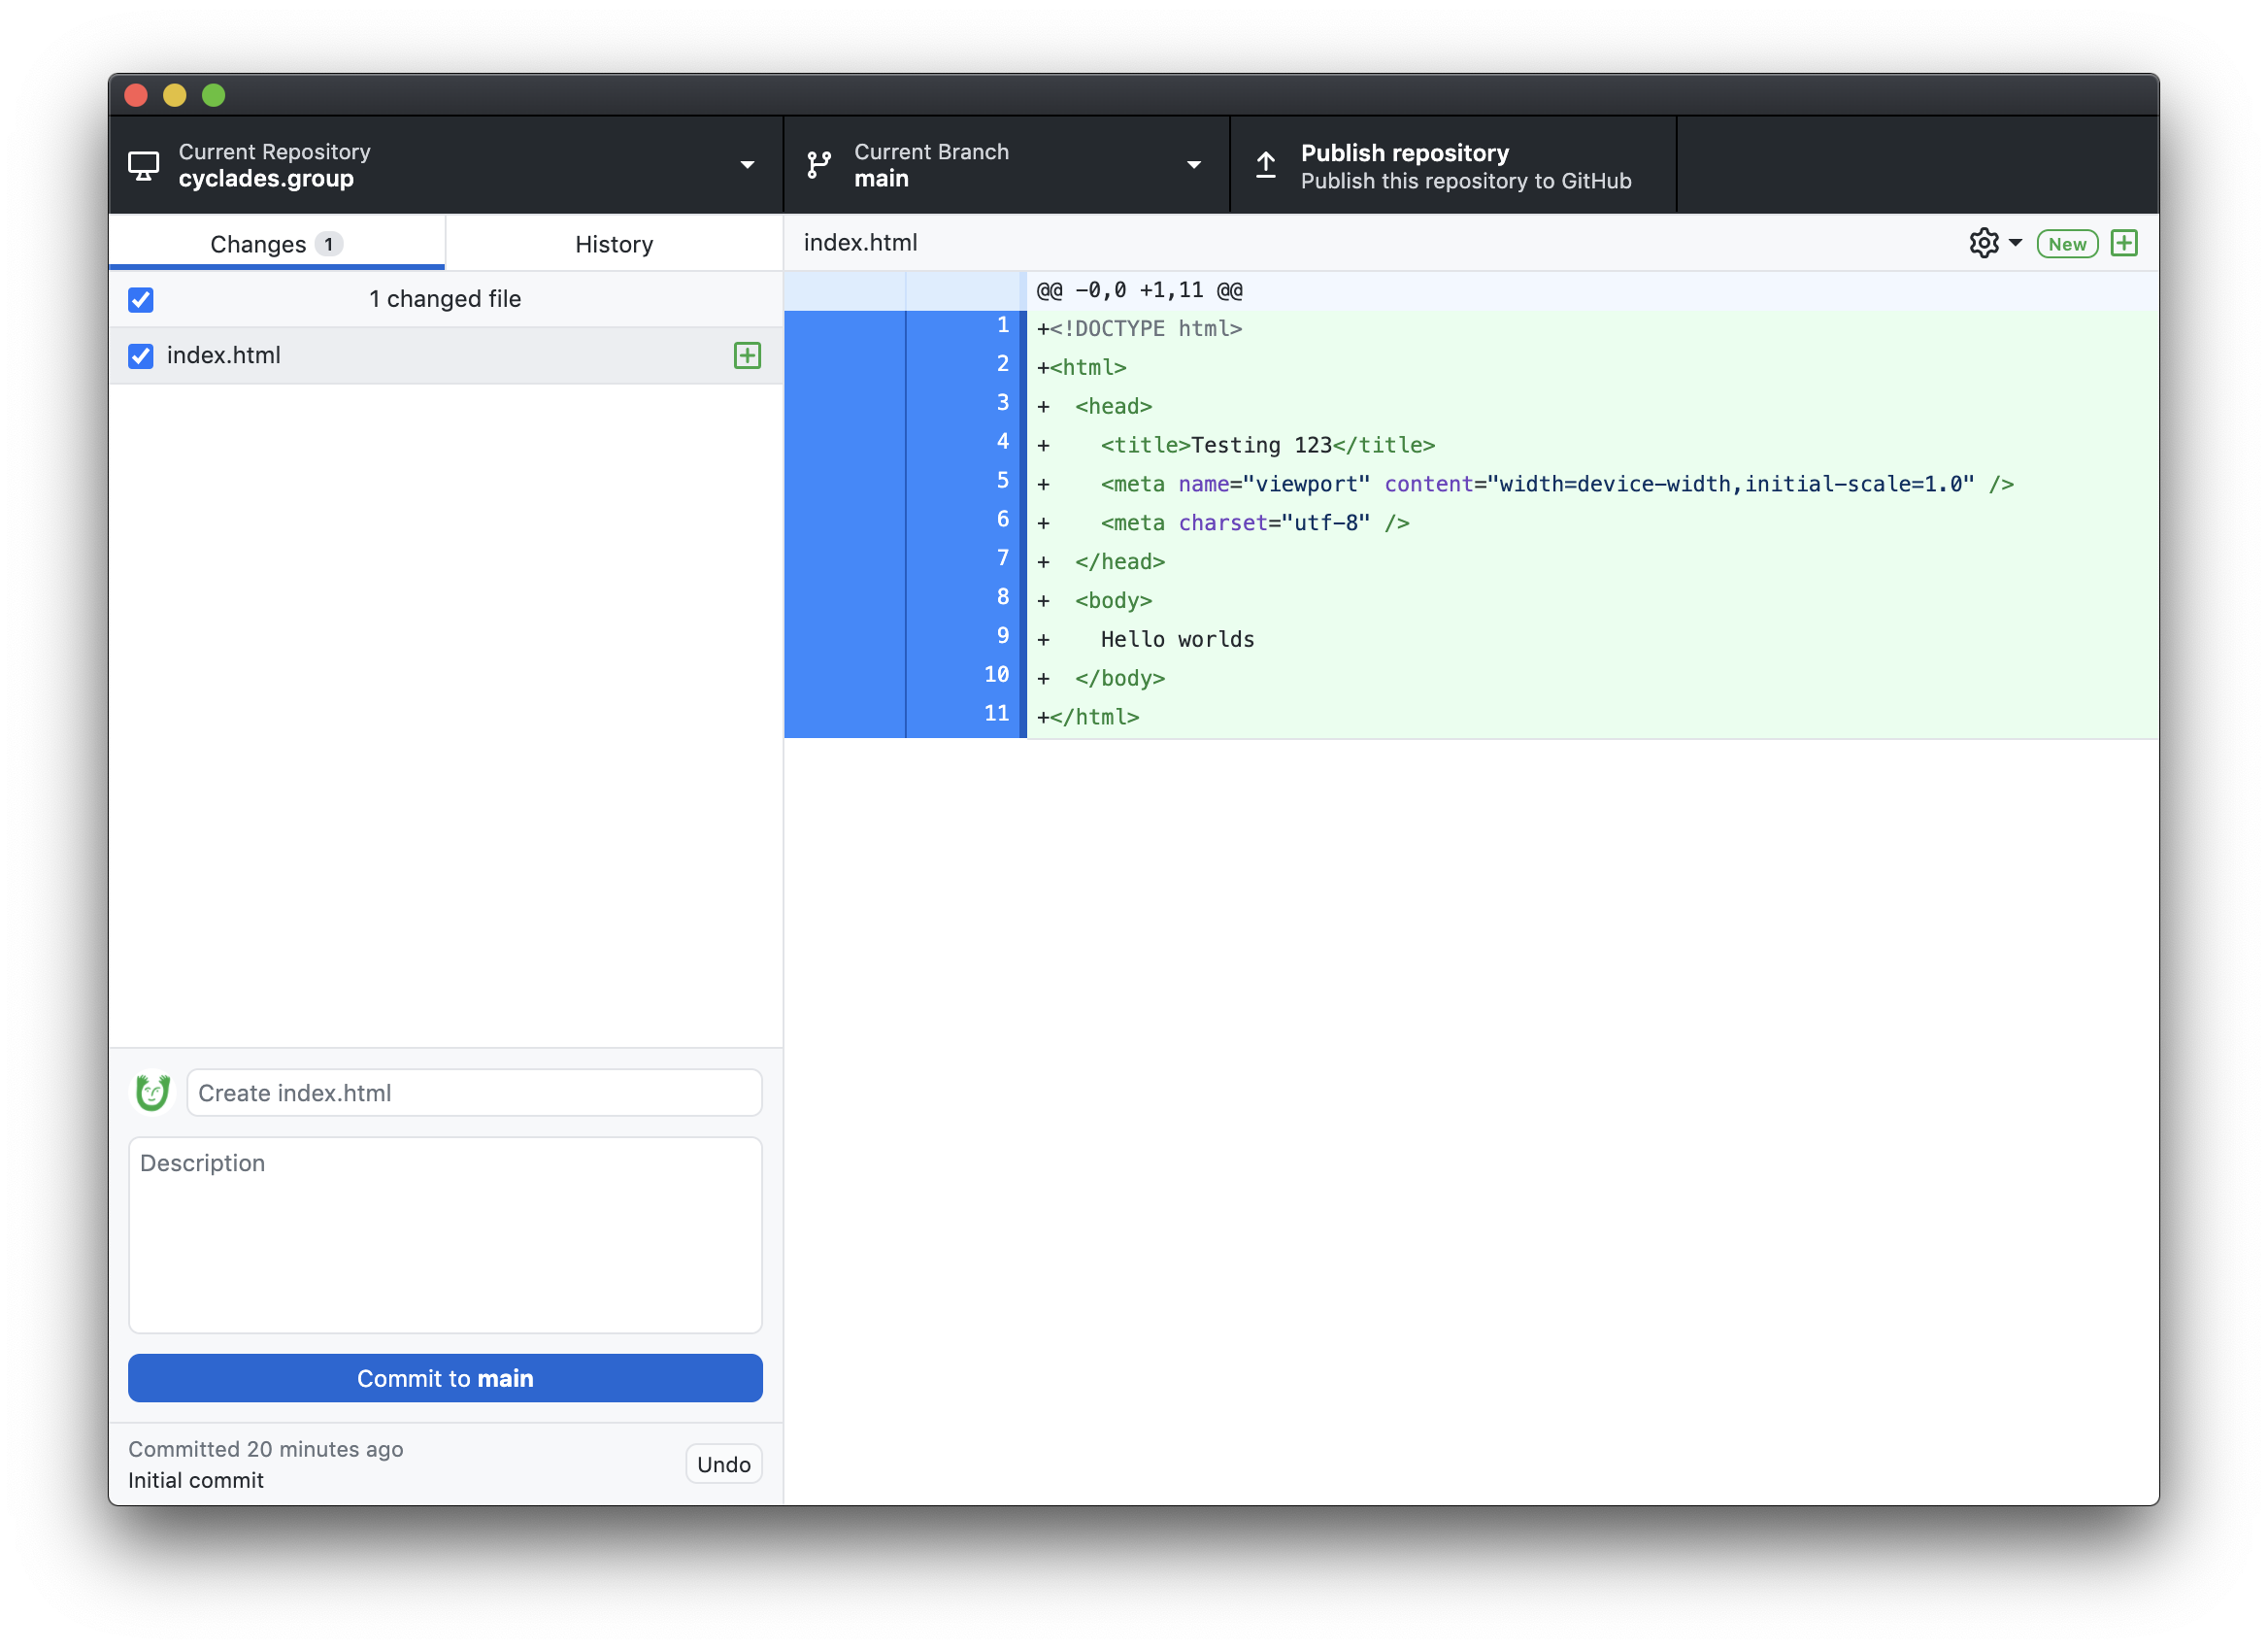
Now, try creating a new file in your text editor called index.html, as a test...
Then save this index.html inside of your repository's folder.
When you return to your GitHub Desktop app, you should notice a change. It sees that you added a file. That's why you see some text highlighted in green on the right.
Next, you'll want to:
1. Write a "commit" message (describing what you changed / updated)
2. Press the "Commit to main" blue button
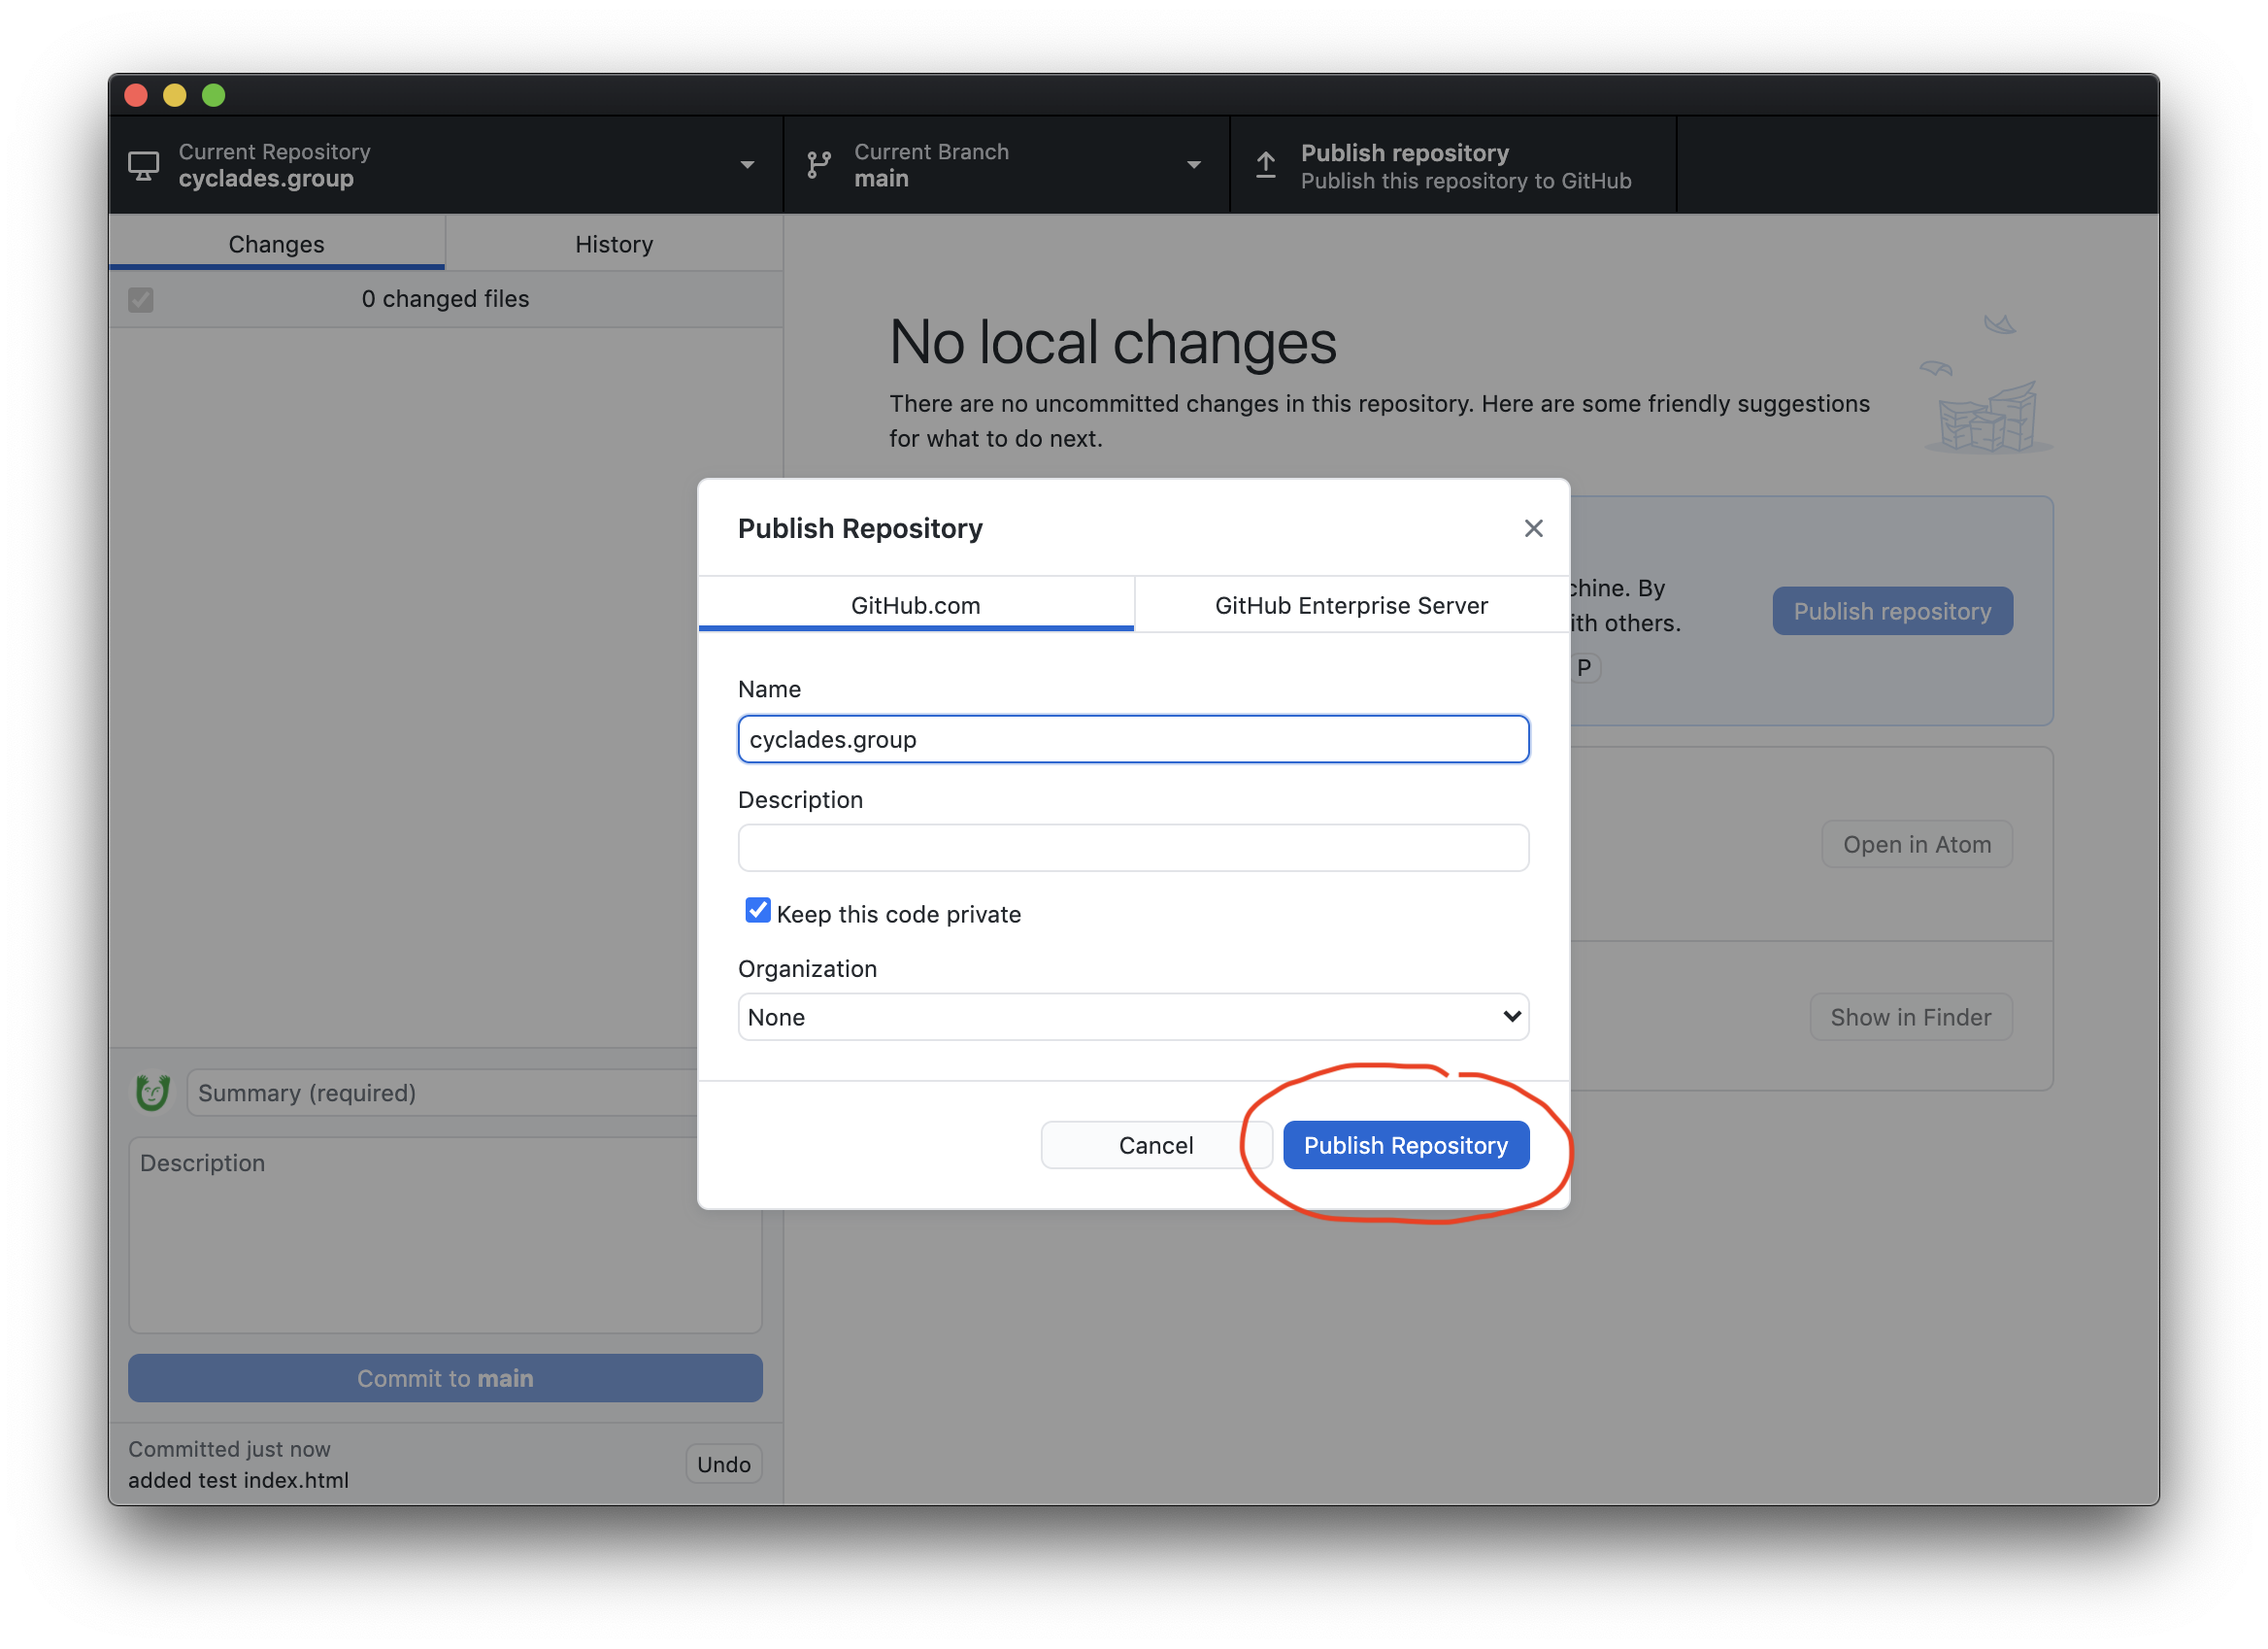
After that...
3. Press the "Publish repository" button at the top.
And finally, you'll get a popup. Press the blue "Publish Repository" button. (Up to you if you want to keep your code private or not.) This will make your local code on your computer go online, to your repository on GitHub.
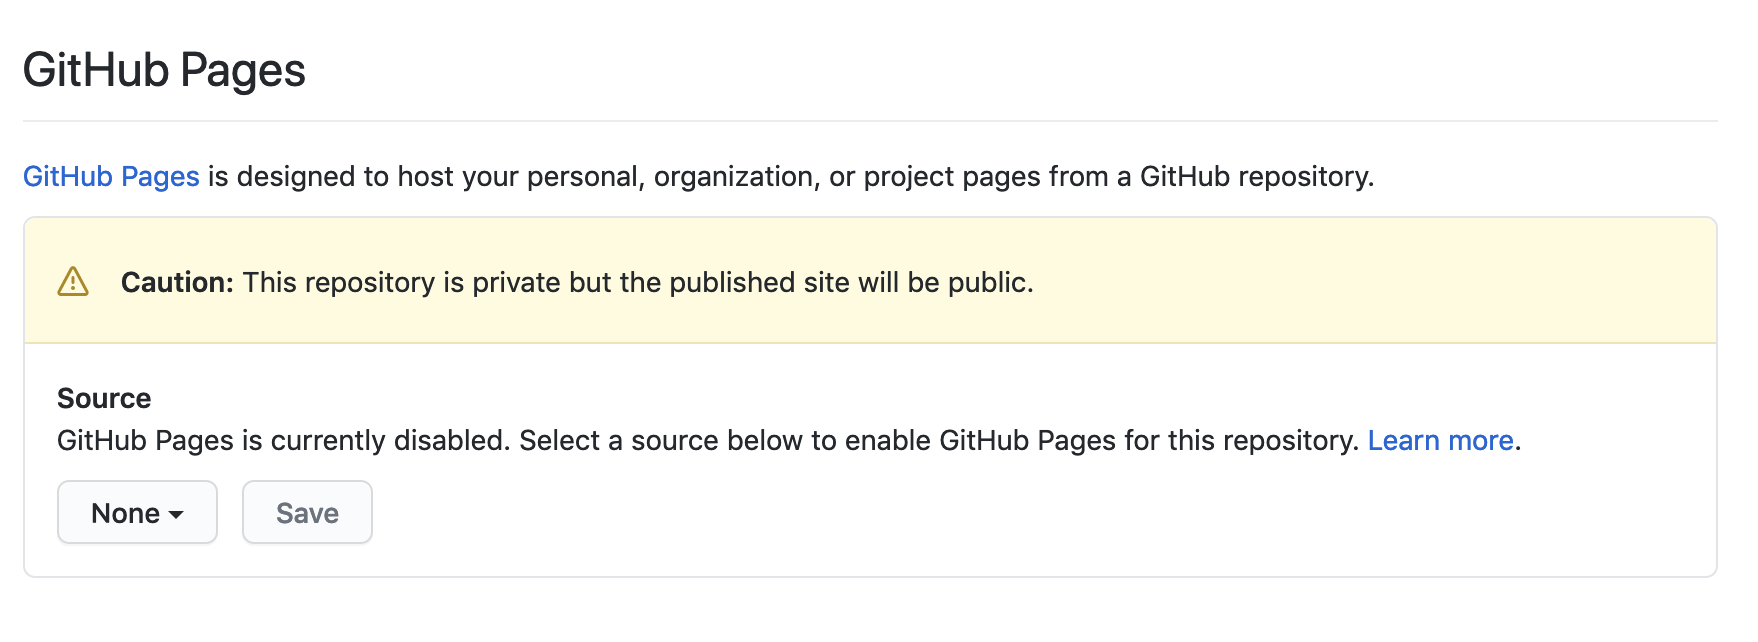
3. Enable GitHub Pages on the repository
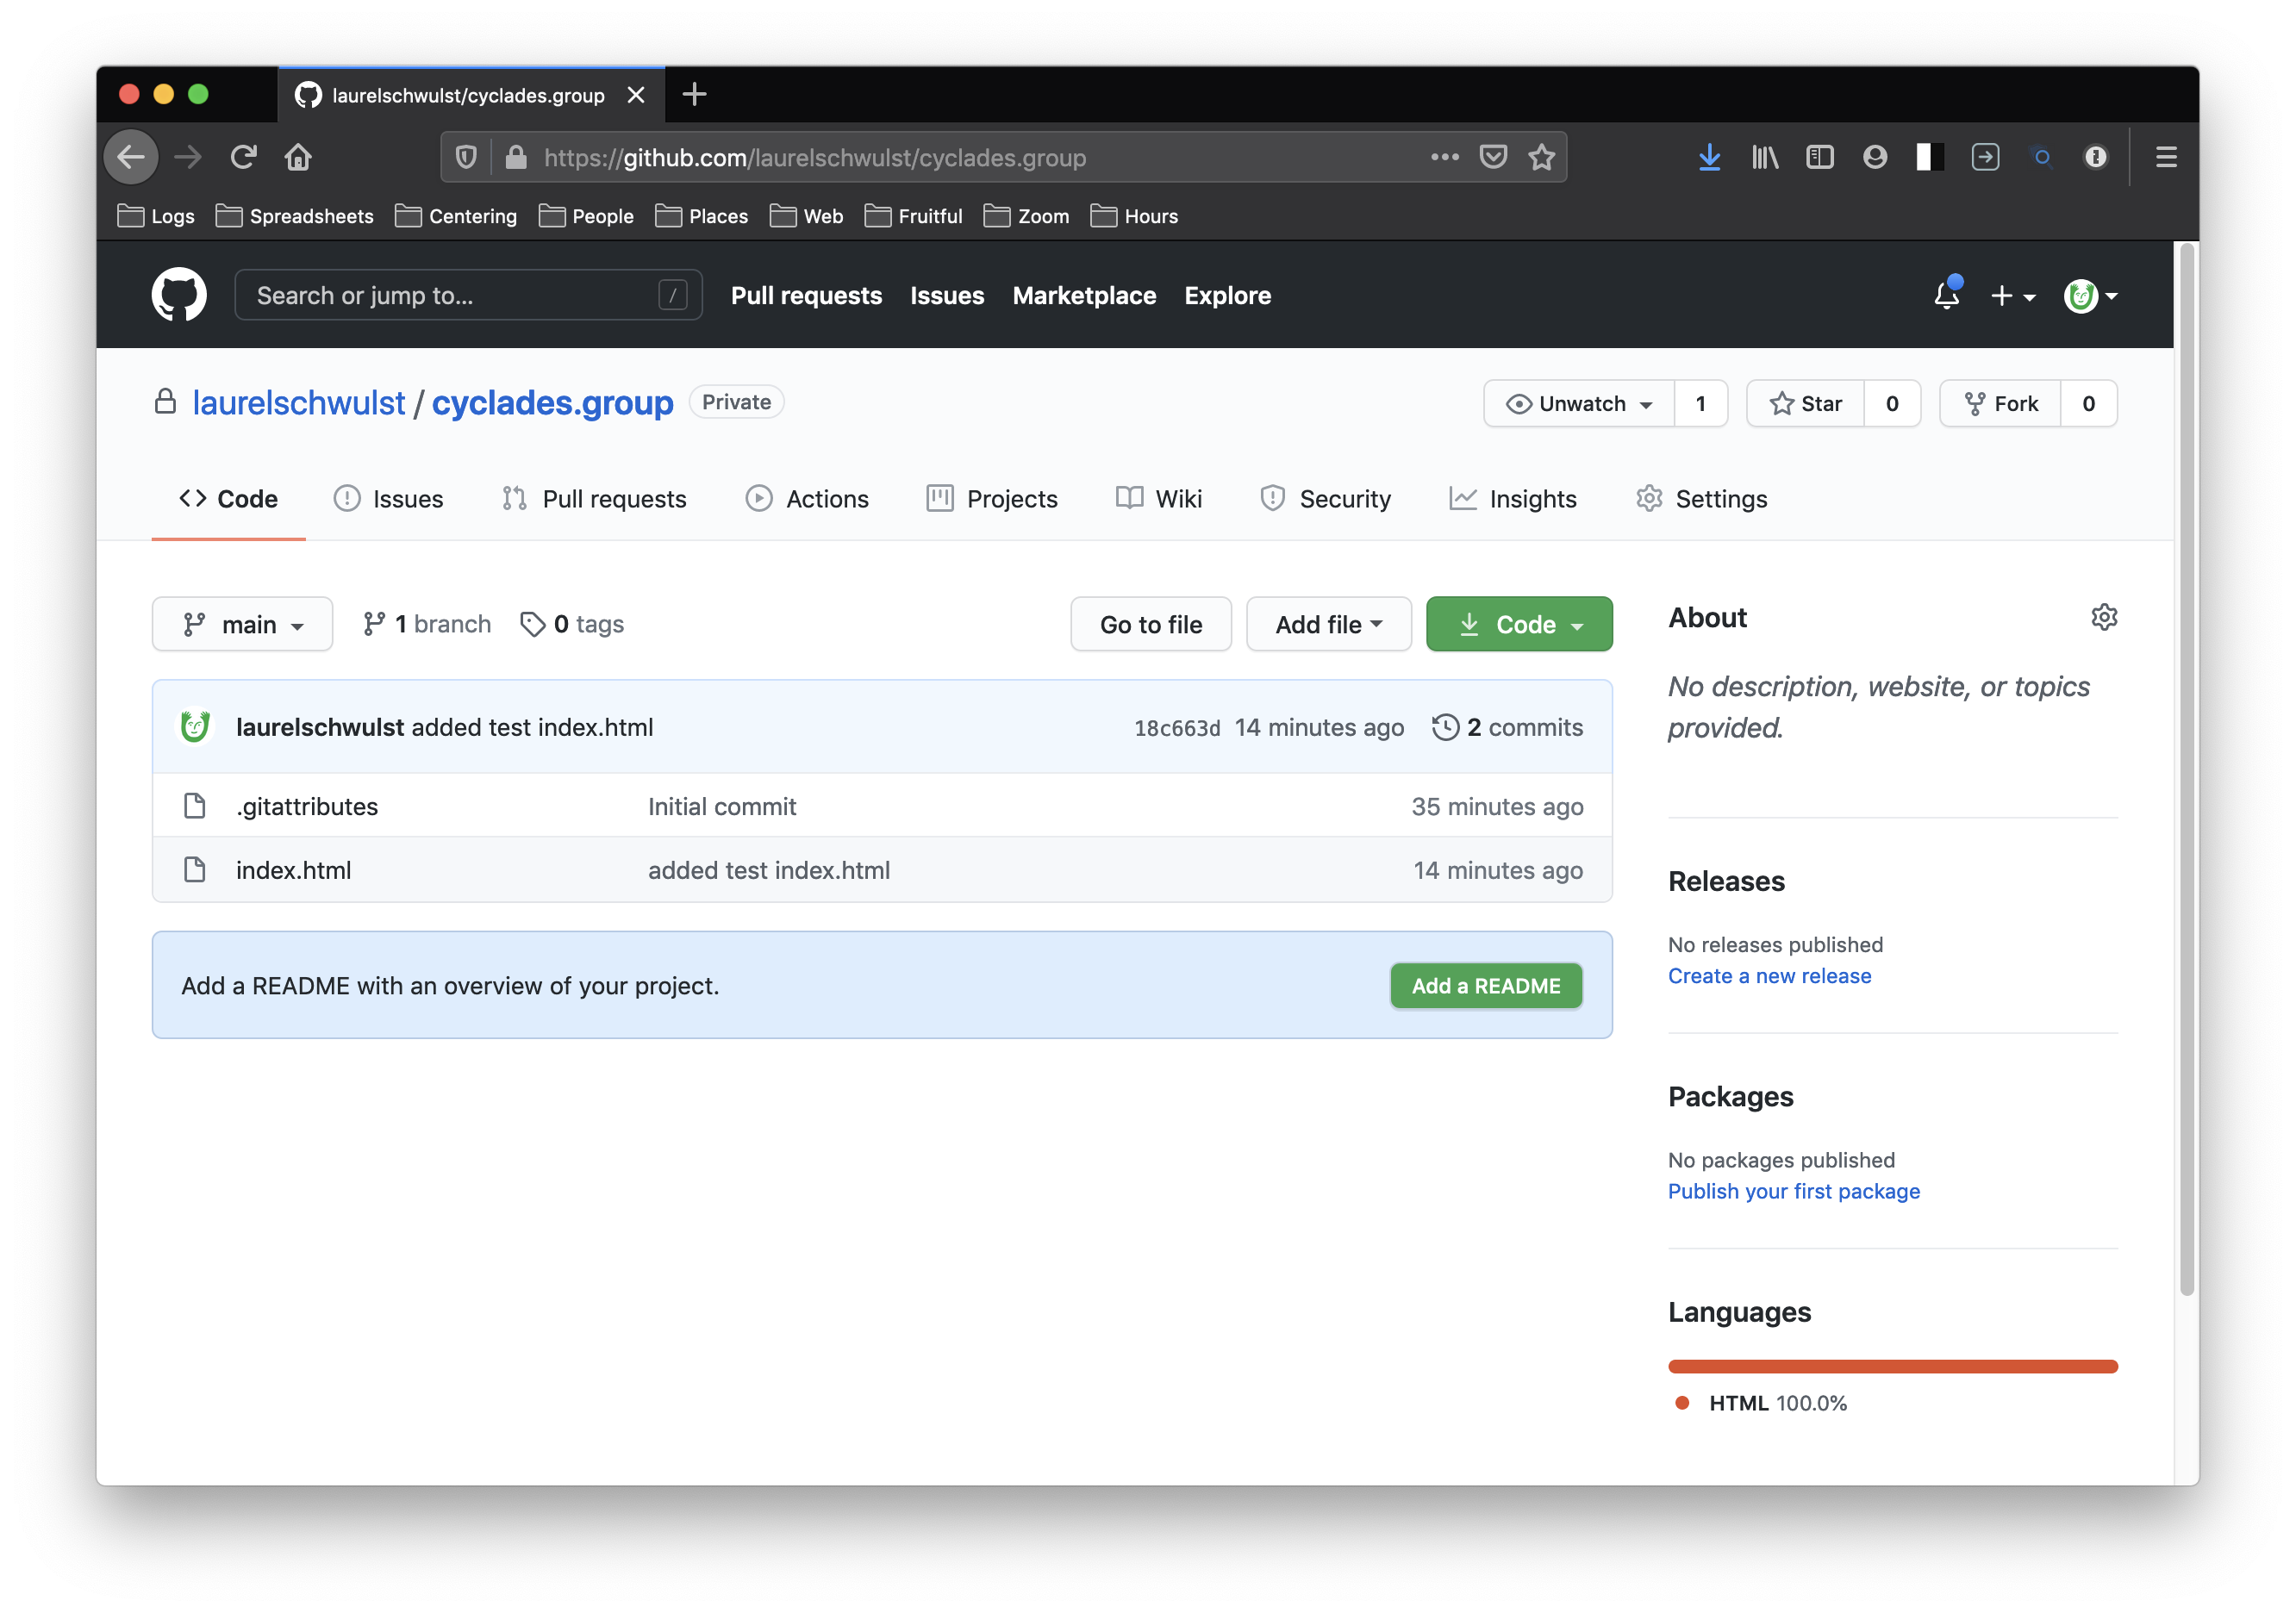
Now that we uploaded to GitHub, let's navigate to the repository's page on github.com. Make sure you're logged in.
The URL should be something like: http://github.com/(your github username here)/(your repository name here)
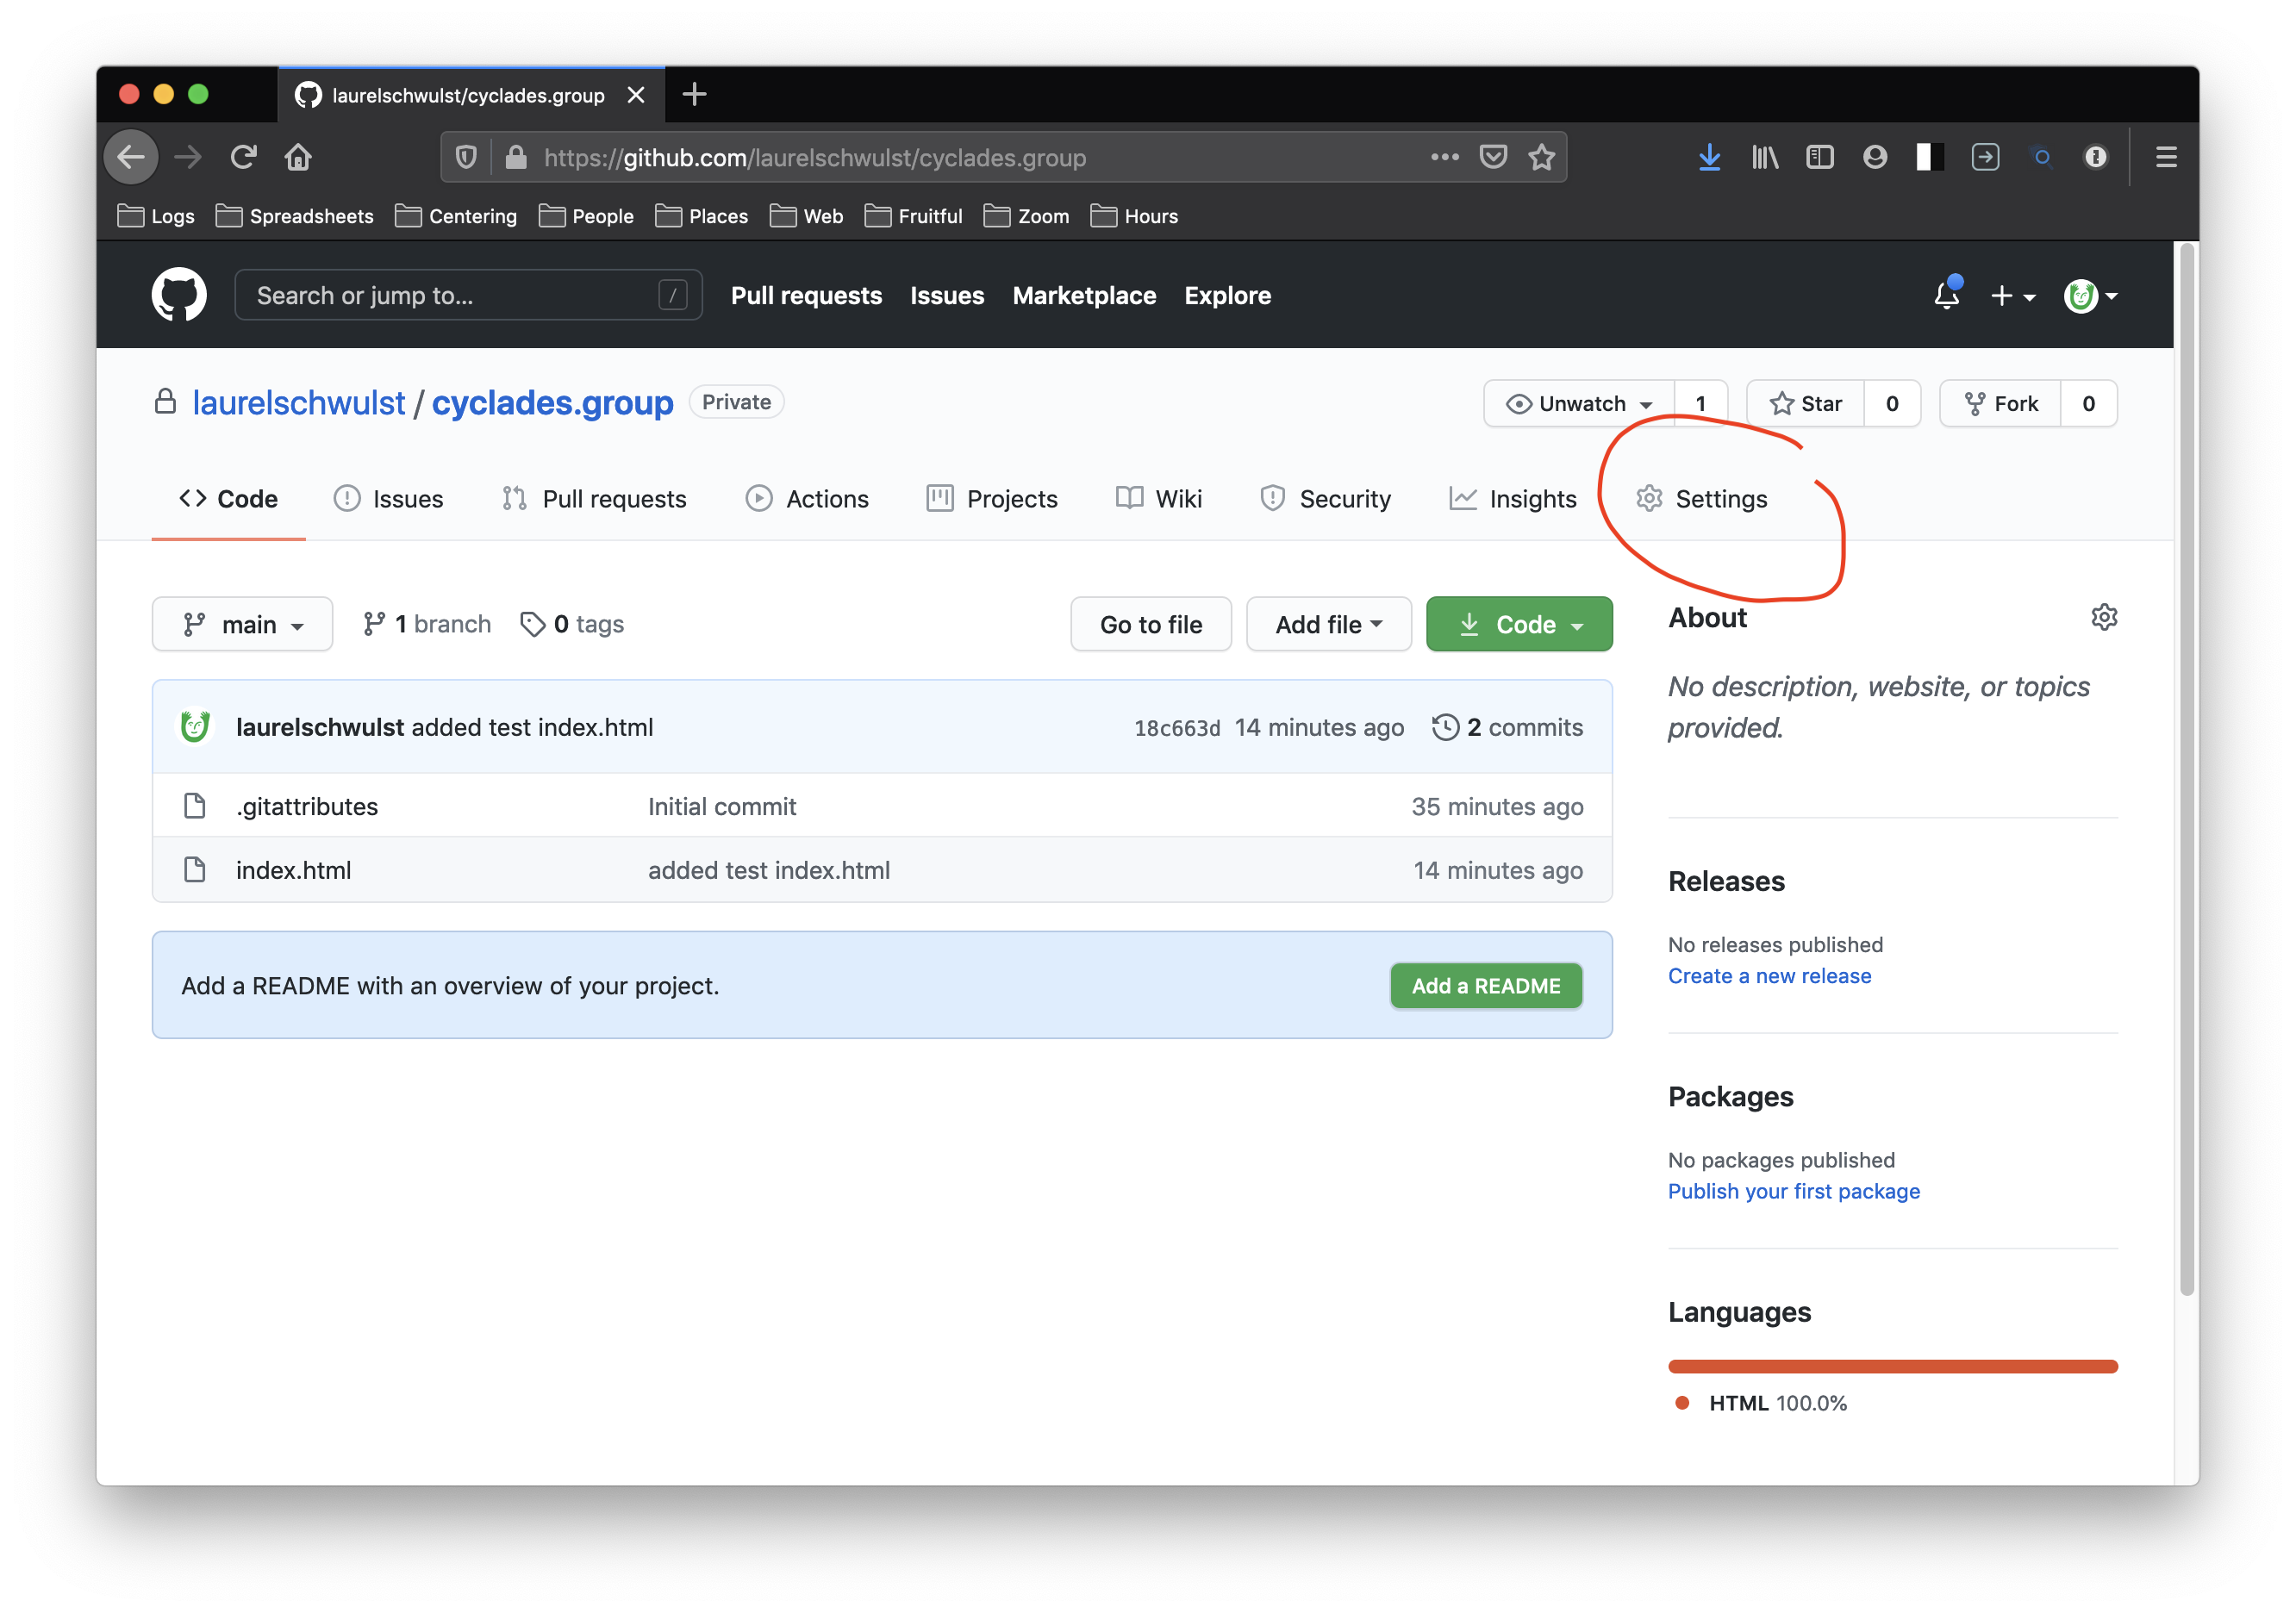
Then, click on "Settings" in the upper right area.
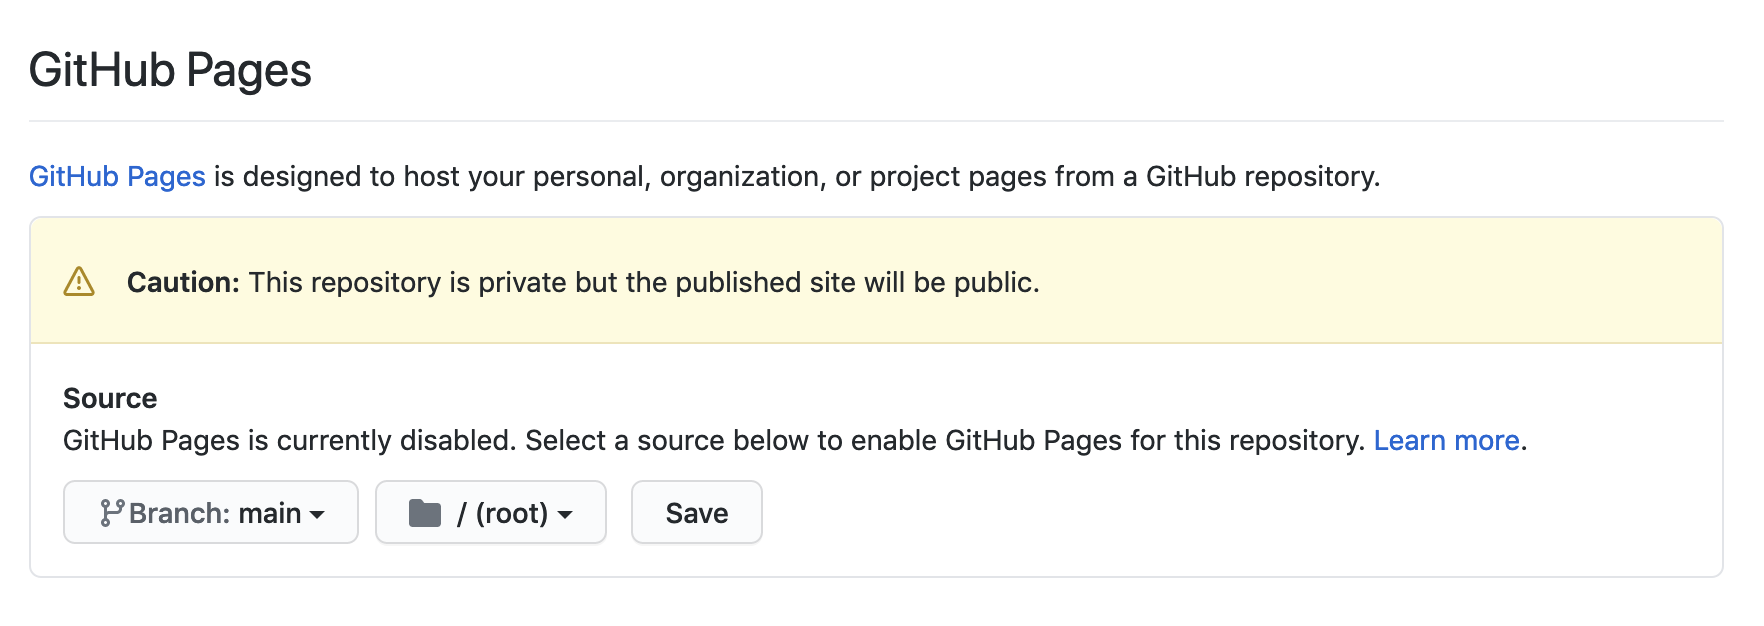
Once you're on the Settings page, scroll down to where it says "GitHub Pages". Where it says "Source", select the dropdown and choose "main". Then press "Save" to the right.
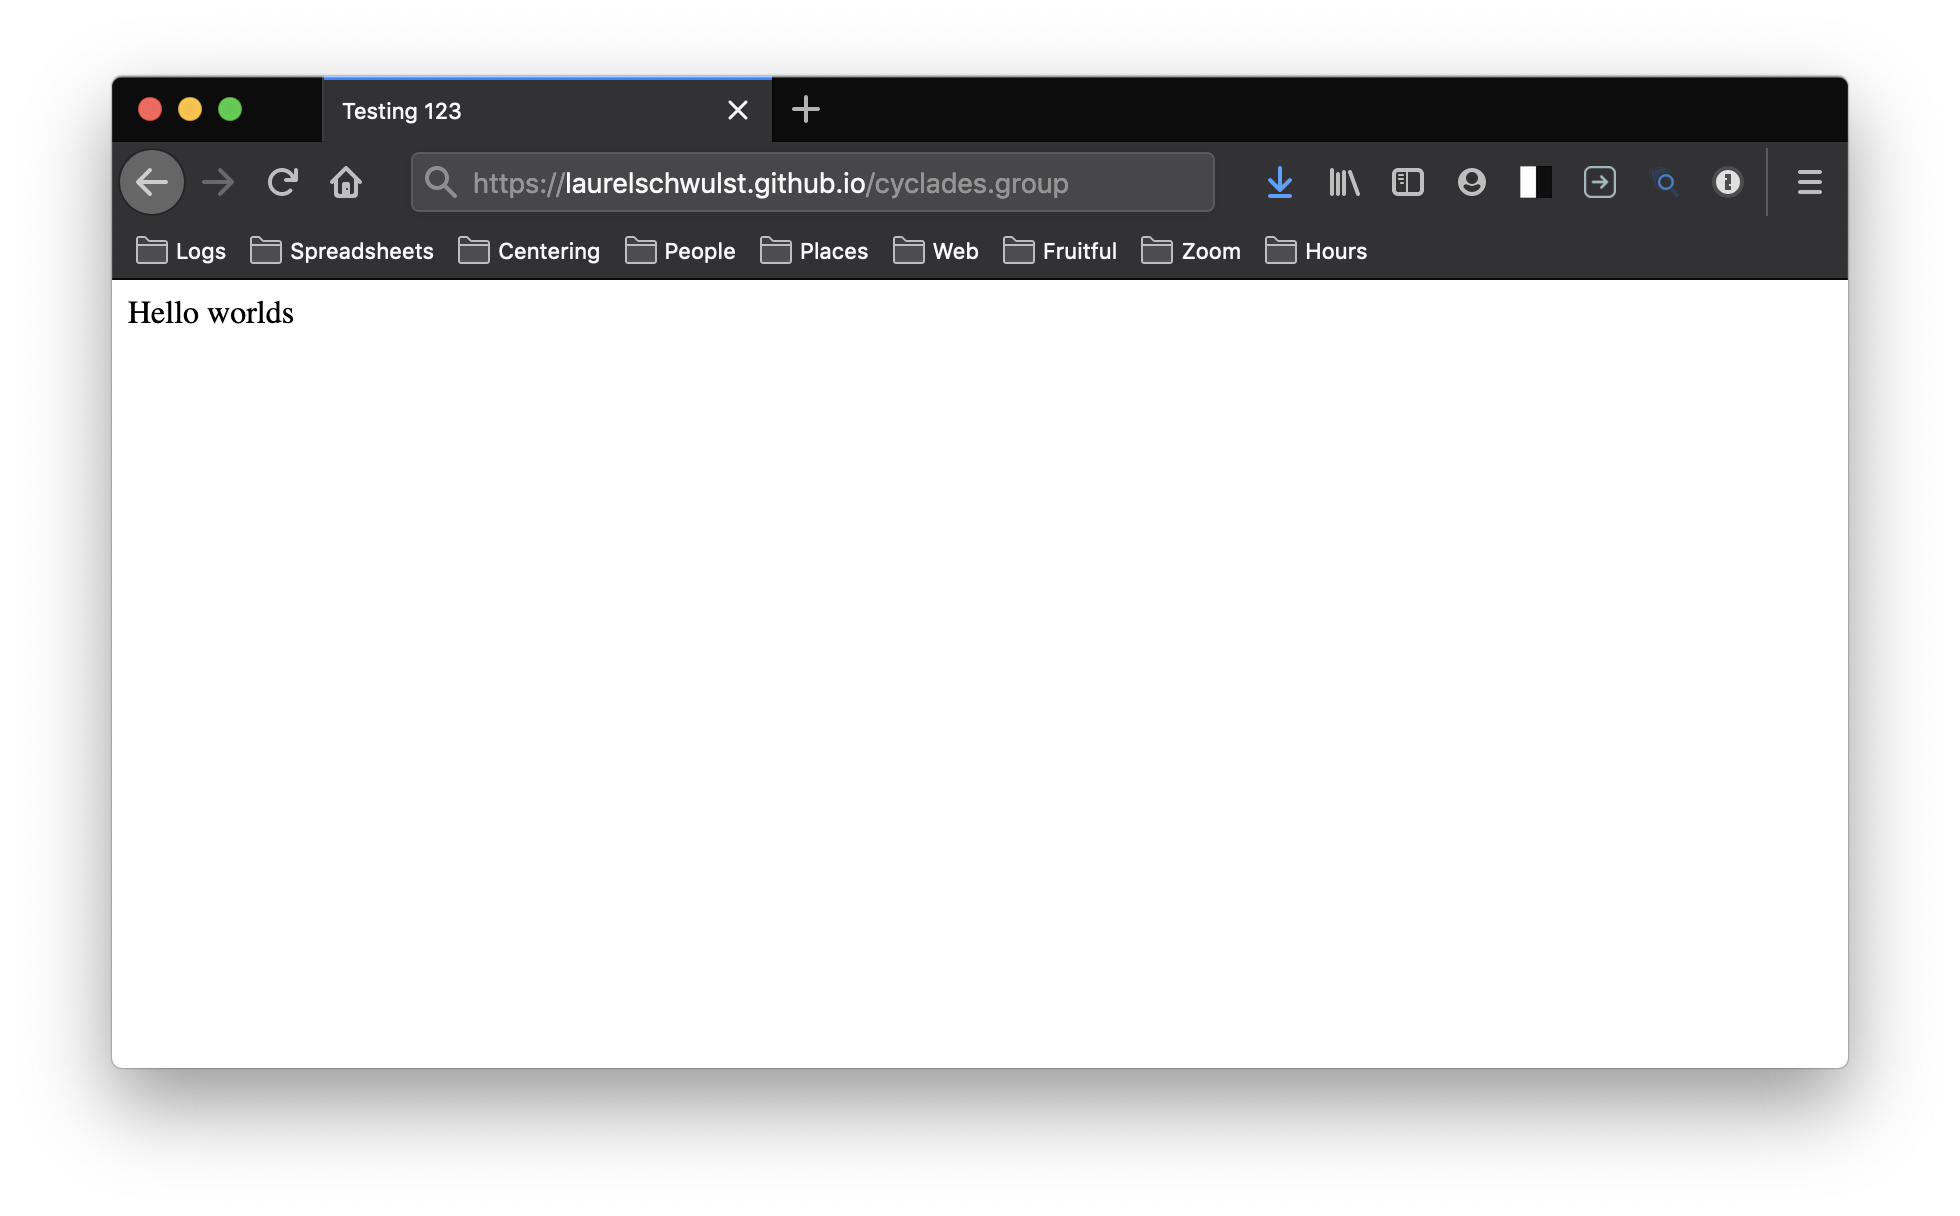
4. Test that the hosting works on the temporary URL given
Once you press "Save", the Settings page will reload. Scroll back down to where it says "GitHub Pages", and you'll find a line that says:
Your site is ready to be published at: https://(your github username).github.io/(your repository name)
Click this link. If you don't see anything at first, or get an error, try checking back in a few minutes. (Sometimes there is some lag with GitHub pages.)
Add "A" records to your domain name registrar with the IP of your host as the answer
Test that your real domain name works
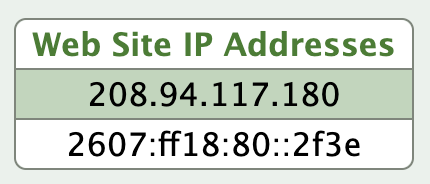
1. Add "A" records to your domain name registrar with the IP of your host as the answer
On your site's dashboard page on nearlyfreespeech.net, copy your site's top IP address at the very bottom of the page. Keep it handy for this next part...
My site's IP is: 208.94.117.180
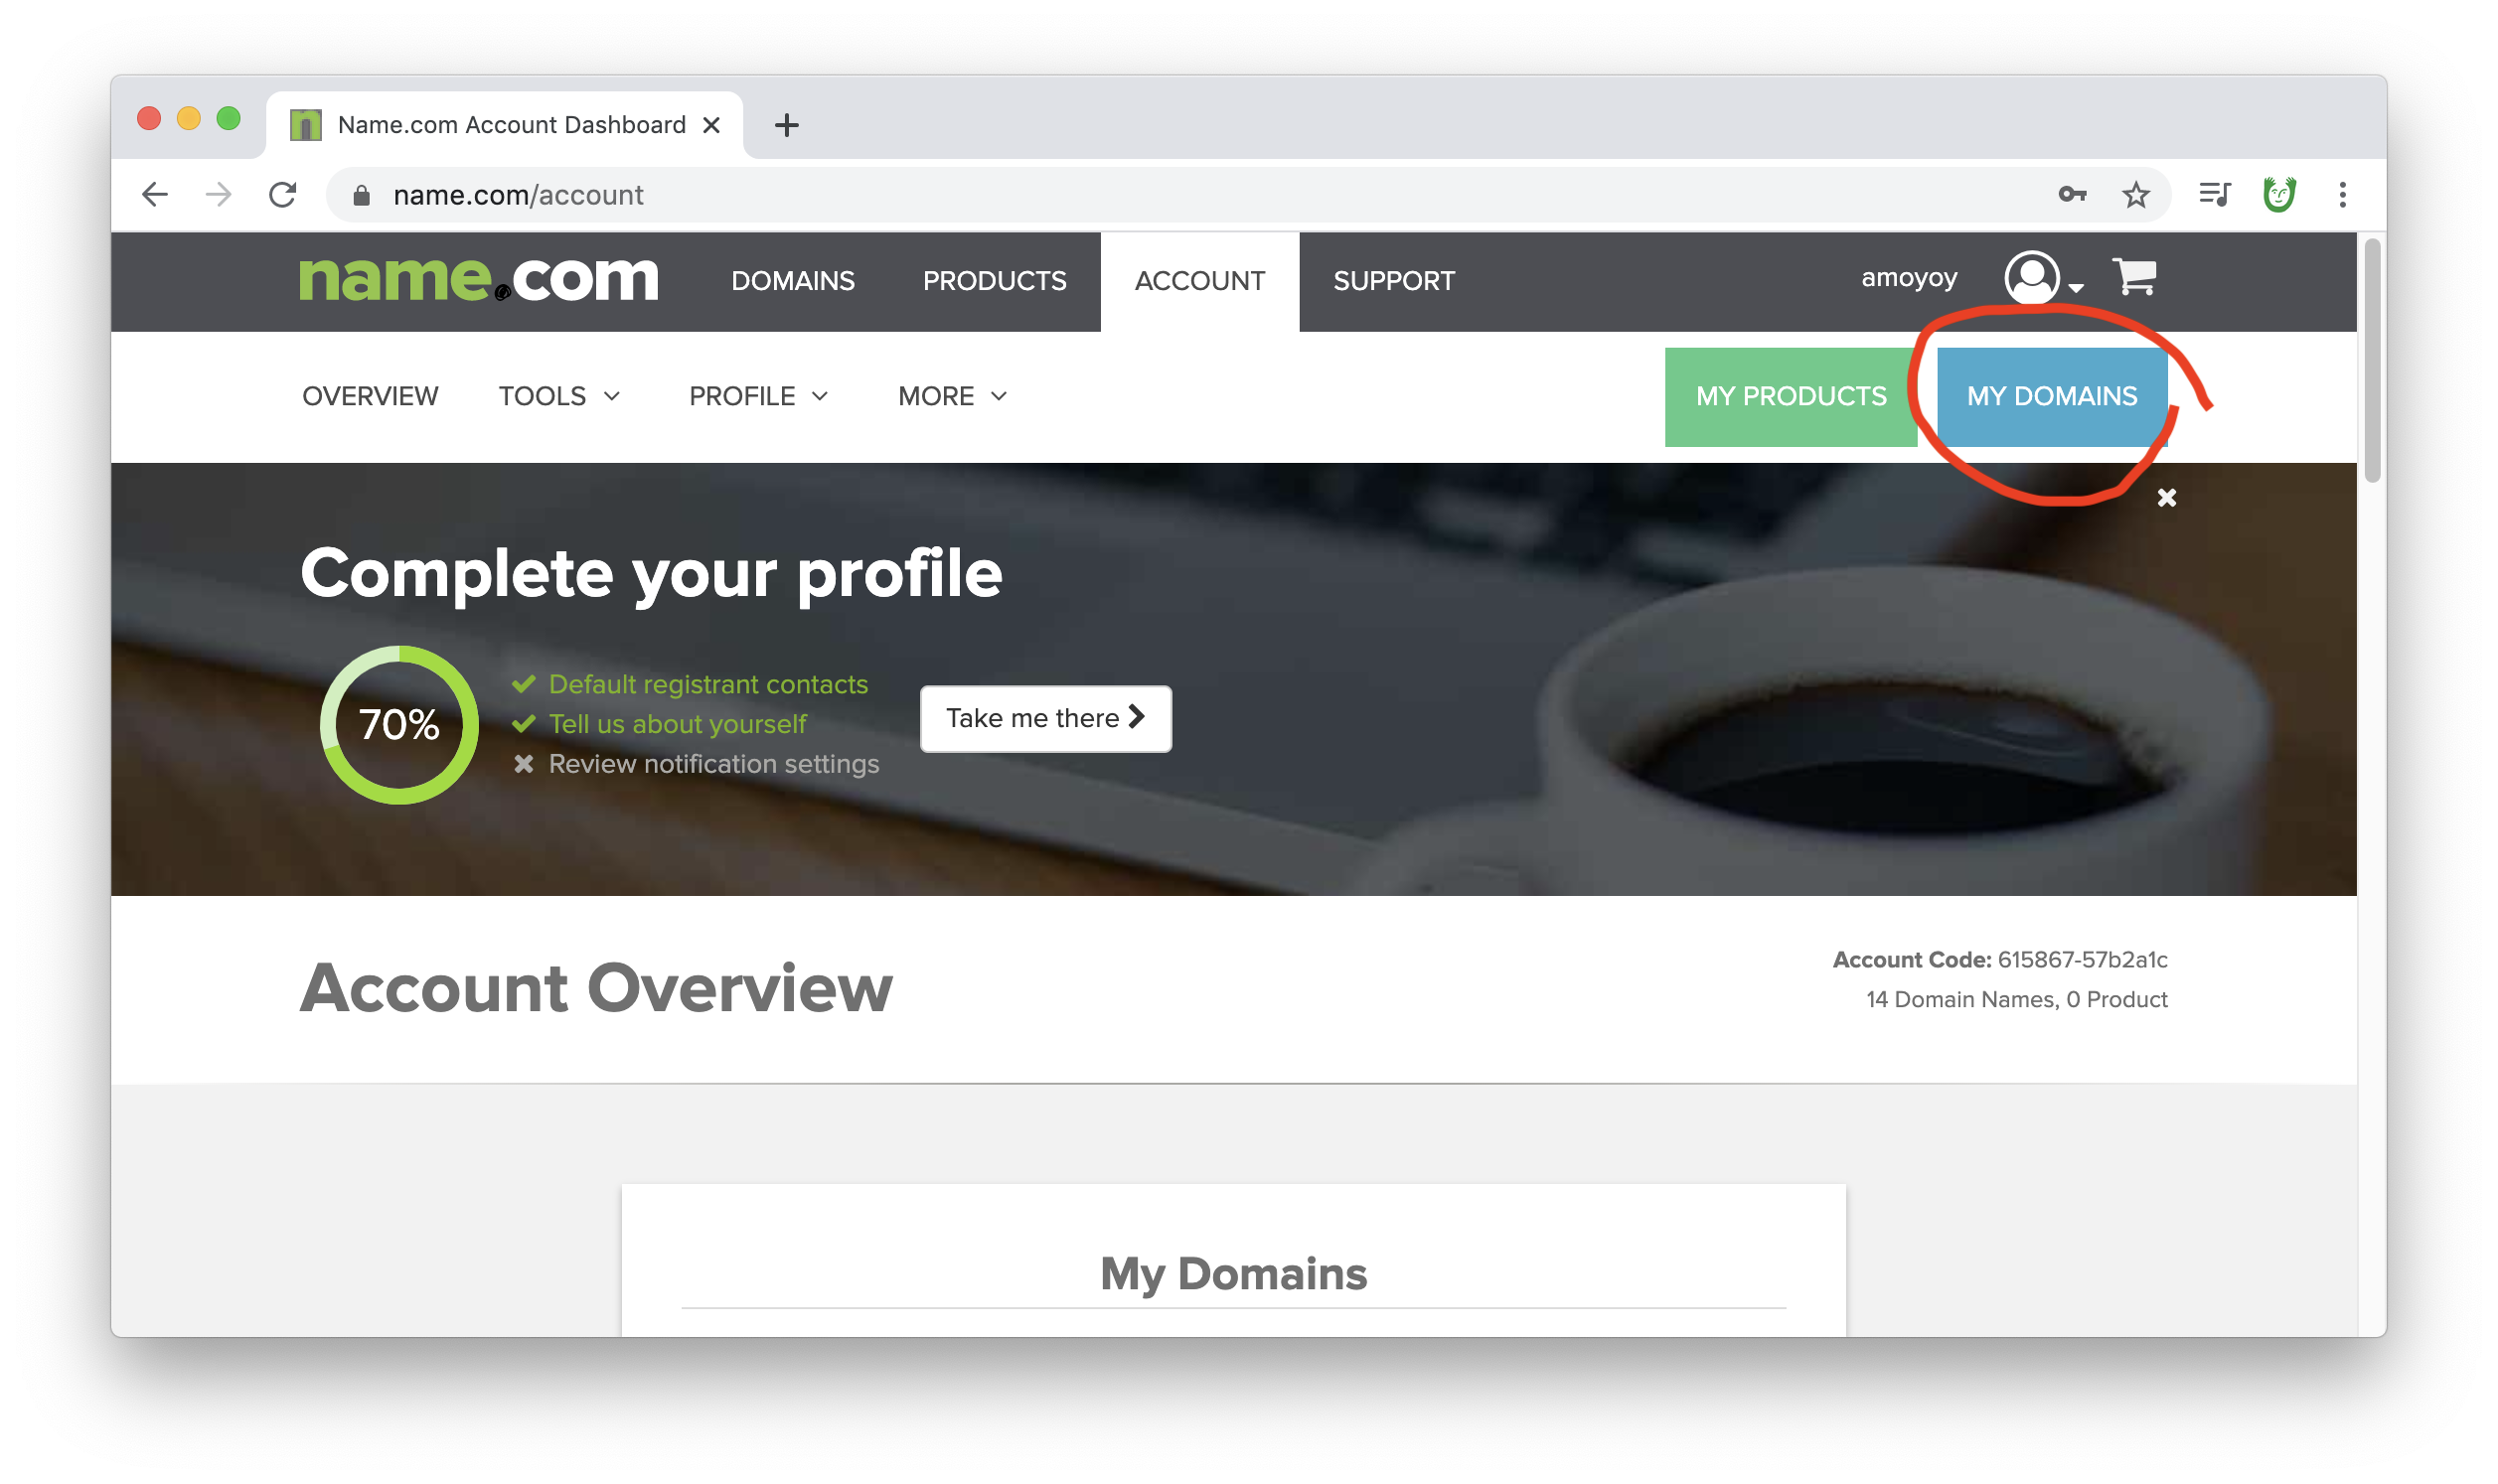
Then navigate back to name.com, and click on "My Domains"...
Find the domain you just purchased, click on it.
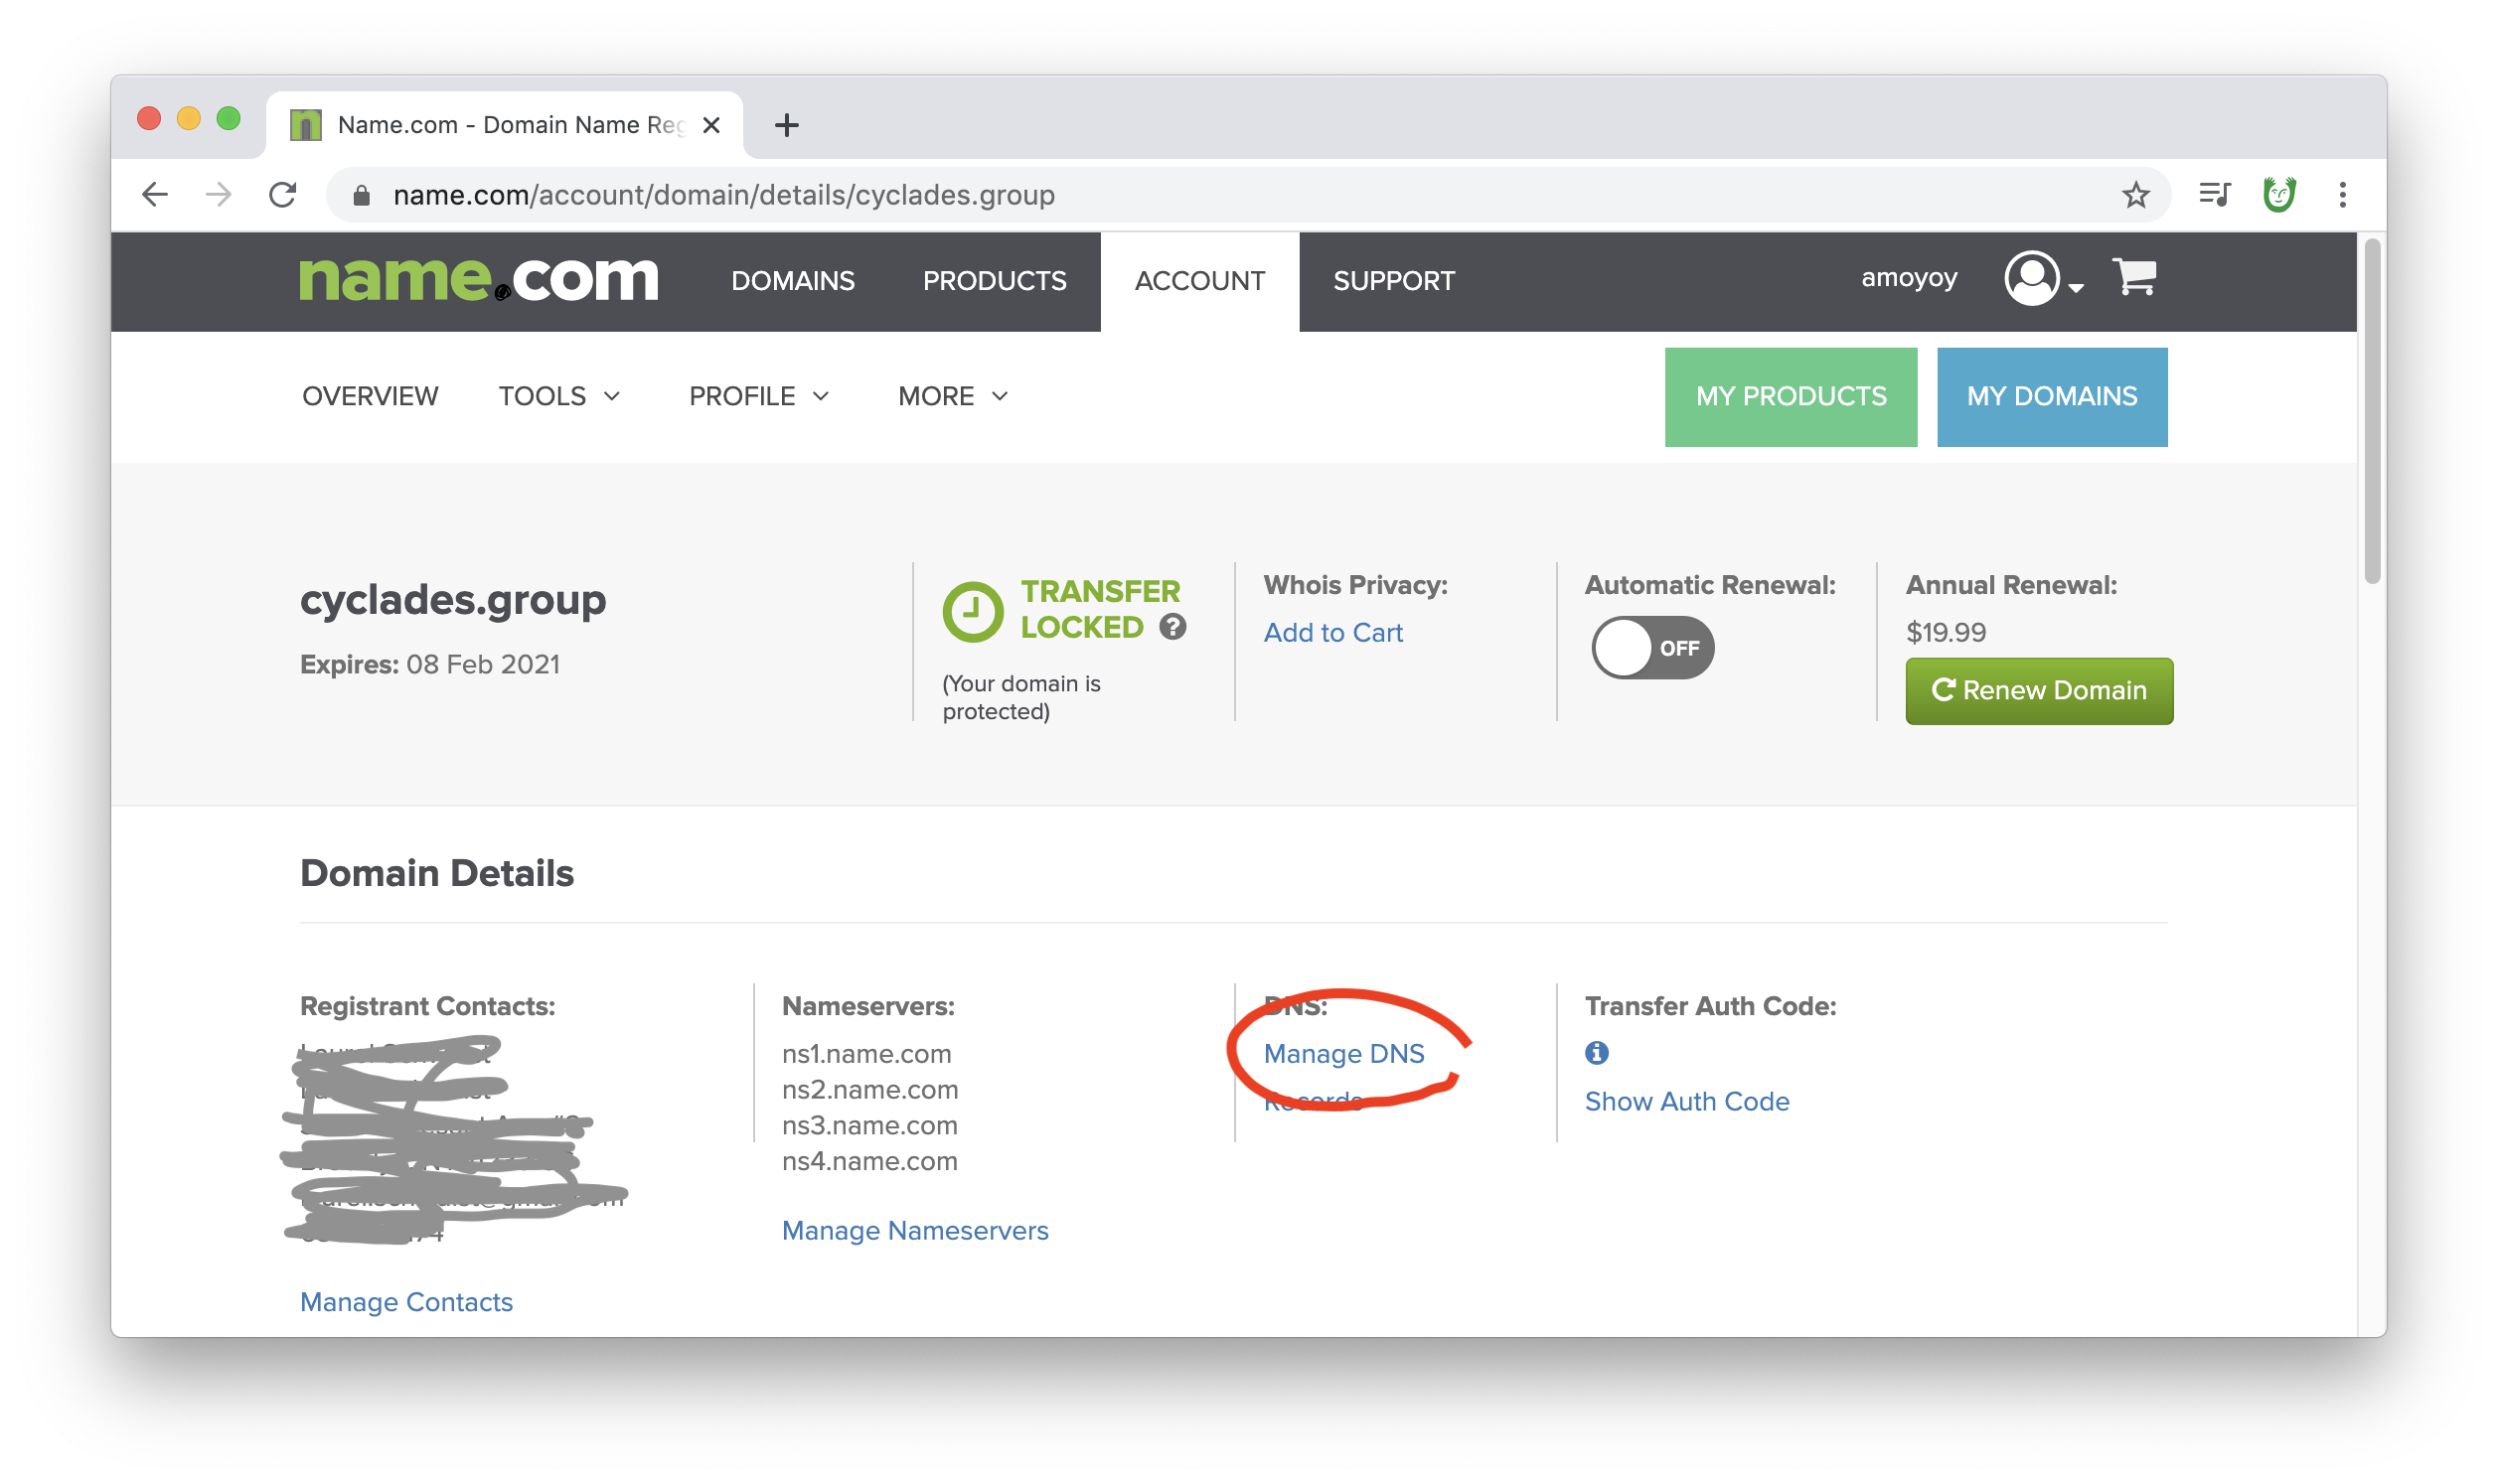
Once you're on its page, click "Manage DNS"...
Once you're here, you'll want to add two "A" records. Each one's answer should be your IP address from nearlyfreespeech. One should have the "Host" area as "www".
Click "Add Record" for each.
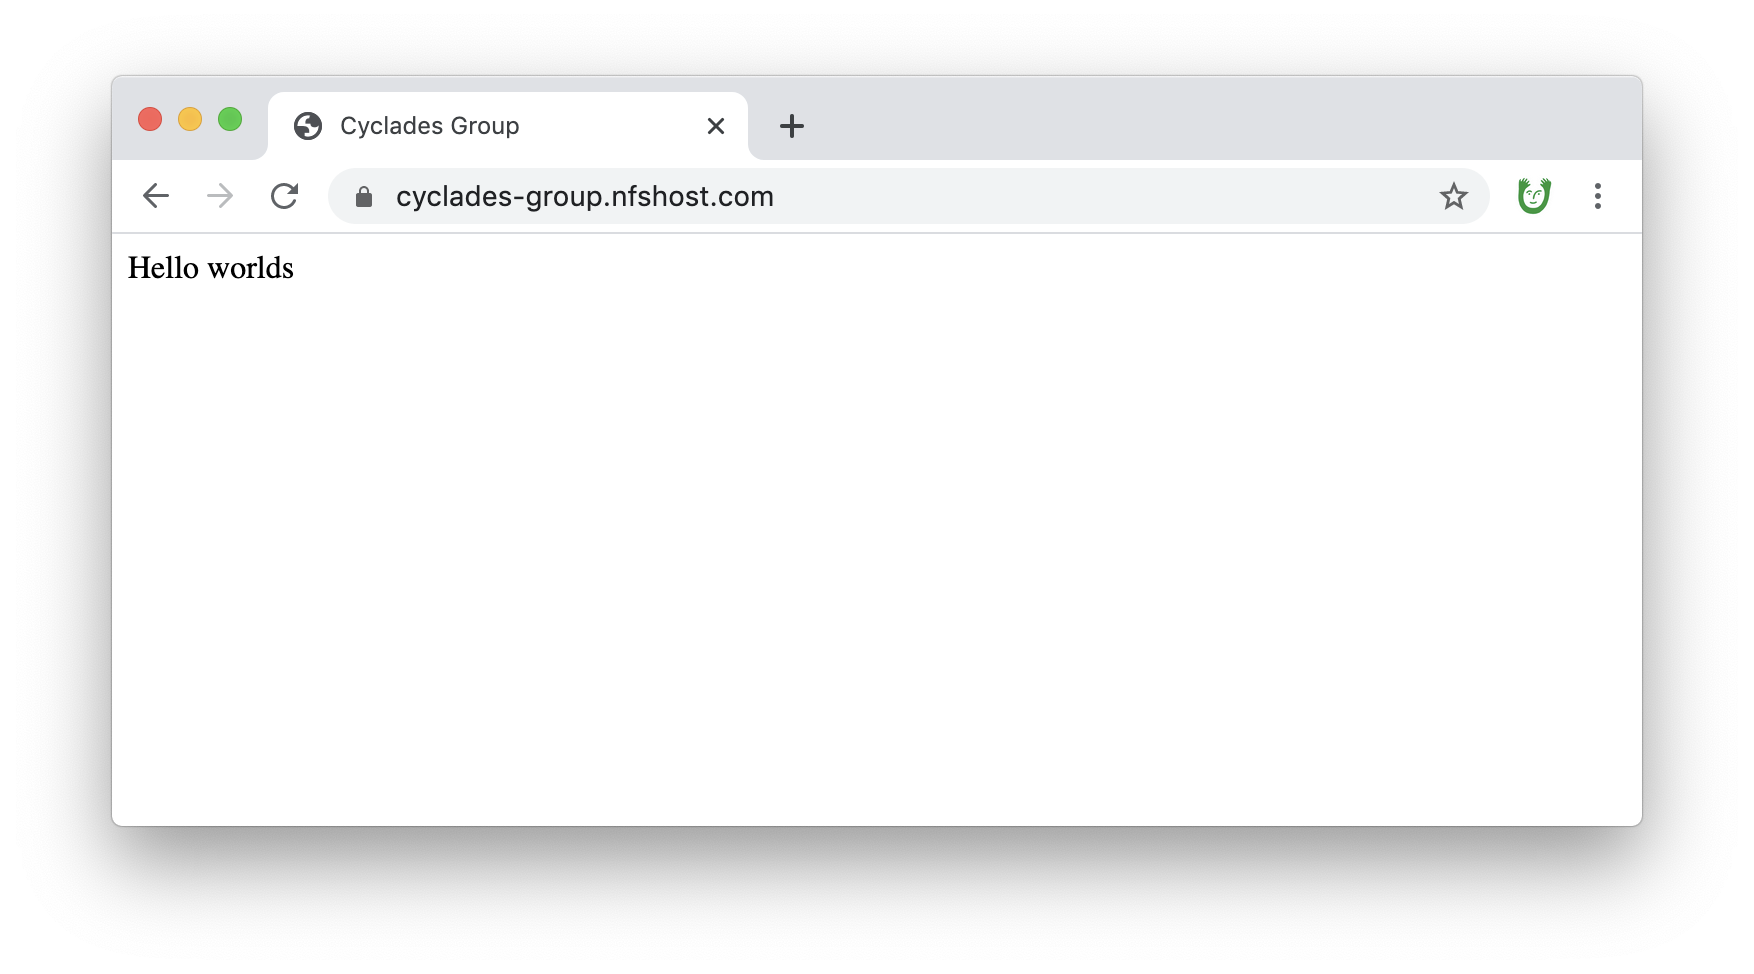
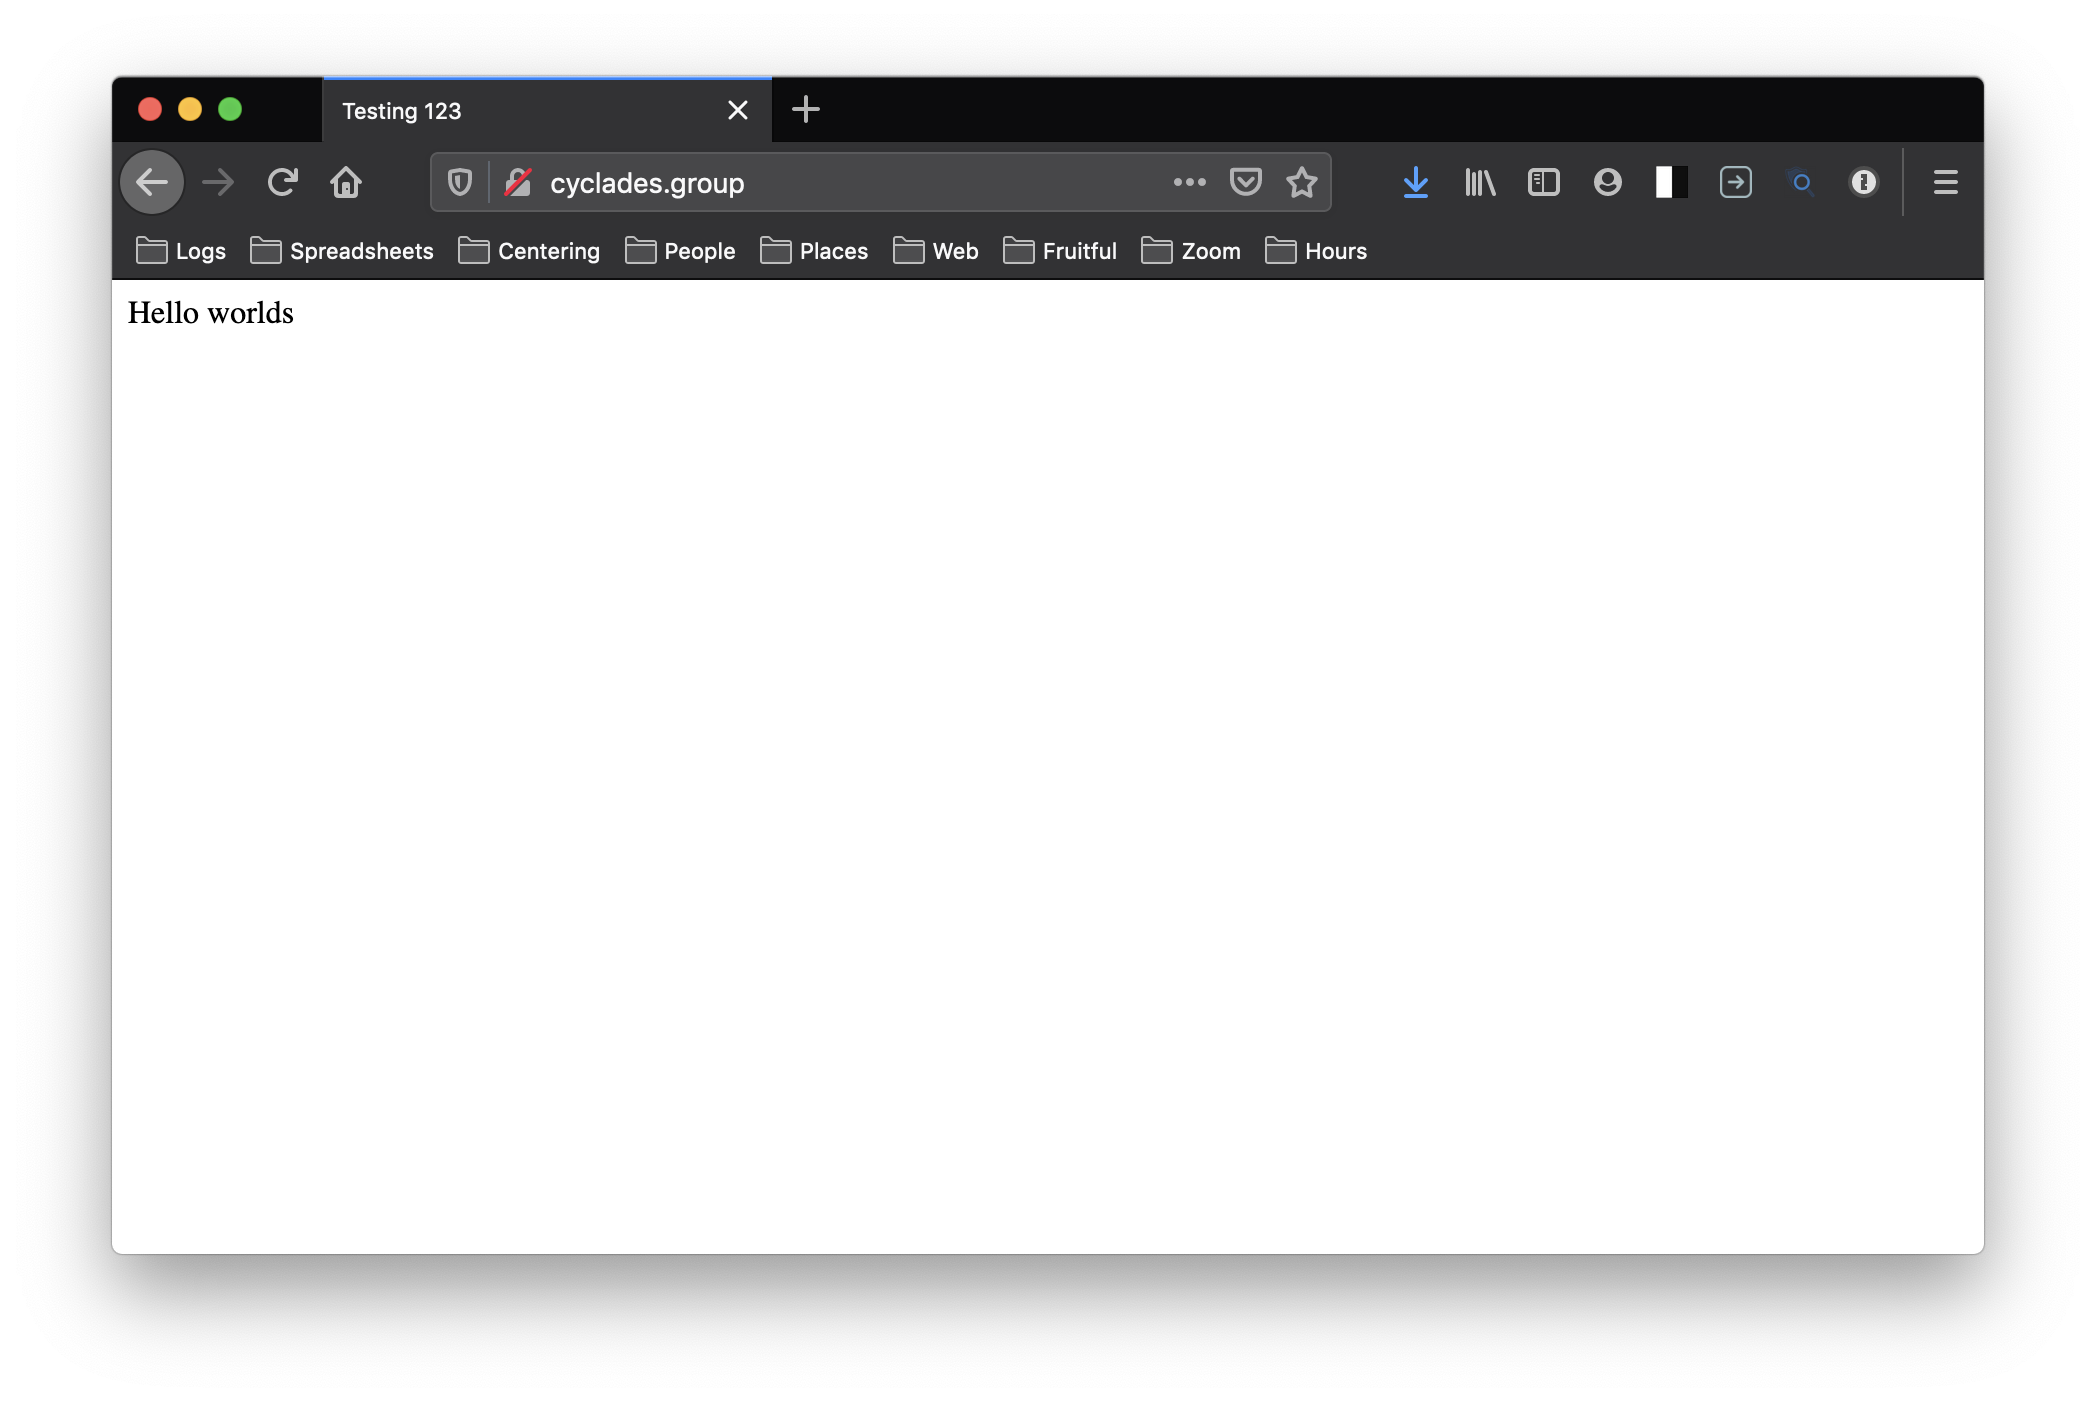
2. Test that your real domain name works
Now, wait a moment, and navigate to your domain name. In my case, it's http://cyclades.group. It works! Now you can drag and drop your site's real files into 🦆 Cyberduck to publish your full site.
p.s. Laurel created this video a couple years ago that is more or less the entire above process for NearlyFreeSpeech, in case it's useful! (Note: This video uses FTP, but we would recommend you use SFTP)
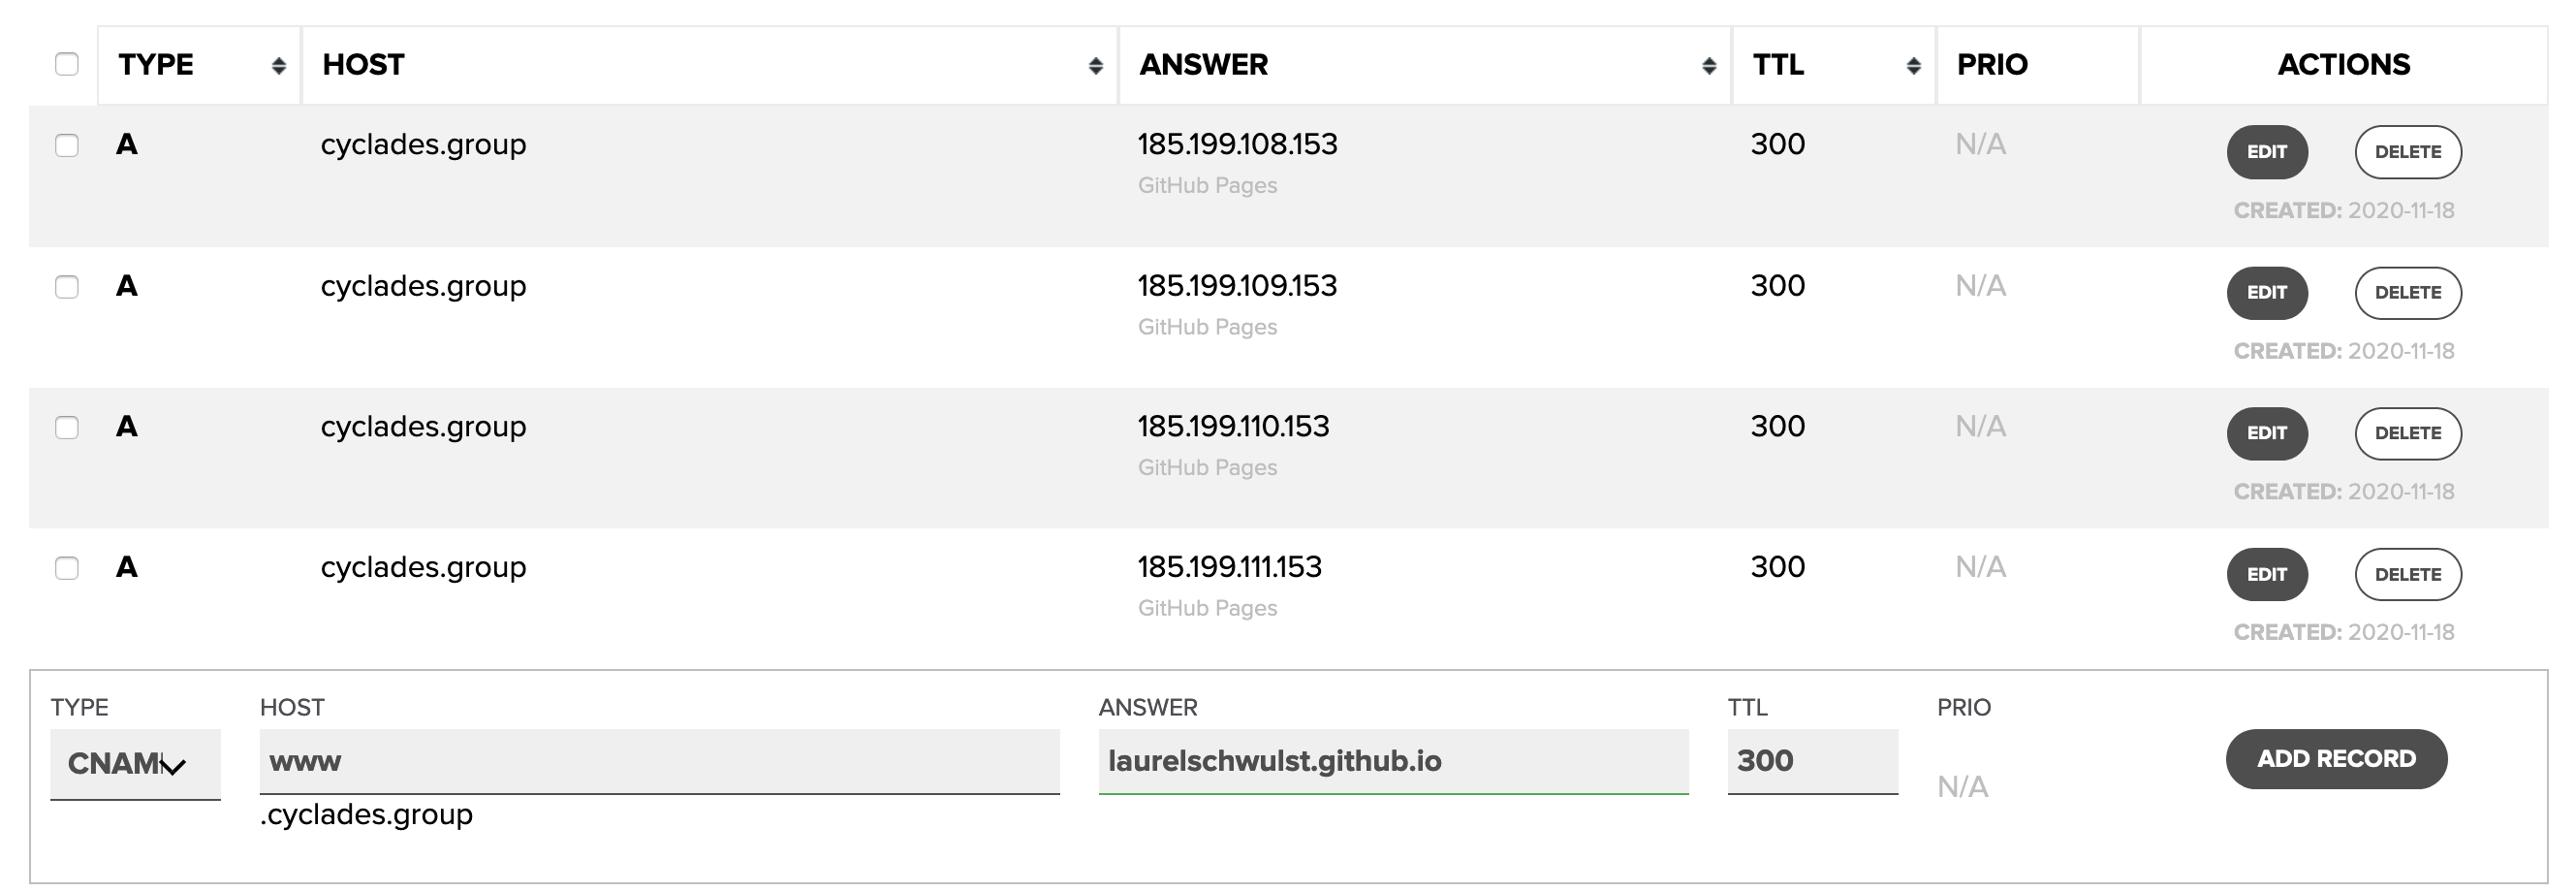
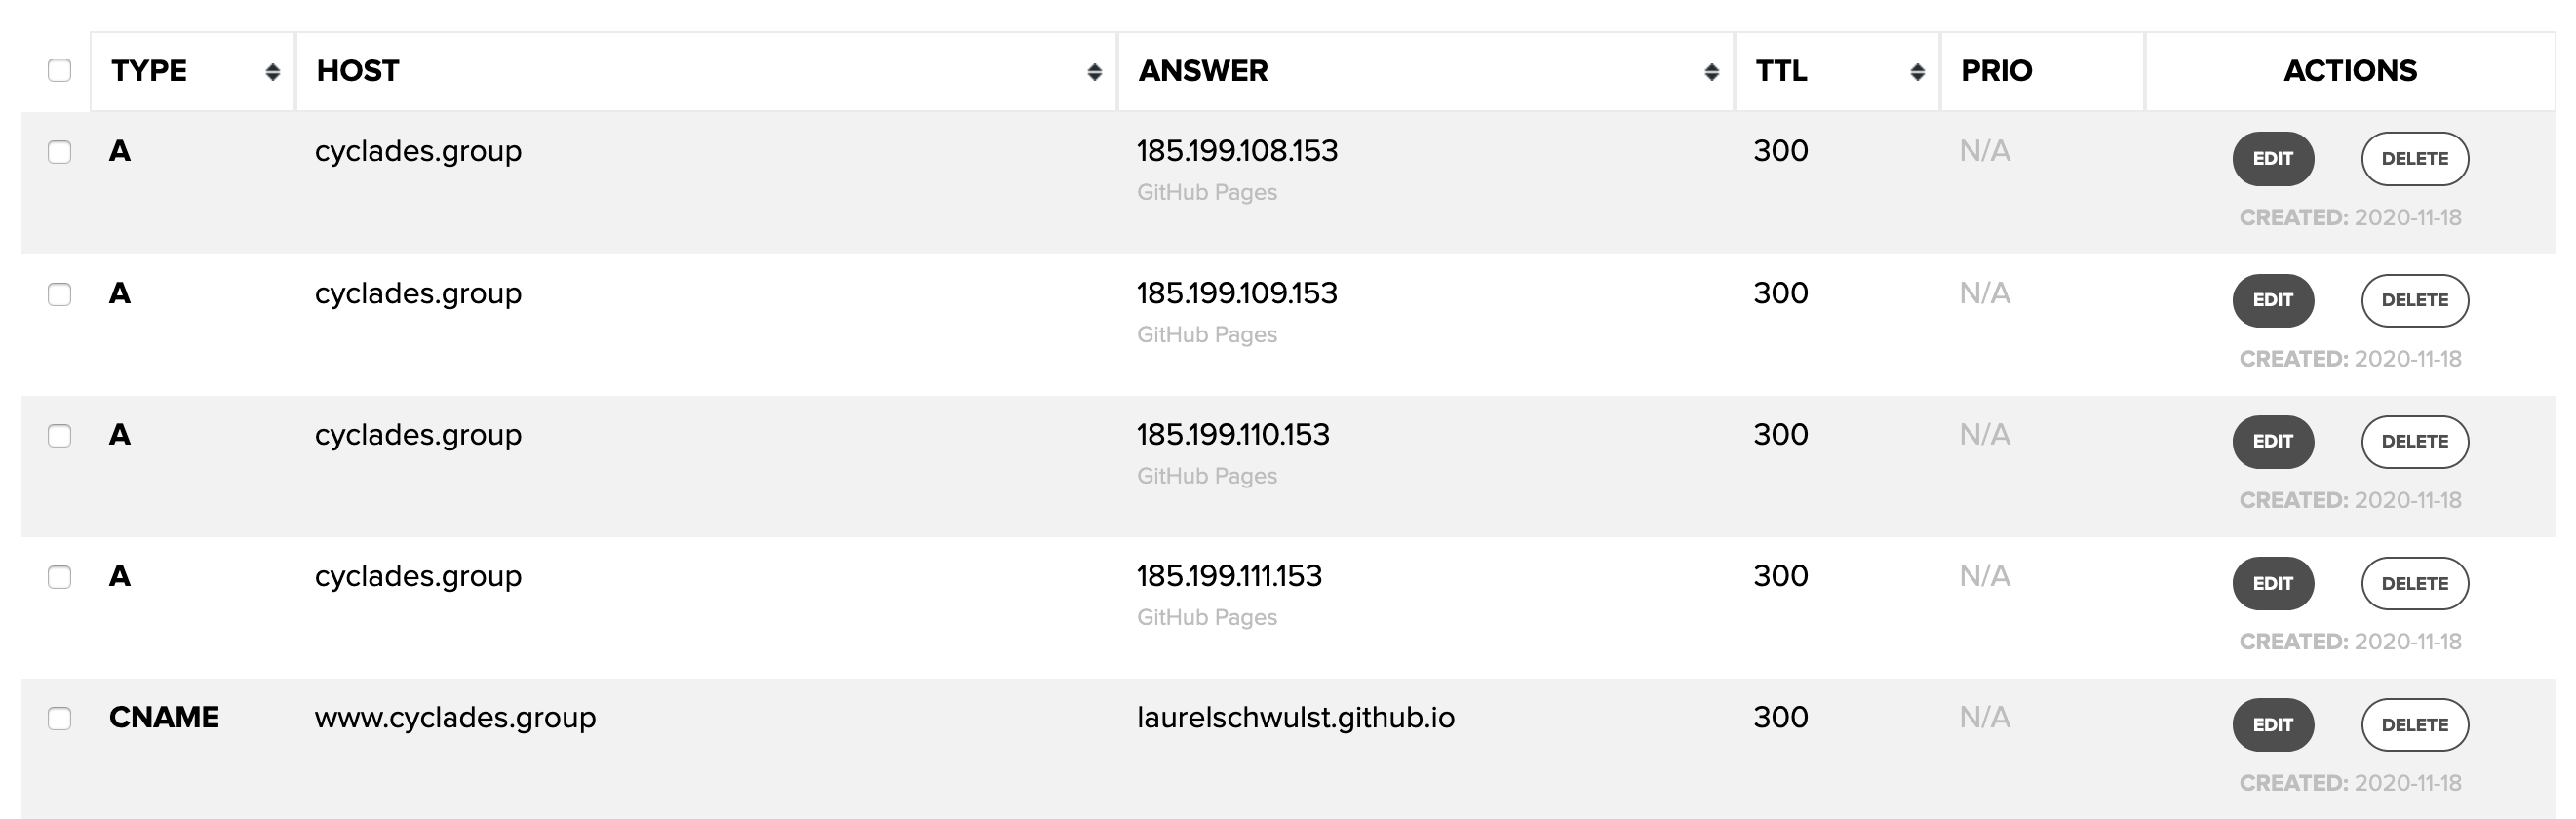
In your DNS registrar, add 4 A records and 1 CNAME record
1. Enable "Custom domain" on the Settings page
Go back to the “Settings” page for your repository and scroll back down to the “Github Pages” part. You should see an area that says “Custom domain.” Here you can type your custom domain. You don’t need to type the www part. Then press "save".
2. In your DNS registrar, add 4 A records and 1 CNAME record
Log into your DNS registrar. In our case, it's name.com.
Make the following additions to your DNS records for your chosen domain...
yourusername.github.io (answer) ← remember to fill in your Github username here
If all of this is done correctly, you should be able to go to your custom domain and see the test site!
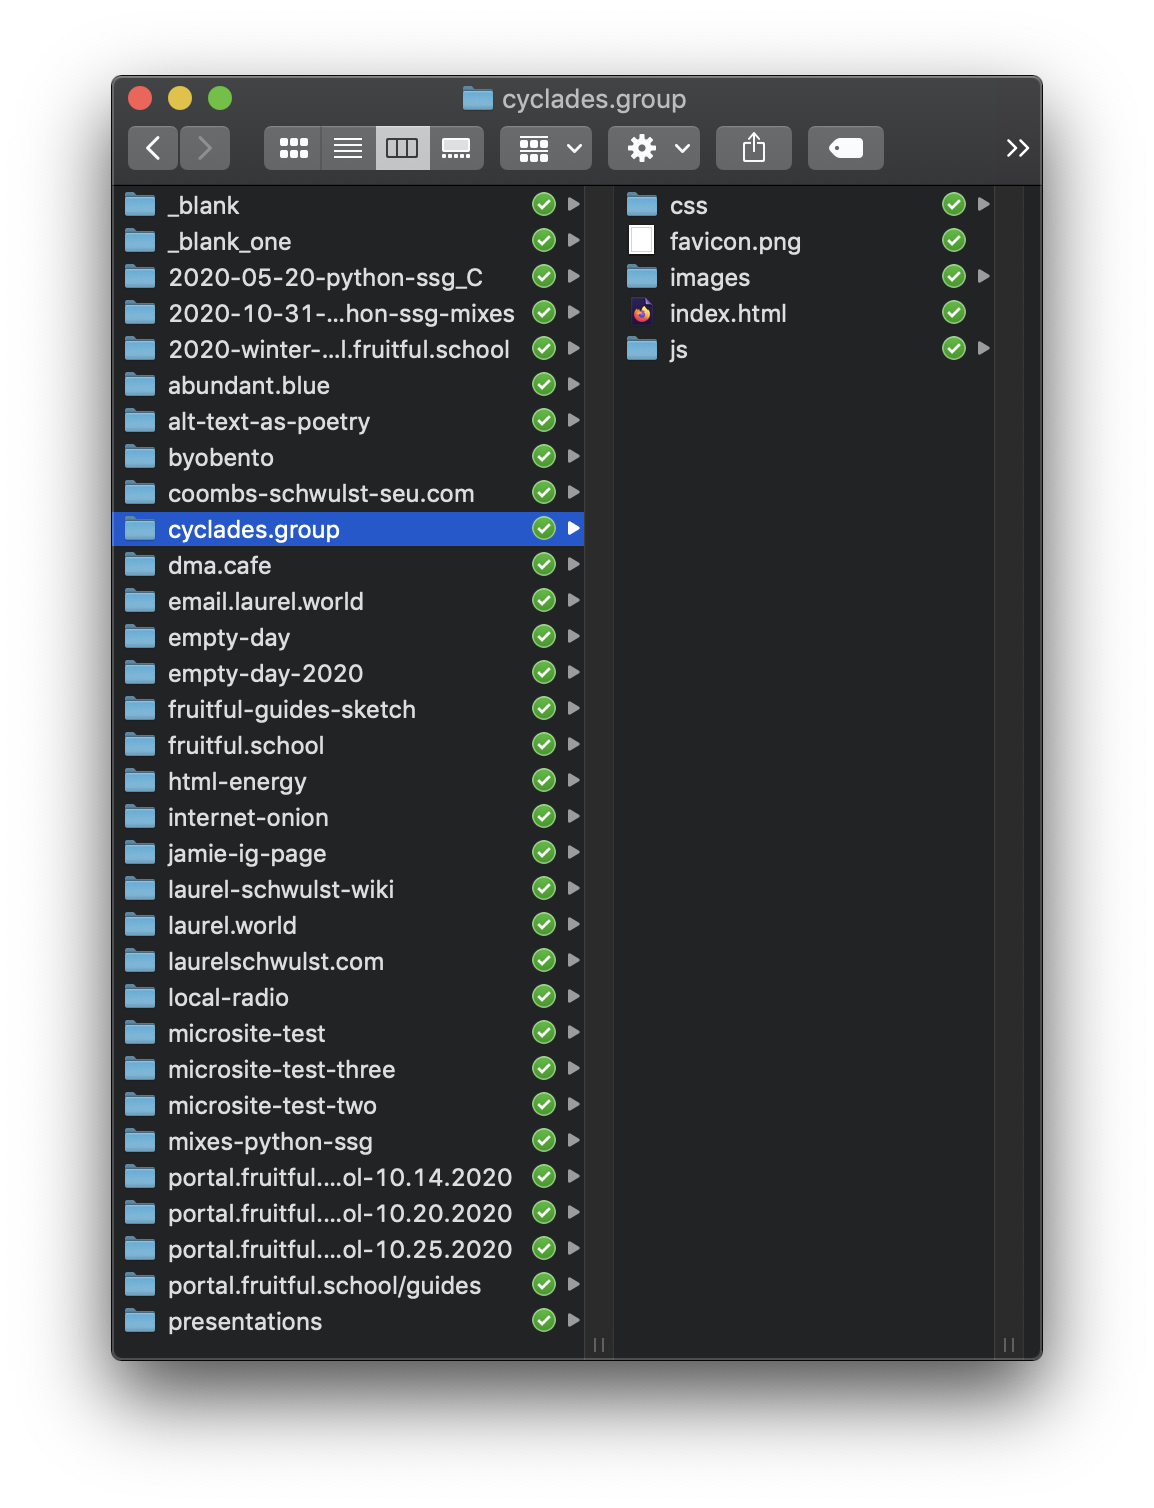
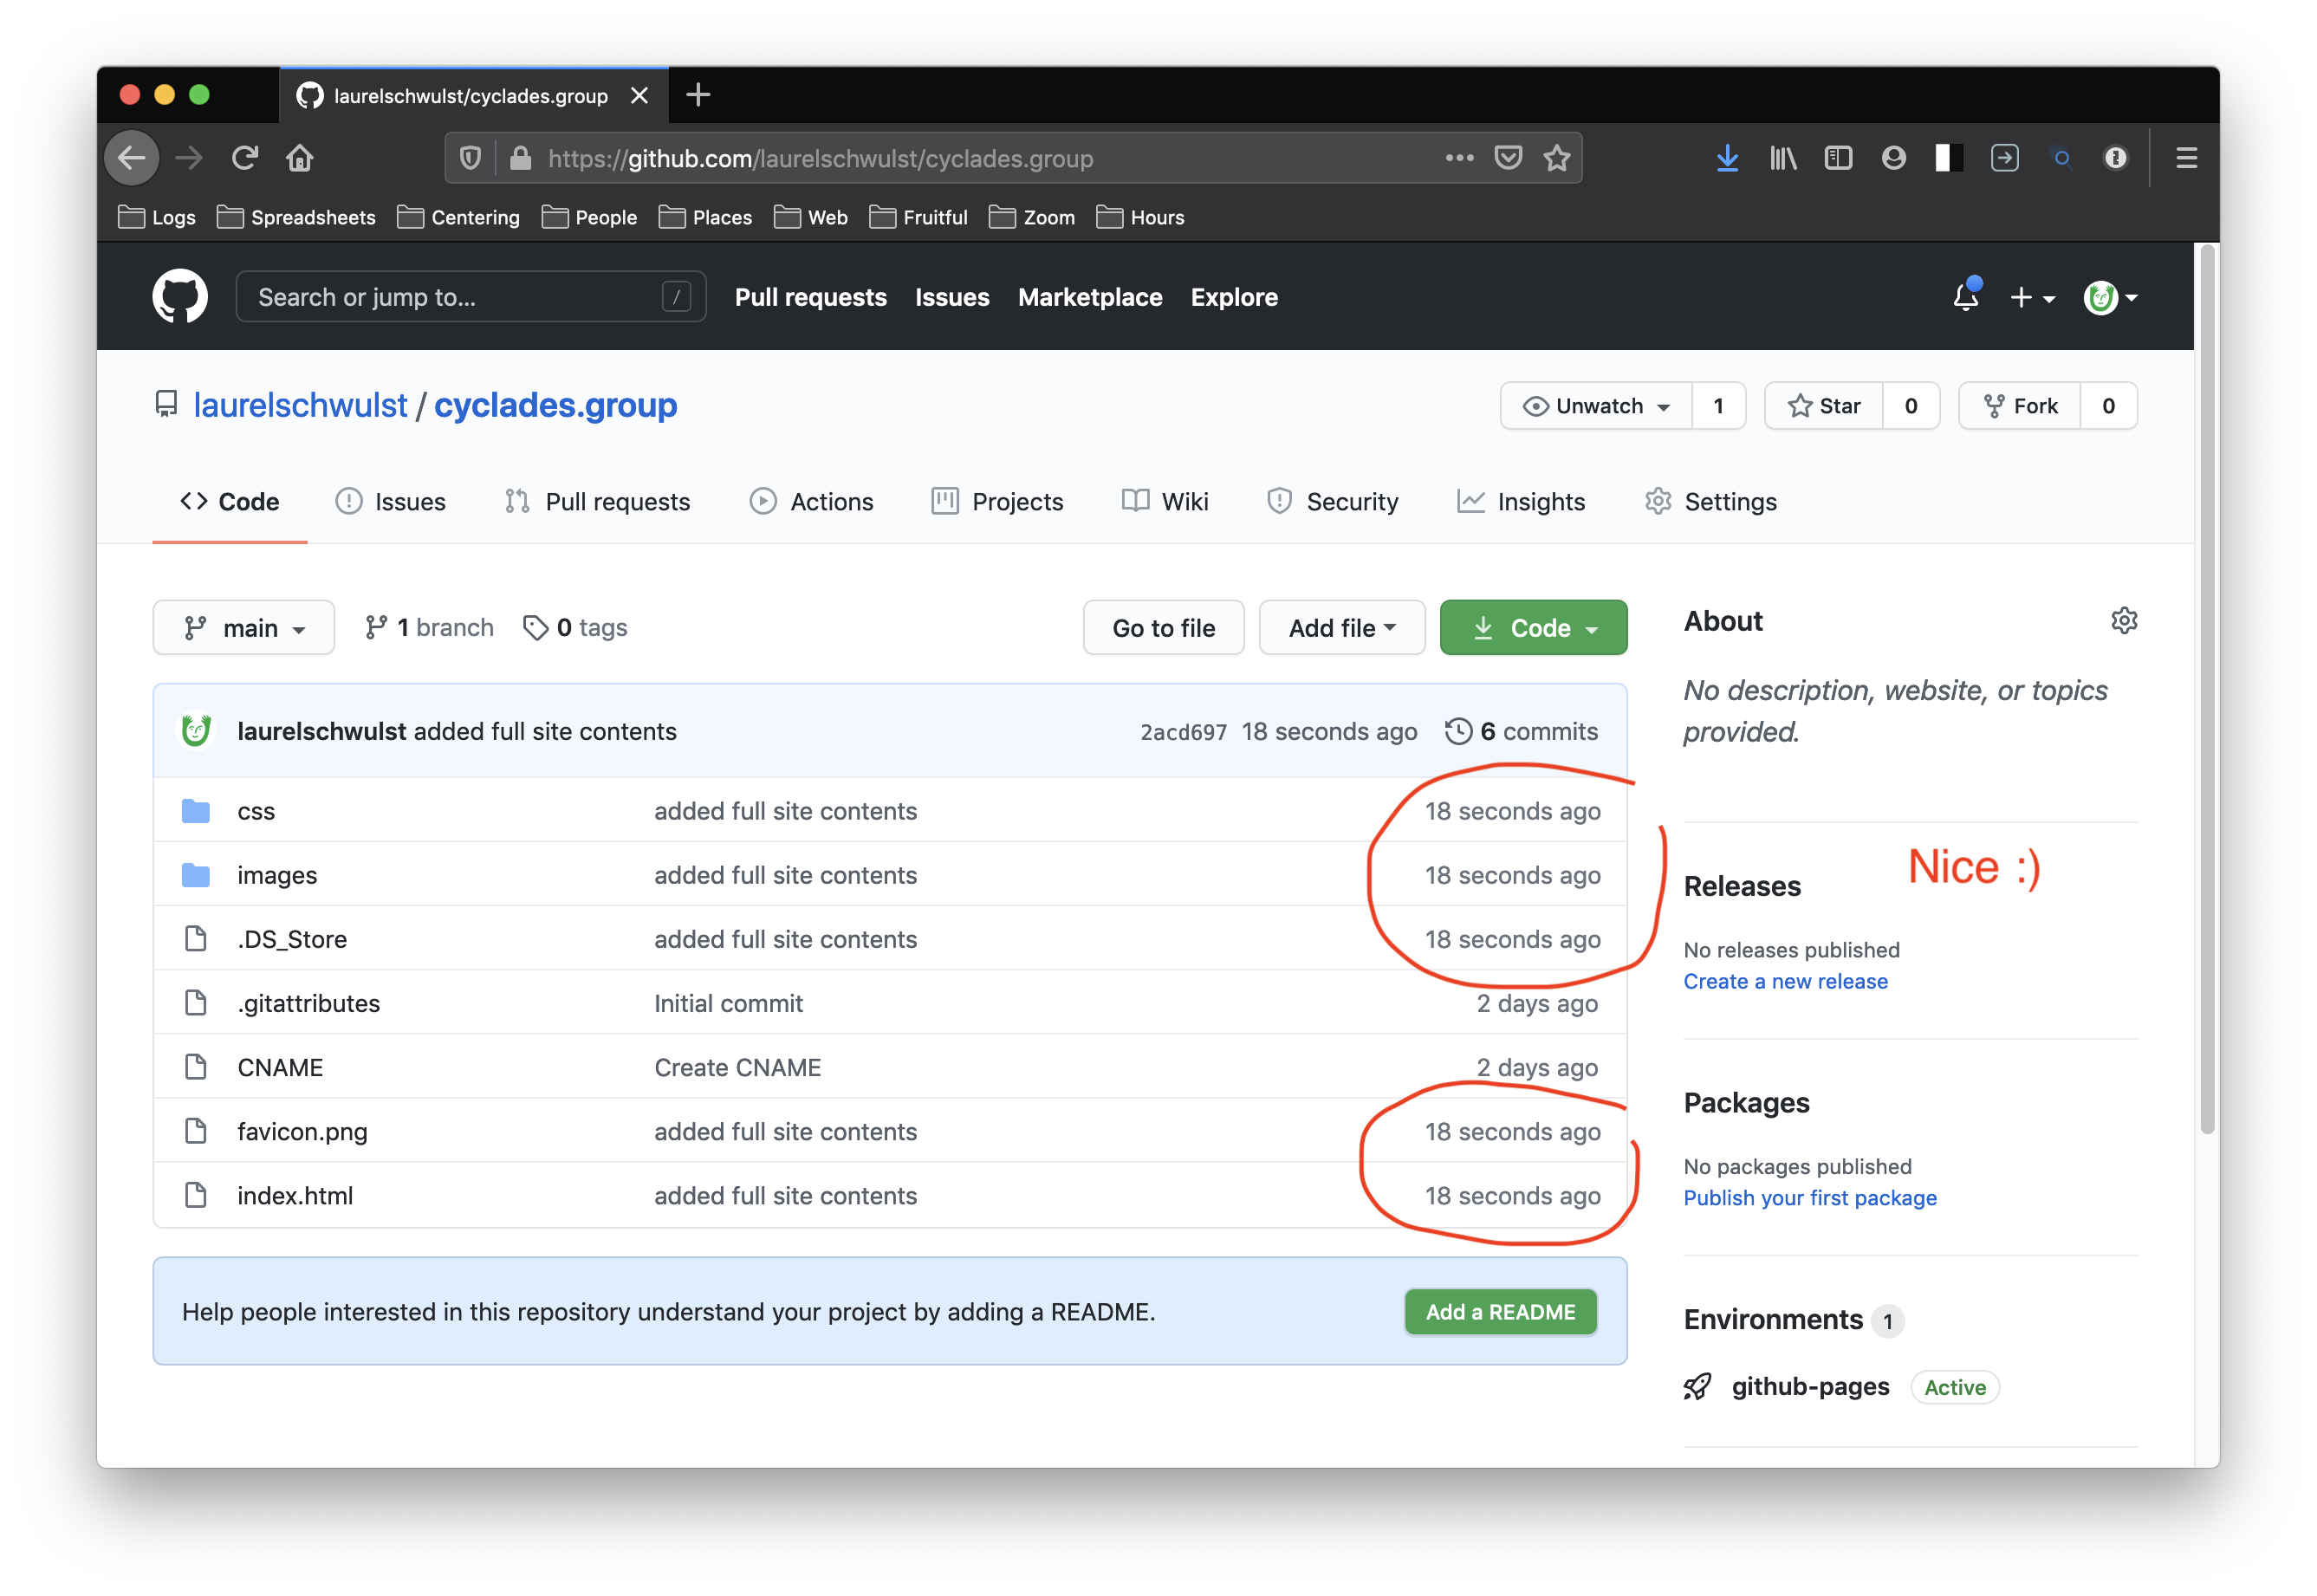
Now that we've tested it works, you can add all your final site's content to the repository's folder on your computer...
In the above image, you see we added our complete site's files, organized into folders for css, js, and images assets. You can divide your site however you want, this is just showing one possible way.
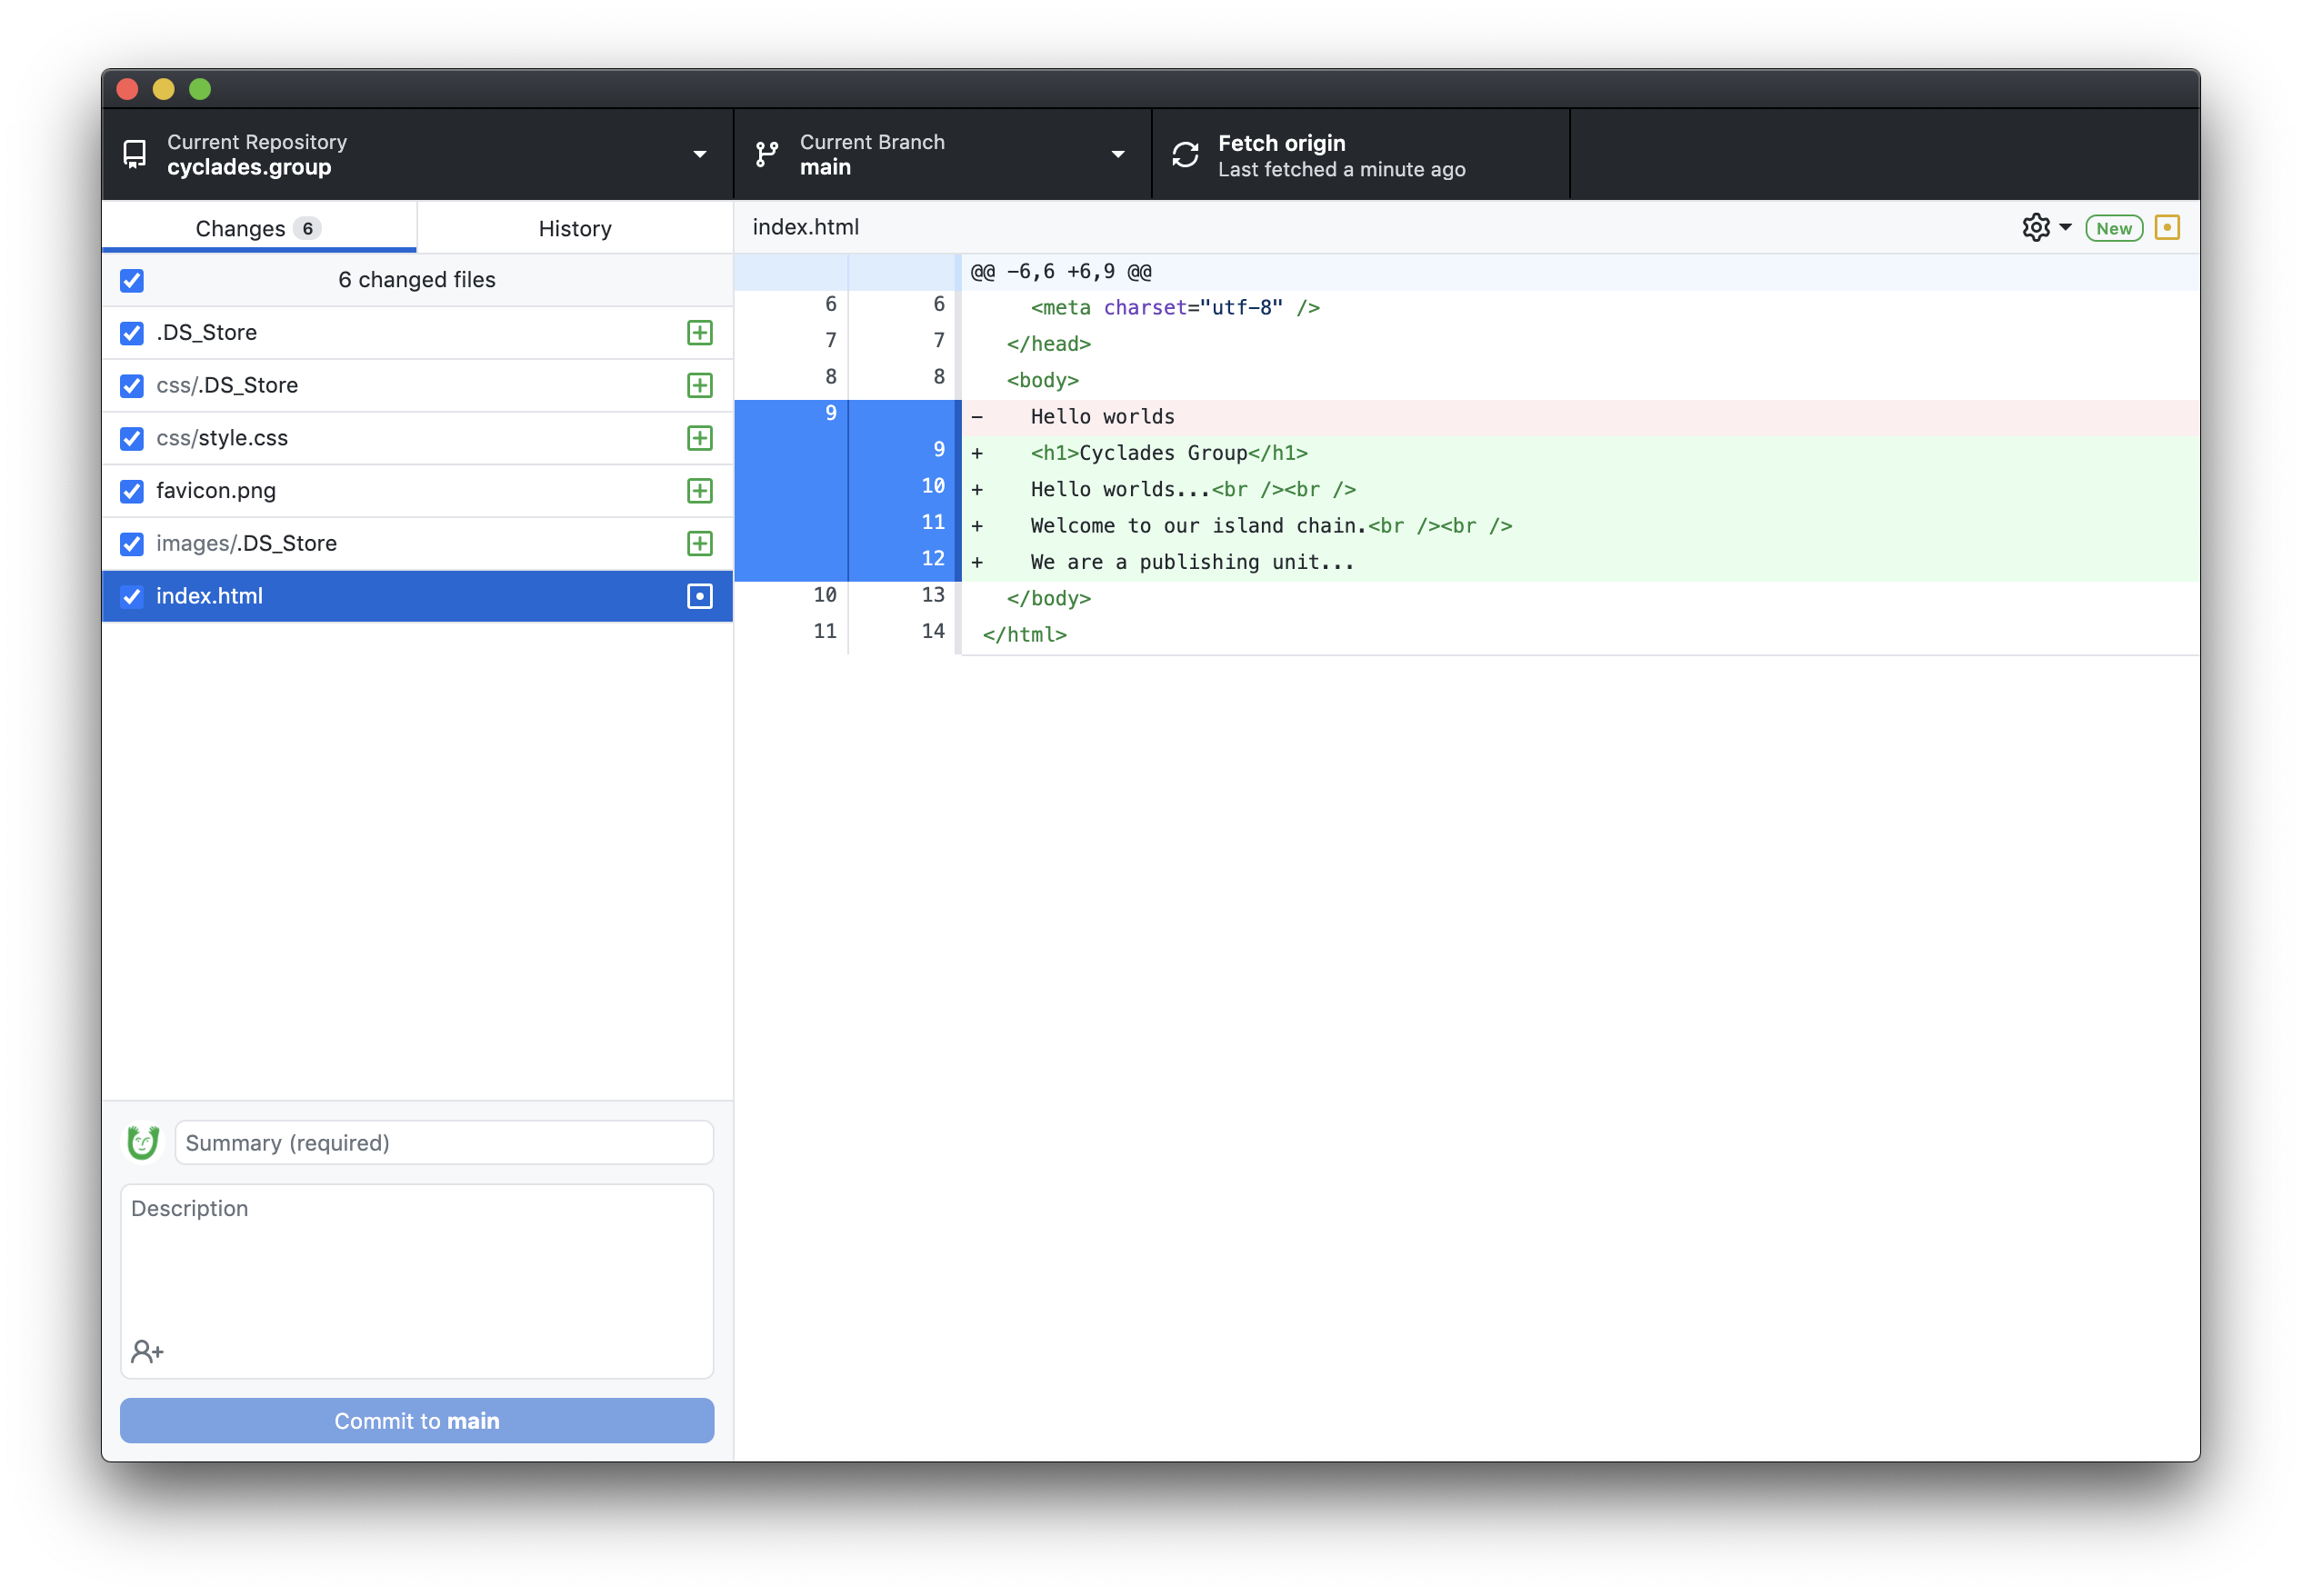
Once you add the new files, then open up GitHub Desktop, and you'll see it notices changes! (Note the green and red highlighting... things deleted and added, respectively.)
Next, add a commit message and press "commit to main"...
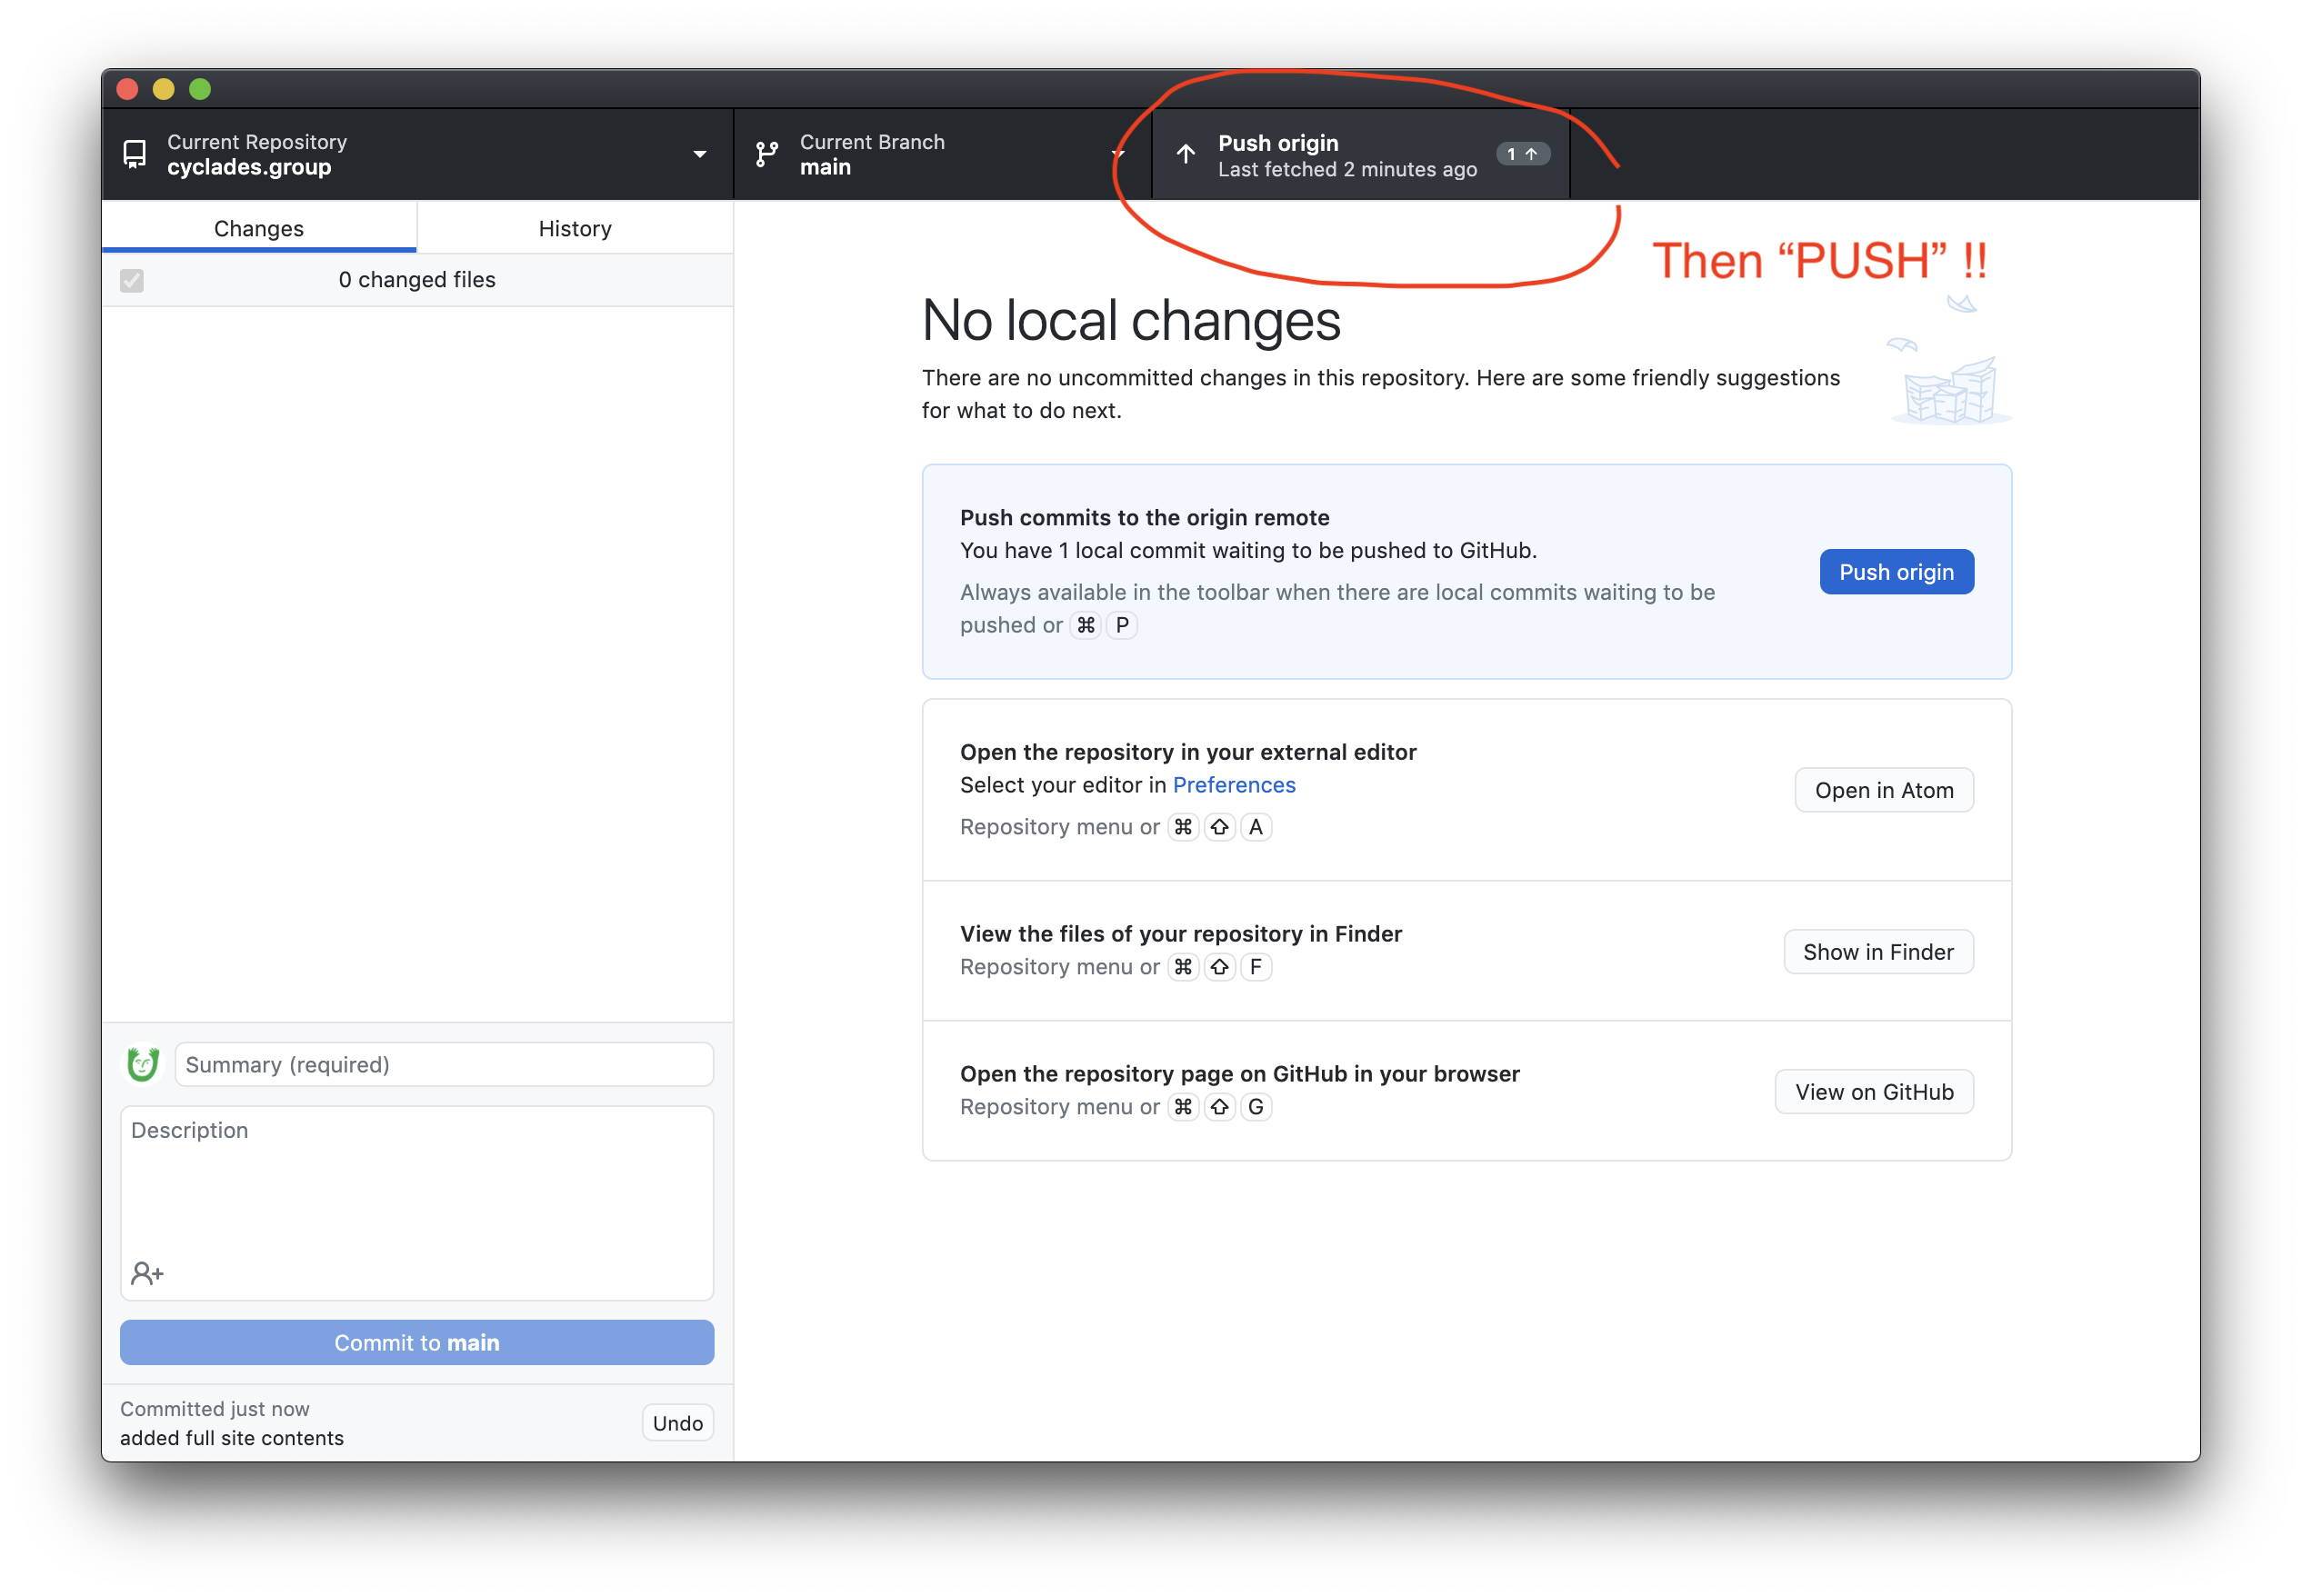
And then push your repository...
There might be a bit of a lag, but your website should update a couple minutes after pushing. To confirm that the changes made it to GitHub, often I like to go back to my repository's page on www.github.com...
Finishing Touches
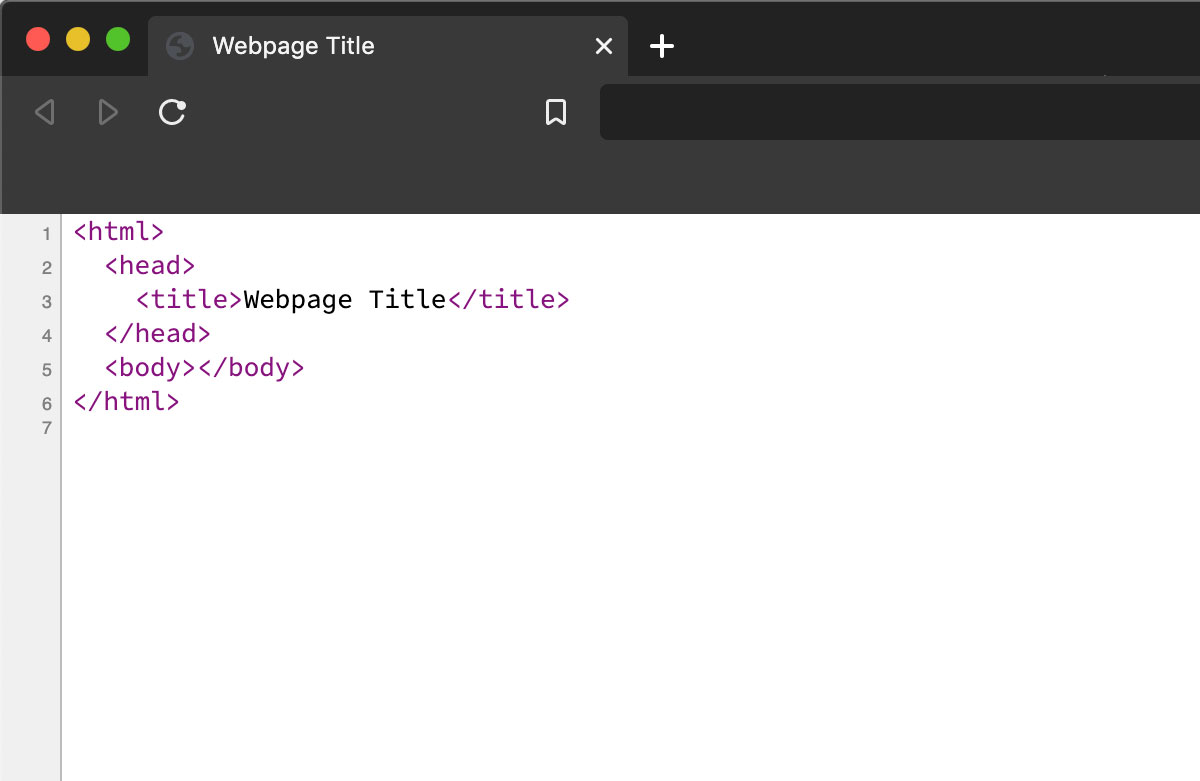
Title
Always remember your <title>, which goes inside the <head> of your document and shows up in your browser tab, search engine results, when the website is posted to social media, etc.
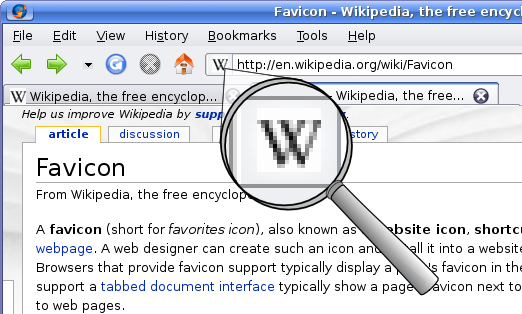
Favicon
A favicon is the small icon or icons associated with a specific webpage.
To include a favicon, include this line of code inside the <head> of your HTML, with the path leading to wherever your (usually square) .png favicon is:
Note that originally favicons were designed to be a tiny 16x16 pixels, but now you can supply them in various sizes. To accommodate for all the devices and sizes you'll need, we would recommend using a favicon generator, as seen in the last two links below:
Meta tags in the <head> of your document help other services like search engines and social media best present and understand your website. Check out all of the meta tags on the fruitful.school site, for instance:
<meta property="og:type" content="website">
<meta property="og:url" content="https://fruitful.school">
<meta property="og:title" content="Fruitful School">
<meta property="og:image" content="https://fruitful.school/images/giovanni_stanchi_scattered_flowers_and_fruit_on_a_ledge_1_medium.jpg">
<meta property="og:description" content="fruitful.school is an independently-run learning initiative for making 'fruitful websites' founded in 2020 by Laurel Schwulst and John Provencher and is dedicated to exploring new ways of publishing together using the www. For our Fall 2020 workshop, participants will hang out and work together online to self-publish a piece to the www over the course of 6 weeks.">
<meta name="twitter:card" content="summary_large_image">
<meta name="twitter:url" content="https://fruitful.school">
<meta name="twitter:title" content="Fruitful School">
You can read a good intro to meta tags, the "og:" Open Graph Protocol, and how to format your sites to best appear on social media here:
There are also a handful of useful tools like the Twitter Card Validator that lets you preview your site on Twitter.
SSL, https://, securing your site
More and more, it's becoming important to secure your sites. This means having an SSL certificate / using the protocol HTTPS (with an "s" for secure) instead of regular HTTP.
For most sites, the easiest way to do this is setting up a free account on Cloudflare and following the steps they provide. Here is a short video tutorial I made to show how to do this.
However, if you're using GitHub Pages, you don't need to use Cloudflare. All you need to do is go to the Settings page of your repository, scroll down to "GitHub Pages" and then check the checkbox for HTTPS. Note it might take up to 24 hours to go into effect.
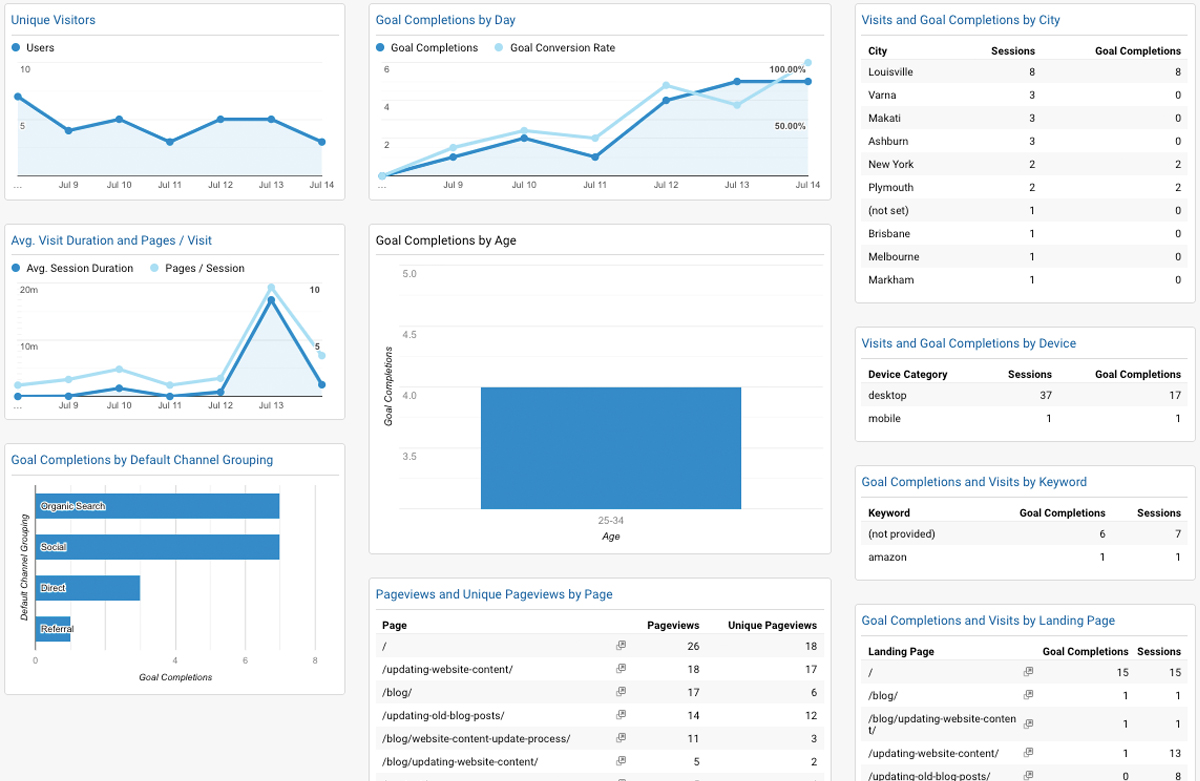
Analytics
If you want to know who is visiting your site, you can install analytics...
Don't forget to test your site in different settings and with different people. Everyone has a unique setup and constraints, and it's natural some bugs might come up.
caniuse.com helps with knowing which code is cross-browser compatible.
For small sites. Note many of these have size and bandwidth limitations.
Peer to Peer
(own computer is server)
experimental—note when your computer is offline the website is also offline. also requires special protocol like dat:// and sometimes special browser, Beaker Browser
"This machine is a server. DO NOT POWER IT DOWN!!"
Content Management Systems (CMS)
CMS Type
Examples
Note
Static
Jekyll, Hugo, Gatsby (you can use services like Siteleaf or Contentful to have a friendly user interface for these)
Require running terminal commands to test and generate HTML locally
PHP
Kirby, Wordpress (30% of the world’s websites)
Require booting PHP server locally to test, like MAMP
Blogging platforms
Tumblr, Blogger, Ghost
Don’t require own hosting, only domain purchase
Crazy hacks
Unconventional backends like Are.na, Airtable, Google Sheets, Notion
Experimental, good for smaller sites. Google around for tutorials
None
http://fruitful.school
A CMS isn’t always the best solution. Sometimes no CMS allows for the most flexibility, especially if the only editor is the site creator. Note the indieweb principle, “manual until it hurts”
🍋 Try this
Find your domain name. Use whatever tools you need, maybe...